
Installation Guide


5
7. INSTALL THE HOOD
1. Align the hood and center it above the hood mounting bracket. Gently lower the
hood until it securely engages the bracket.
2. Level the hood.
3. With the hood hanging in place, mark the two hole locations on wall (see
illustration at right).
4. Remove the hood.
5. Drill through marked holes on wall using a 3/32" drill bit.
6. Hang the hood to the wall bracket.
7. Secure the hood to the wall using 2 no. 8 x 1½" Phillips flat head screws for top
holes. Use 2 washers and 2 no. 8 x 1½" Phillips flat head screws for bottom holes.
WARNING
VQ0010
!
!
BE CAREFUL when installing the decorative flue and hood, they may have sharp edges.
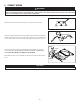
6. REMOVE GREASE FILTER(S)
Lay the back side of the hood flat on a table. Use a piece of cardboard to
avoid damaging the table or the hood.
To remove the grease filter(s), pull down on the metal latch tab and tilt
each filter downward. Set filters aside.
NOTE: There is only one filter on 24-in. width hoods.
HD1148
Detach the junction box cover from the top of the hood by removing both retaining
screws. Set aside the cover and the screws.
HO0296
hole locatIoNs
HD1294
hole locatIoNs