
installation guide

AIR FLOW REDUCER RÉDUCTEUR DE DÉBIT REDUCTOR DE CAUDAL
INSTALLATION INSTRUCTIONS INSTRUCTIONS D’INSTALLATION INSTRUCCIONES DE INSTALACIÓN
3¼" X 10" ARP310 3¼" X 10"
08229 rev. C
I. Vertical and horizontal discharge
I. Sortie verticale et horizontale
I. Salida vertical y horizontal
II. Vertical and horizontal discharge
II. Sortie verticale et horizontale
II. Salida vertical y horizontal
III. Down draft discharge
III. Sortie pour tirage vers le bas
III. Salida para tiro descendente
Instructions - ENGLISH
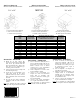
1) Mount the air flow reducer (A)
between the hood and the adapter (B)
with screws (C) included with the
hood, as illustrated above. Refer to the
table above for the installation type
according to the hood model.
2) Seal the joints between the adapter and
the hood using duct tape.
3) Check the box corresponding to the
range hood brand on the sticker
(included in this kit). Affix it near the
HVI certification sticker located inside
the hood.
4) Keep the air flow reducer installation
instructions with the hood instruction
manual.
Note: Once installed, this reducer will limit
the output of the range hood under 300 CFM.
Instructions – FRANÇAIS
1) Fixer le réducteur de débit (A) entre la
hotte et l’adaptateur (B) à l’aide des vis
(C) incluses avec la hotte, tel qu’il est
illustré ci-dessus. Voir le tableau
ci-dessus pour le type d’installation
requis selon le modèle de hotte.
2) Sceller l’adaptateur à la hotte à l’aide
de ruban adhésif à conduit.
3) Cocher la case correspondant à la
marque de la hotte sur l’autocollant
(inclus dans cet ensemble), puis
l’apposer à l’intérieur de la hotte, près
de l’autocollant HVI.
4) Conserver cette feuille d’installation
avec le guide d’installation de la hotte.
Note: Une fois installé, ce réducteur limite le
débit de la hotte à moins de 300 PCM.
Instrucciones – ESPAÑOL
1) Instale el reductor de caudal (A) por
encima del adaptador (B) con los
tornillos (C) provistos, como se ve en
la ilustración. Vea la tabla para el tipo
de instalación necesaria, según el
modelo de campana.
2) Selle el adaptador a la campana con
cinta adhesiva para tubos.
3) Marque la casilla correspondiente a su
campana marca en el autoadhesivo
(incluido con este conjunto). Ponga
este autoadhesivo en la campana, cerca
del autoadhesivo HVI.
4) Conserve esta hoja de instalación con
la guía de instalación de la campana.
Nota: Una vez instalado, este reductor limita el
caudal de la campana a menos de 300 pi³/min.
Series
Série
Serie
Actual CFM
PCM Actuel
pi³/min actual
Maximum CFM with reducer
Débit maximum avec le réducteur
Caudal máximo con reductor
Installation
Installation
Instalación
Allure II 300 275 II
64000 + P5 500 290 I
RMDD 500 275 III
15000 300 260 I
27000 500 280 III
RMIP + P5 460 260 I
K210A + P5 500 290 I
PIK + P5 460 260 I
DD01 500 270 III
V30 300 260 I
AP130 440 290 I
Ap136 440 290 I
C370 300 260 I