
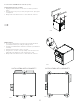
User Guide


8
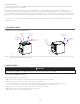
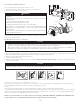
2.3 CONNECTING THE DRAIN (HRV ONLY)
Install the drain hose included and run it to a drain or a pail. This unit may generate a large amount of water in cooler
weather. It is necessary to install the drain hose properly to prevent water damage and/or material damage.
CAUTION
• Cut the appropriate length of drain tubing (see illustrations below).
• Connect the tubing to the provided adaptor.
• Make a water trap loop in the tube to prevent the unit from drawing unpleasant odors from the drain source.
• Add water in the loop to prevent noise or hiss.
• Make sure there is a distance of at least 2" between the unit and the tubing loop (see illustration below).
• Using the tie wrap provided, attach the tubing as illustrated below.
• Run the tube to the fl oor drain or to an alternate drain pipe or pail.
• IMPORTANT: If using a pail to collect water, place the tube end approximately 1” inside the pail in order to prevent water from being
drawn back up into the unit.
VO0290A
13"
(330 mm)
13"
(330 mm)
VO0083
± 1”
TIE WRAP
≥ 2”
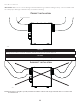
2.4 INSTALLING DUAL EXTERIOR HOOD USING TANDEM
®
TRANSITION KIT (OPTIONAL)
For units set at 110 CFM or less, a Tandem transition kit can be used instead of 2 exterior hoods;
but take into account this device will generate approximately an additional 0.2 in w.g. static pressure
depending on the installation.
The minimum joist opening needed to install the Tandem
®
transition is 9¾”. The maximum height of
the Tandem transition is 8¾”.
To connect the insulated fl exible ducts to the Tandem transition (Exhaust air to outdoors and Fresh air
from outdoors), follow the instructions included with the Tandem transition kit (part no.VTYIK1).
VR0003