
Additional Info


1
ADA LOW VOLTAGE WIRING INSTRUCTIONS FOR SINGLE BLOWER RANGE HOODS (PAGE 1 AND 2)
AND DOUBLE BLOWER RANGE HOODS (PAGE 3 TO 5)
WARNING
VQ0010
!
For residential (domestic) installation only. Before proceeding, switch power off at service panel and lock service disconnecting
means to prevent power from being switched on accidentally. Installation work and electrical wiring must be done by qualified
person(s) in accordance with all applicable codes and standards, including fire-rated construction codes and standards. Also,
it is recommended to wear safety glasses and gloves.
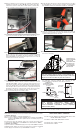
B Remove filters from the hood and set them aside.
C Remove the wiring cover (shaded part in illustration below) retaining
screw. Slide the wiring cover out of the hood and set it aside with its
screw.
D Unplug the blower connector from the main harness.
NOTE: The illustrations in this procedure are generic; some hood details may slightly differ from the hood you have on hand but the procedure itself applies
to all single blower range hoods listed in this document (see page 2).
HD0737
Wiring cover
screw
E Using a 11/32'' socket, remove the 6 nuts retaining the blower
chamber to the hood assembly (2 nuts on inner back and 2 other nuts
per sides), then use a Phillips no. 2 screwdriver to remove both front
corner screws. See picture below for nuts and screws locations. Pull
the blower chamber out of the hood assembly and set it aside with its
retaining screws and nuts.
HE0253
HD0672
Nuts
Nuts
Screw
F Remove and set aside the 4 front screws retaining the control access
panel to the hood.
HD0673
Screw locations
G Fold back the control access panel to access the control panel connections.
HD0674
99045883B
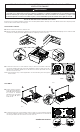
H Measure 4 feet from the connector end of the provided ADA cable
and cut the cable. Set aside the remaining 15-ft. cable section without
connector; it will be used later (refer to step N). Run the connector of the
ADA cable section through the wiring cable hole on the bent plate.
HE0274
I Connect the ADA cable connector to the 6-pin connector on control
board (circled on picture below).
HE0288
CAUTION
Use exclusively the cable included in this kit.
J Secure the ADA cable section to the main harness using a tie-wrap.
HD0952
Tie-wrap