Model EB15 EXTERIOR MOUNTED BLOWER FOR USE WITH "BEST BY BROAN" K210A OR K260A SERIES RANGE HOODS BEST BY BROAN, P.O.
READ AND SAVE THESE INSTRUCTIONS WARNING WARNING TO REDUCE THE RISK OF FIRE, ELECTRIC SHOCK, OR INJURY TO PERSONS, OBSERVE THE FOLLOWING: 1. Use this unit only in the manner intended by the manufacturer. If you have questions, contact the manufacturer at the address or telephone number listed in the warranty. 2. Before servicing or cleaning unit, switch power off at service panel and lock the service disconnecting means to prevent power from being switched on accidentally.
PREPARE THE INSTALLATION LOCATION PREPARE THE INSTALLATION LOCATION ROOF INSTALLATIONS WALL INSTALLATIONS 1. Locate the blower on the rear slope of the roof. Place it in a location to minimize duct run. The location should be free of obstacles (T.V. leads, electrical lines, etc.). If the blower top is level with the roof peak, it will not be seen from the street. Keep this approximate location in mind as you work from within the attic. 1. Choose a position on the outside wall.
INSTALL THE BLOWER INSTALL THE BLOWER ROOF INSTALLATIONS WALL INSTALLATIONS 1. Remove the cover and screws. 2. Attach an appropriate U.L. approved cable connector in the hole at the rear of the wiring box. 3. Remove roofing nails from shingles around the TOP and SIDES of the cutout area only.Carefully lift the shingles to allow the back flashing sheet on the blower housing to fit under them. 4.
WARRANTY BROAN ONE YEAR LIMITED WARRANTY Broan warrants to the original consumer purchaser of its products that such products will be free from defects in materials or workmanship for a period of one year from the date of original purchase. THERE ARE NO OTHER WARRANTIES, EXPRESS OR IMPLIED, INCLUDING, BUT NOT LIMITED TO, IMPLIED WARRANTIES OF MERCHANTABILITY OR FITNESS FOR A PARTICULAR PURPOSE.
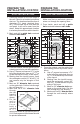
USE AND CARE 1 Disconnect electrical power supply and lock out service panel before cleaning or servicing this unit. CLEANING Remove cover and carefully vacuum blower and inside of housing. Be careful not to bend or otherwise damage blower wheel. MOTOR LUBRICATION The motor is permanently lubricated. Do not oil or disassemble motor. 2 14 15 3 13 16 17 4 18 18 11 10 9 7 8 5 12 19 13 15 6 SERVICE PARTS 20 MODEL EB15 KEY NO. 1 2 3 4 5 6 7 8 9 10 11 12 13 14 15 16 17 18 19 PART NO.
Modelo EB15 VENTILADOR DE MONTAJE EXTERIOR PARA USARSE CON LAS COMPANAS “BEST BY BROAN” DE ESTUFA, SERIES K210A O K260A BEST BY BROAN, P.O.
LEA Y CONSERVE ESTAS INSTRUCCIONES ADVERTENCIA ADVERTENCIA Para reducir el riesgo de incendio, descarga eléctrica, o lesiones a personas, cumpla los siguientes puntos: 1. Solamente use esta unidad de la manera propuesta por el fabricante. Si tiene alguna pregunta, póngase en contacto con el fabricante en la dirección o teléfono anotados en la garantía. 2.
PREPARE EL ÁREA DE LA INSTALACION PREPARE ÁREA DE LA INSTALACION INSTALACIONES DE TECHO INSTALACIONES DE PARED 1. Ubique el ventilador en la pendiente posterior del techo. Colóquelo en un área en la cual minimice la longitud del tramo de conductos. Esta área debe estar libre de obstáculos (cables de T.V., cables eléctricos, etc.). Si la parte superior del ventilador está al ras del pico del techo, no se verá desde la calle. Mantenga en mente esta ubicación aproximada mientras trabaja desde el ático. 2.
INSTALE DEL VENTILADOR INSTALE DEL VENTILADOR INSTALACIONES DE TECHO INSTALACIONES DE PARED 1. Quite la cubierta y los tornillos. 2. Coloque un conectador de cables apropiado, aprobado por U.L., en el orificio que se encuentra en la parte posterior de la caja de conexiones. 3. Quite los clavos solamente de las tejas que se encuentran en las partes SUPERIOR y LATERALES del área de corte.
GARANTIA GARANTÍA BROAN LIMITADA POR UN AÑO Broan garantiza al consumidor comprador original de sus productos que dichos productos carecerán de defectos en materiales o en mano de obra por un período de un año a partir de la fecha original de compra. NO EXISTEN OTRAS GARANTÍAS, EXPRESAS O IMPLÍCITAS, INCLUYENDO, PERO NO LIMITADAS A, GARANTÍAS IMPLÍCITAS DE COMERCIALIZACIÓN O APTITUD PARA UN PROPÓSITO PARTICULAR.
USO Y CUIDADO Desconecte la fuerza eléctrica y bloquee el panel de servicio antes de limpiar o hacer el servicio en la unidad. 1 LIMPIEZA Saque la tapa y con cuidado limpie con la aspiradora el ventilador y el interior de la caja. Tenga cuidado de no torcer o causar daño a los rodetes del ventilador. 2 14 15 LUBRICACION DEL MOTOR El motor tiene lubricación permanente. No lo enaceite o desarme. 3 13 16 17 4 18 18 11 10 9 7 8 5 12 19 13 15 6 PARTES DE SERVICIO 20 MODELO EB15 CLAVE NO.
Modèle EB15 VENTILATEUR À MONTAGE EXTÉRIEUR À UTILISER AVEC LES HOTTES “BEST BY BROAN” DE SÉRIE K210A OU K260A BEST BY BROAN, P.O.
LIRE ET CONSERVER CES INSTRUCTIONS AVERTISSEMENT AVERTISSEMENT POUR RÉDUIRE LES RISQUE D’INCENDIE, D’ÉLECTROCUTION OU DE BLESSURES CORPORELLES, OBERVEZ CE QUI SUIT: 1. N’utilisez cet appareil que selon la manière prévue par le fabricant. Si vous avez des questions, contactez le fabricant à l’adresse ou au numéro de téléphone indiquée dans la garantie. 2. Avant de réparer ou de nettoyer l’appareil, éteindre ce dernier au panneau de service afin d’éviter sa remise en marche accidentelle.
PRÉPARATION DE L’INSTALLATION PRÉPARATION DE L’INSTALLATION INSTALLATIONS SUR UN TOIT INSTALLATIONS SUR UN MUR 1. Positionez le ventilateur sur la pente arrière du toit. Placez-le de manière à minimiser la longueur des conduits. L’emplacement doit être dépourvu d’obstacles (câble de télévision, fils électriques, etc.). si le dessus du ventilateur est à égalité avec le faîte du toit, il ne sera pas visible de la rue.
INSTALLATION DUVENTILATEUR INSTALLATION DUVENTILATEUR INSTALLATIONS SUR LE TOIT INSTALLATIONS SUR LE MUR 1. Enlevez le couvercle et les vis. 2. Fixez un connecteur de câble adéquat portant l’homologation U.L. dans le trou arrière de las boîte de câblage. 3. Enlevez les clous à toiture des bardiaux entourant uniquement le HAUT et les CÔTÉS de l’ouverture. Soulevez soigneusement les bardiaux afin de pouvoir glisser le solin arrière du boîtier du ventilateur en dessous. 4.
GARANTIE LIMITÉE D´UN AN DE BROAN Broan garantit à l´acheteur consommateur original de ses produits qu´ils sont exempts de défauts dans les matières premières ou la main-d´oeuvre pour une période d´un an à compter de la date d´achat original. IL N´Y A PAS D´AUTRES GARANTIES, EXPRIMÉES OU IMPLICITES, INCLUANT LES MAIS NON PAS LIMITÉES AUX GARANTIES IMPLICITES POUR FIN DE COMMERCIALISATION ET DE CONVENANCE DANS UN EUT PARTICULIER.
USAGE ET ENTRETIEN Débrancher le courant et le panneau de service avant de nettoyer ou d’effectuer une réparation ou un entretien dans ce ventilateur. 1 NETTOYAGE 2 Enlever le couvercle passer soigneusement à l’aspirateur. Veillez à ne pas plier ou endommager d’une manière quelconque la roue du ventilator. LUBRIFICATION DU MOTEUR Le moteur est lubrifié en permanence. Ne pas graisser ni démonter le moteur.
99042940C 20