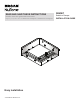
READ AND SAVE THESE INSTRUCTIONS Installer: leave this guide with homeowner. Register your product online at: www.broan.com/register or www.nutone.com/register.
RDMWT Installation Guide Page 2 Usage For use with 1, 2 or 3-Hour-Rated Floor-Ceiling and Roof-Ceiling Designs. UL/ cUL Listed for use in the following Floor Ceiling and Roof Ceiling Assemblies: L521, L528, L546, L558, L562, L574, L576, L581, L583, L585, P522, P533, P538, P545, and P547 when installed per the following instructions. Flat Ceiling / Horizontal Mount Only.
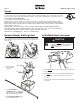
RDMWT Installation Guide Page 3 Attach Radiation Damper Extension to Fan Housing Prepare Ceiling Structure for Fan Housing This radiation Damper and Fan Combination is UL/ cUL Listed for use in the following Floor Ceiling and Roof Ceiling Assemblies: L521, L528, L546, L558, L562, L574, L576, L581, L583, L585, P522, P533, P538, P545, and P547. A CAUTION B D • DO NOT attach fan directly to combustible truss members. Attach fan to additional vertical 2x4 blocks, as shown.
RDMWT Installation Guide Page 4 Attach 4-inch Round Metal Duct 13. Attach 4-inch round metal duct to the duct connector and discharge air to an outside location. Seal all joints with duct tape. Install Blower into Fan Housing F 14. Make sure damper flap opens and closes freely without binding. Connect Wiring 15. Refer to instructions supplied with the fan for various electrical wiring options. 16. Install electrical box cover removed in Step 2.
RDMWT Installation Guide Page 5 Install Mask, Finish Ceiling and Install Plaster Supports Install Grille REMOVE THE MASK BEFORE INSTALLING GRILLE OR OPERATING FAN. N K P FOR FAN MODELS WITHOUT LIGHTS 25. Install CORRUGATED MASK (K) supplied with the fan to protect unit from drywall spray, construction dust, etc. 28. Squeeze GRILLE SPRINGS (N) and slide into tabs on the radiation damper frame. Push GRILLE (P) until it’s tight against ceiling surface. 29.
RDMWT Installation Guide Page 6 Service Feature For Fans If your ventilation fan needs service, the inner damper can be removed from the outer frame without disturbing the surrounding ceiling material. Remove the grille and disconnect all electrical connections from the grille (if lighted). Remove screws from plaster supports. Make sure plaster supports are reinstalled after servicing fan. Remove (4) screws from the radiation damper. Completely remove radiation damper to access blower.
LEA Y CONSERVE ESTAS INSTRUCCIONES Instalador: Deje esta guía con el dueño de la casa. Registre su producto en el sitio web: www.broan.com/register o www.nutone.com/register.
Guía de instalación del RDMWT Página 8 Uso Para usarse en los diseños de piso a cielo raso y techo a cielo raso con clasificación de 1, 2 o 3 horas. Tiene certificación de UL/ cUL para usarse en los siguientes conjuntos de cielo raso a piso y cielo raso a techo: L521, L528, L546, L558, L562, L574, L576, L581, L583, L585, P522, P533, P538, P545, y P547 al instalarlo según las siguientes instrucciones. Solamente montaje horizontal / en cielo raso plano.
Guía de instalación del RDMWT Página 9 Fije la extensión del regulador de radiación a la cubierta del ventilador Prepare la estructura del cielo raso para la cubierta del ventilador La combinación de regulador de radiación y ventilador tiene certificación de UL/cUL para usarse en los siguientes conjuntos de cielo raso a piso y cielo raso a techo: L521, L528, L546, L558, L562, L574, L576, L581, L583, L585, P522, P533, P538, P545 y P547.
Guía de instalación del RDMWT Página 10 Fije el conducto metálico redondo de 4 pulgadas (10 cm) 13. Fije el conducto metálico redondo de 4 pulgadas (10 cm) al conector para conductos y haga que se descargue el aire en un lugar en el exterior. Selle todas las juntas con cinta para conductos. Instale el soplador en la cubierta del ventilador F 14. Asegúrese de que el regulador de tiro abre y cierra libremente sin trabarse. Conecte el cableado 15.
Guía de instalación del RDMWT Página 11 Instale la cobertura, termine el cielo raso e instale soportes de yeso Instale la rejilla QUITE LA COBERTURA ANTES DE INSTALAR LA REJILLA O DE ACTIVAR EL VENTILADOR. N K P PARA MODELOS DE VENTILADOR SIN LUCES 25. Instale la COBERTURA CORRUGADA (K) suministrada con el ventilador a fin de proteger la unidad contra los rociados de yeso, polvos de construcción, etc. 28.
Guía de instalación del RDMWT Página 12 Función de servicio para ventiladores Si su ventilador necesita servicios de reparación/mantenimiento, es posible quitar el regulador interior del marco exterior sin perturbar el material del cielo raso circundante. Quite la rejilla y desconecte todas sus conexiones eléctricas (si tiene luz). Quite los tornillos de los soportes de yeso. Asegúrese de instalar de nuevo los soportes de yeso luego de dar servicio al ventilador.