
Installation Guide


3
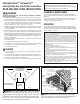
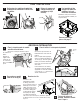
Mount fan to
ceiling structure.
Mount
housing
to ceiling
structure with
appropriate
fasteners
in locations
shown.
1
7
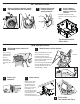
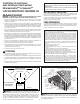
RETROFIT INSTALLATION
Remove old
fan and prepare
ceiling.
2
10½-in.
9¾-in.
JOIST
1
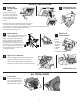
Fold mounting ears
at against housing.
1
4
1
5
Existing fan housings are typically attached to the structure:
•
with screws, nails, or staples, which must be removed.
•
with hangers or rails which are fastened to joists and must be removed along with housing.
A pry bar may be needed to remove the old housing.
Leave ductwork and wiring in place.
1
6
Connect wiring.
Connect power cable that will supply
constant 120VAC to unit. Attach
Enlarge ceiling opening (if
necessary) to 9¾” parallel to
joist) by 10½” (perpendicular
to joist). (Some models have
a cut-out template on side of
carton.)
Connect 4-in. round duct.
Pull existing ducting through housing discharge
opening and
tape ducting to duct connector.
Push connector/ducting back through opening.
Engage tabs and
secure with screw from parts bag.
1
8
Continue with Step 9.
1
2
3
4
TABS
wiring to wiring plate (from parts bag)
using UL approved connector. Connect
house wiring to fan wiring - black to
black, white to white, and green to green
or bare wire. Use screw (from parts bag)
to secure wiring plate to fan housing.
Re-install wiring panel and secure with
screw from parts bag.
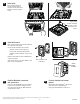
Install blower.
Re-install blower removed in
Step1. Secure blower with 2
screws from parts bag. Plug
blower into black receptacle.
1
9
ALL INSTALLATIONS
*
*
Center hole is optional.