
Technical data


106 Web Tools Administrator’s Guide
53-1002934-02
Viewing trunk group information
7
1. Select a port in the Switch View to open the Port Admin tab.
2. Select the FC Ports tab.
3. From the tree on the left, select the switch name or slot name.
4. From the table, select the port that you want to trunk.
You can select multiple ports from the table. You cannot select multiple ports from the tree.
5. Select View > Advanced.
6. Select Trunking > Enable or Disable from the Actions list.
If the option is unavailable, then the selected port is already in that state.
7. Cl ick Yes in the confirmation dialog box.
Admin Domain considerations
You can only enable and disable trunking for a port when the current Admin Domain owns the
switch. You can log in to a switch that is not in your Admin Domain, but most of the functionality is
unavailable. F_Port trunking should not be configured in physical fabric mode.
Viewing trunk group information
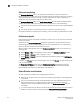
Use the Trunking tab on the Switch Administration window to view trunk group information.
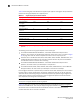
FIGURE 19 Trunking tab
The following trunking attributes can be displayed from the Switch Admin view:
• Trunk port state, either master or slave.
• Trunk master port
• Trunk index (applies only to F_Port trunking).
• Trunk type
• Bandwidth (shown only for E_Port, EX-Port, F_Port, and N_Port).
• Throughput (shown only for E_Port, EX-Port, F_Port, and N_Port).