
Technical data


136 Web Tools Administrator’s Guide
53-1002934-02
Zone configuration and zoning database management
9
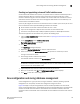
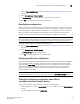
FIGURE 26 Sample zoning database
Creating zone configurations
To create a zone configuration, perform the following steps. After creating a zone configuration, you
must explicitly enable it for it to take effect.
For information on enabling the configuration, refer to “Enabling zone configurations” on page 138.
NOTE
Any changes made to the currently enabled configuration does not display until you re-enable the
configuration.
To create zone configurations, perform the following steps.
1. Open the Zone Administration window as described in “Opening the Zone Admin window” on
page 124.
2. Select a format to display zoning members in the Member Selection List as described in
“Selecting a zoning view” on page 129.
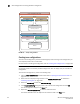
3. Select the Zone Config tab and click New Zone Config.
4. In the Create New Config dialog box, enter a name for the new configuration and click OK.
The new configuration displays in the Name list.
5. Expand the Member Selection List to view the nested elements.
The choices available in the list depend on the selection made in the View menu.
Zone Configuration: myconfig
WWN 5
Alias 3
WWW 5; WWN 6; WWN7
Alias 4
Zone B
Other Elements
WWW 9
WWN 1; WWN 2; WWN 3
Alias 1
WWN 4; <domain, portarea>
Alias 2
Zone A
<domain, portarea>
Other Elements