
Technical data

2-4 Brocade SilkWorm 4100 Hardware Reference Manual
Publication Number: 53-0000563-02
Configuring the SilkWorm 4100
2
3. “Connecting to the Switch Using the Serial Connection” on page 2-5
4. “Setting the Switch IP Address” on page 2-5
5. “Creating an Ethernet Connection” on page 2-6
6. “Completing Switch Configuration” on page 2-6
Providing Power to the Switch
To provide electrical power to the SilkWorm 4100:
1. Connect the power cords to both power supplies and then to power sources on separate circuits to
protect against AC failure. Ensure that the cords have a minimum service loop of 6 inches available
and are routed to avoid stress.
2. Power on the power supplies by flipping both AC switches to “1”. The power supply LED lights up
green, and the switch begins running POST. The switch requires a minimum of three minutes to boot
and complete POST.
3. After POST is complete, verify that the switch power and status LEDs on the left of the port side of
the switch are green.
Creating a Serial Connection
To create a serial connection to the SilkWorm 4100:
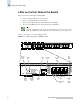
1. Remove the plug from the serial port and insert the serial cable provided with the SilkWorm 4100.
2. Connect the serial cable to the serial port on the switch and to an RS-232 serial port on the
workstation. If the serial port on the workstation is RJ-45 instead of RS-232, you can remove the
adapter on the end of the serial cable and insert the exposed RJ-45 connector into the RJ-45 serial
port on the workstation.
3. Disable any serial communication programs running on the workstation.
4. Open a terminal emulator application (such as HyperTerminal for Windows or TERM in a UNIX
environment) and configure the application as follows:
• In a Windows 95, 98, 2000, or NT environment:
Bits per second: 9600
Databits: 8
Parity: None
Stop bits: 1
Caution
Do not connect the switch to the network until the IP address is correctly set. For
instructions on how to set the IP address, see “Configuring the SilkWorm 4100” on
page 2-3.
Note
Power is supplied to the switch as soon as the first power supply is connected and turned on.