
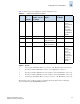
Technical data


Fabric OS Administrator’s Guide 5-11
Publication Number: 53-0000518-09
Setting Chassis Configurations
5
5. After the system reboots, log in again as admin to each logical switch and enter the switchName
command to assign a name to the new switch.
6. Using the configuration file saved in step 3 as a guide, manually reconfigure sw0 and sw1.
Do not configure zoning parameters; these are propagated automatically when you merge the
director into the fabric.
7. If the fabric is in secure mode, perform the following steps; otherwise, proceed to step 8.
a. Optionally, to configure sw0 and sw1 in one operation, connect them with an ISL link to form
a temporary fabric.
b. If you want sw0 and sw1 to be fabric configuration servers, update the overall fabric’s FCS
policy to include them. If not, skip this step.
c. On sw0, enable security mode and use the secModeEnable command to create an FCS list that
matches your overall fabric’s FCS policy.
d. Reset the version stamp on sw0.
e. If you connected sw0 and sw1 in step a and you do not want them connected, disconnect the
ISL link between them. If you did not connect them, repeat step b through step d on sw1.
8. If you physically disconnected the switch in step 2, reconnect it to the fabric.
If you used the portCfgPersistentDisable command in step 2, use the portCfgPersistentEnable
command to persistently enable all ports that connect the switch to other switches in the fabric.
9. Use the fabricShow command to verify that sw0 and sw1 have been merged with the fabric.
10. Use the configShow command to verify that zoning parameters were propagated.
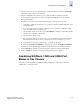
Combining SilkWorm 12000 and 24000 Port
Blades in One Chassis
For details on combining SilkWorm 12000 and 24000 port blades in a single chassis, refer to the
SilkWorm Director Migration Guide.