
Technical data


9-2 Web Tools Administrator’s Guide
Publication Number: 53-0000522-09
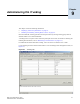
Displaying Trunk Group Information
9
Displaying Trunk Group Information
Use this procedure to display the following information about ISL Trunking groups:
• Trunk group number identifier
• Master port
• Member ports
To view information on a trunk group
1. Launch the Switch Admin module as described on page 4-3.
2. Click the Trunking tab.
3. Optional: Click Refresh to refresh the information.
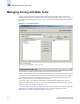
Disabling or Reenabling Trunking Mode on a Port
When the trunking license is activated, trunks are automatically established on eligible ISLs and
trunking capability is enabled by default on all ports. Use the following procedure to disable trunking on
a port or to reenable trunking if it has been disabled.
To disable or reenable trunking mode on a port
1. Launch the Switch Admin module as described on page 4-3.
2. Click the Ports tab (see Figure 4-4 on page 4-12).
3. This step is switch-specific:
For SilkWorm 12000, 24000, and 48000 directors, click the slot subtab that corresponds to the
correct slot for the logical switch.
For SilkWorm 200E, 3014, 3016, 3250, 3850, 3900, 4012, and 4100 switches, proceed directly to
the next step.
4. To enable trunking mode on a port, click the checkbox in the Enable Trunking column that
corresponds to the port you want to trunk.
To disable trunking mode on a port, uncheck the box.
5. Click Apply.
Note
The SilkWorm 3016 switch has two external ports that are available for ISL Trunking. The 14 internal
ports have ISL Trunking disabled as they attach only to host devices. Refer to the Fabric OS
Administrator’s Guide for additional details.