
Technical data


Web Tools Administrator’s Guide 11-3
Publication Number: 53-0000522-09
Managing Trace Dumps
11
Setting up for automatic transfer of diagnostic files involves the following tasks:
• Specify a remote server to store the files.
• Enable the automatic transfer of trace dumps to the server. (Trace dumps overwrite each other by
default; sending them to a server preserves information that would otherwise be lost.)
You should also set up a periodic checking of the remote server so that you are alerted if the server
becomes unavailable and you can correct the problem. Refer to the Fabric OS Administrator’s Guide
for additional information.
The following procedures describe in detail the tasks for setting up automatic transfer.
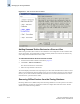
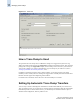
To specify a remote server
1. Launch the Switch Admin module as described on page 4-3.
2. Click the Trace tab.
3. Type the FTP host IP address, path of the remote directory in which to store the trace dump files,
FTP user name, and FTP password in the appropriate fields.
The password is optional if you log in as an anonymous user.
4. Click Apply.
To enable automatic transfer of trace dumps
1. Launch the Switch Admin module as described on page 4-3.
2. Click the Trace tab.
3. Click Enable in the Auto FTP Upload section to enable automatic uploading of the trace dump to
the FTP host.
4. Click Apply.
Disabling Automatic Trace Uploads
If automatic uploading of a trace dump is disabled, you must manually upload the trace dump or else the
information is overwritten when a subsequent trace dump is generated.
To disable automatic uploading of the trace dump
1. Launch the Switch Admin module as described on page 4-3.
2. Click the Trace tab.
3. Click Disable in the Auto FTP Upload section to disable automatic uploading of the trace dump to
the FTP host.
4. Click Apply.
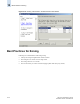
Uploading a Trace Dump Manually
You can manually upload a trace dump when automatic uploading is not enabled.