
Technical data


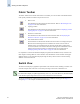


Web Tools Administrator’s Guide 3-1
Publication Number: 53-0000522-09
Chapter
3
Using Advanced Web Tools
This chapter contains the following sections:
• “Viewing the Switch Explorer,” next
• “Displaying Switches in the Fabric” on page 3-10
• “Ending the Web Tools Session” on page 3-10
• “Using Web Tools and Secure Mode” on page 3-10
• “Working With Web Tools: Recommendations” on page 3-12
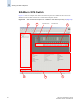
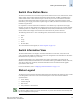
Viewing the Switch Explorer
The first thing you see when you log in to a switch with Web Tools is the Switch Explorer (see
Figure 3-1 on page 3-2). The Switch Explorer is divided into several areas that provide access to and
information about the switch and fabric. You should familiarize yourself with these areas, as the
procedures in this guide refer to them as follows:
• Fabric Tree, which displays a list of all the switches in the fabric
• Fabric Toolbar, which provides access to fabric-wide management interfaces, such as Name
Server, zoning, and events
• Switch View, which displays an interactive graphical representation of the switch
• Switch View Button Menu, which displays buttons providing switch information such as status,
event information, access to telnet, switch administration, switch performance, beaconing, and
much more
• Switch Information View, which displays information about the switch such as name, status,
Fabric OS version, domain ID, IP address, and WWN
• Status Legend, which defines the meaning of the colors visible in the background of various icons
in the Switch Explorer
These areas are described further in the sections that follow.
Clicking some of the buttons and icons in the Switch Explorer opens up a separate module, from which
you can perform management tasks. In this document, a module is a collection of related tabs or
“views” that display in a single browser window. The zoning module and the Switch Admin module
require you to log in, if upfront login is not enabled.
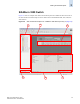
The format of the Switch Explorer varies, depending on the hardware type. Figure 3-1 on page 3-2
through Figure 3-5 on page 3-6 show Switch Explorer examples for several SilkWorm switches.
Note that the figures are grayed out so that you can more easily see the areas of the Switch Explorer.
In Figure 3-1 through Figure 3-5, the letters A through F call out the different areas within the Switch
Explorer. Table 3-1 on page 3-2 is a key for these callouts.