
Technical data


4-14 Web Tools Administrator’s Guide
Publication Number: 53-0000522-09
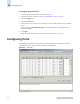
Configuring Ports
4
To configure port speed
1. Launch the Switch Admin module as described on page 4-3.
2. Click the Ports tab.
3. This step is switch-specific:
For SilkWorm 12000, 24000, and 48000 directors, select the subtab that corresponds to the
correct slot for the logical switch.
For SilkWorm 200E, 3014, 3016, 3250, 3850, 3900, 4012, and 4100 switches, proceed directly to
the next step.
4. Select a port speed from the Change Speed drop-down list corresponding to the port for which you
want to change the speed.
5. Click Apply.
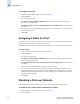
Assigning a Name to a Port
Port names are optional. You can assign a name to a port to make port grouping easier. The Port Name
column in the Ports tab displays the port name, if one exists.
The SilkWorm 3016 switch is preconfigured with port names; you can change them to suit your needs.
To name a port
1. Launch the Switch Admin module as described on page 4-3.
2. Click the Ports tab.
3. This step is switch-specific:
For SilkWorm 12000, 24000, and 48000 directors, select the slot subtab that corresponds to the
correct slot for the logical switch.
For SilkWorm 200E, 3014, 3016, 3250, 3850, 3900, 4012, and 4100 switches, proceed directly to
the next step.
4. Double-click in the Port Name field for the port you want to change.
5. Type a name for the port. Port names can be from 0 through 32 alphanumeric characters, unless
FICON Management Server (FMS) mode is enabled; if FMS mode is enabled, port names should
be limited from 0 through 24 alphanumeric characters. Although it is not required that port names
be unique, it is recommended.
6. Click Apply.
Disabling a Port over Reboots
Use the following procedure to disable a port so that it remains disabled if the switch reboots.
To disable a port so that it remains disabled over reboots
1. Launch the Switch Admin module as described on page 4-3.
2. Click the Ports tab.