
Installation guide


Table Of Contents
- Contents
- Preface
- About This Document
- Brocade 5100 Introduction
- Brocade 5100 Installation and Configuration
- Brocade 5100 Operation
- Removal and Replacement of Combined Power Supply and Fan Assembly (Port-side Air Exhaust)
- Brocade 5100 Technical Specifications
- Regulatory Statements
- Cautions and Danger Notices
- Index
1. Unscrew the captive screw on the power supply/fan assembly you are replacing using a Phillips-head
screwdriver.
2. Remove the power supply/fan assembly from the chassis by pulling the handle out, away from the
chassis.
3. Confirm that the new power supply/fan assembly has the same part number as the removed one.
4. Install the new power supply/fan assembly in the chassis:
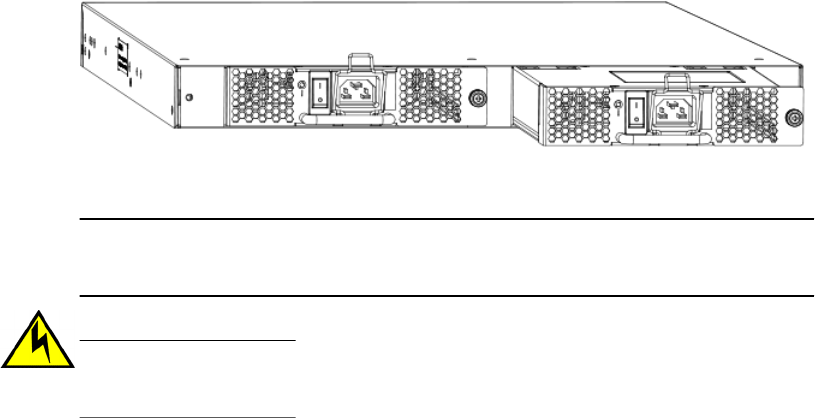
a) Orient the new fan assembly as shown in the following figure, with the captive screw on the
right.
FIGURE 9 Orientation of the power supply and fan assembly FRU
b) Gently push the power supply/fan assembly into the chassis until it is firmly seated.
NOTE
Do not force the installation. If the FRU does not slide in easily, ensure that it is correctly
oriented before continuing.
CAUTION
Carefully follow the mechanical guides on each side of the power supply slot and
make sure the power supply is properly inserted in the guides. Never insert the power
supply upside down.
c) Secure the power supply/fan assembly to the chassis by screwing in the captive screw
using the Phillips-head screwdriver.
5. Verify that the fan status LED is lit steady green to indicate normal operation.
6. Optionally, display the fan status using the fanShow command from the CLI.
Removal and Replacement of Combined Power Supply and Fan Assembly (Port-side Air Exhaust)
Brocade 5100 Hardware Installation Guide 37
53-1000854-07