
Owner manual


12 Brocade 7800 Extension Switch Hardware Reference Manual
53-1001350-04
Installing and configuring the Brocade 7800
2
• In a UNIX environment using TIP, enter the following string at the prompt:
tip /dev/ttyb -9600.
If ttyb is already in use, use ttya instead and enter the following string at the
prompt:
tip /dev/ttya -9600
Setting the switch IP address
You can configure the Brocade 7800 with a static IP address, or you can use a DHCP (Dynamic
Host Configuration Protocol) server to set the IP address of the switch. DHCP is enabled by
default. The Brocade 7800 supports both IPv4 and IPv6.
Using DHCP to set the IP address
When using DHCP, the Brocade 7800 obtains its IP address, subnet mask, and default
gateway address from the DHCP server. The DHCP client can only connect to a DHCP server
that is on the same subnet as the switch. If your DHCP server is not on the same subnet as the
Brocade 7800, use a static IP address.
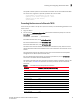
Setting a static IP address
1. Log into the switch using the default password, which is password.
2. Use the ipaddrset command to set the Ethernet IP address.
If you are going to use an IPv4 IP address, enter the IP address in dotted decimal notation
as prompted.
Ethernet IP Address: [192.168.74.102]
If you are going to use an IPv6 address, enter the network information in colon-separated
notation as prompted.
switch:admin> ipaddrset -ipv6 --add 1080::8:800:200C:417A/64
IP address is being changed...Done.
3. Complete the rest of the network information as prompted. (IPv4 format shown)
Ethernet Subnetmask: [255.255.255.0]
Ethernet IP Address: [192.168.74.102]
Ethernet Subnetmask: [255.255.255.0]
4. Enter off to Disable DHCP when prompted.
DHCP [OFF]: off
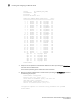
Parity None
Stop bits 1
Flow control None
Parameter Value