
Computer Hardware User Manual


2-2 SilkWorm 4016 Hardware Reference Manual
Publication Number: 53-1000175-01
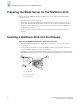
Preparing the Blade Server for the SilkWorm 4016
2
Preparing the Blade Server for the
SilkWorm 4016
Before you insert the SilkWorm 4016 into the blade server chassis, make sure that the following
conditions are met:
• The blade server chassis is powered up.
• The I/O bay into which the SilkWorm 4016 will be inserted is empty and ready to receive the
switch. The SilkWorm 4016 should only be inserted into the specific chassis I/O bay indicated.
• All power requirements specific to the blade server chassis are met. Refer to the manufacturer’s
documentation for details.
• If you are replacing an existing switch, the new one should be inserted within one minute of
removal.
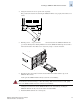
Inserting a SilkWorm 4016 into the Chassis
To insert the SilkWorm 4016 into a blade server chassis:
1. Unpack the SilkWorm 4016 from its shipping box, as described in “Unpacking the SilkWorm
4016” on page 2-1.
2. Verify that the chassis I/O bay into which the SilkWorm 4016 is being inserted is empty. Do not
insert the SilkWorm 4016 into any other chassis I/O bay.
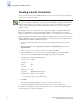
3. Gripping the top and bottom of the release latch, gently squeeze the latch to free the insertion arm.
The SilkWorm 4016 is designed to work only in the designated chassis I/O bay of the blade server.
A Top of latch
B Bottom of latch
C Insertion arm
R
10
11
A
B
C