
Installation Guide Owner's manual
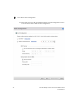
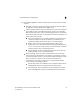
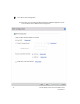

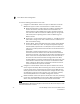

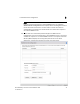
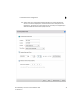
Table Of Contents
- Introduction
- Hardware Installation
- Installation instructions
- Precautions
- Access Point placement
- Integrated antenna model wall mount instructions
- Integrated antenna model suspended ceiling t-bar mount
- External antenna model wall mount instructions
- External antenna model suspended ceiling t-bar mount
- External antenna suspended ceiling tile (Plenum) mount
- Mobility 1220 Access Point external antenna model antenna options
- LED indicators
- Initial Access Point Configuration
- Specifications
- Regulatory Information
- Country Approvals
- Health and Safety Recommendations
- Health and Safety Recommendations
- RF Exposure Guidelines
- Wireless Devices - Countries
- Radio Frequency Interference Requirements—FCC
- Radio Frequency Interference Requirements – Canada
- CE Marking and European Economic Area (EEA)
- Statement of Compliance
- Waste Electrical and Electronic Equipment (WEEE)
- TURKISH WEEE Statement of Compliance
- Mobility 1220 China ROHS Compliance
Initial Access Point Configuration
3
44 Brocade Mobility 1220 Access Point Installation Guide
53-1002916-01
23. Refer to the Username, Password, Description, and Actions columns to review
credentials of existing RADIUS Server user accounts. Add new accounts or edit
the properties of existing accounts as updates are required.
24. Refer to the Add On-Board RADIUS Server Users field to set the following
parameters for a user account:
•
Username - If you are adding a new user account, create a username up to
X characters in length. The username cannot be revised if modifying the
user configuration. This is a required parameter.
•
Password - Provide (or modify) a password between X - X characters in
length entered each time a requesting client attempts access to the AP
managed network using the Access Point's onboard RADIUS server. This is
a required parameter.
•
Confirm Password - Re-enter (or modify) the password as a means of
confirming the password. This is a required parameter.
•
Description - Optionally provide a description of the user account as means
of further differentiating it from others.
25. When completed, select Add User to commit a new user, Modify User to commit
a modified user or Reset to clear the screen without updating the
configuration. Selecting Reset clears the field of all entered user account
information.