53-1003220-01 11 July 2014 Brocade Network Advisor Port Commissioning Quick Start Guide Supporting Network Advisor 12.3.
Copyright © 2014 Brocade Communications Systems, Inc. All Rights Reserved. Brocade, Brocade Assurance, the B-wing symbol, DCX, Fabric OS, MLX, SAN Health, VCS, and VDX are registered trademarks, and AnyIO, Brocade One, CloudPlex, Effortless Networking, ICX, NET Health, OpenScript, and The Effortless Network are trademarks of Brocade Communications Systems, Inc., in the United States and/or in other countries. Other brands, products, or service names mentioned may be trademarks of their respective owners.
In this document • Port commissioning overview . . . . . . . . . . . . . . . . . . . . . . . . . . . . . . . . . . . . . • Configuring port commissioning . . . . . . . . . . . . . . . . . . . . . . . . . . . . . . . . . . . • CIMOM servers . . . . . . . . . . . . . . . . . . . . . . . . . . . . . . . . . . . . . . . . . . . . . . . . . • F-Port commissioning. . . . . . . . . . . . . . . . . . . . . . . . . . . . . . . . . . . . . . . . . . . • E-Port commissioning . . . . . . . . . . . . . . . . . . . . . .
z/OS requirements You must meet the following requirements to configure port decommissioning and recommissioning through the Management application. • Make sure the z/OS is running 1.12 or later to support z/OS CIM and port decommission. • Make sure there is a working CIMOM server on each LPAR (logical partition) that participates in port decommission.
Configuring port commissioning The following procedure provides an overview of the steps you must complete to configure port commissioning. 1. Make sure you meet the z/OS (mainframe operating system) requirements. For more information, refer to “z/OS requirements” on page 4. 2. Register each CIMOM servers within the fabric affected by the action. For step-by-step instructions, refer to “Registering a CIMOM server” on page 5. 3. Decommission an F-Port.
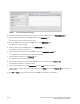
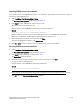
FIGURE 1 Port Commissioning Setup dialog box 2. Enter the IP address (IPv4 or IPv6 format) or host name of the CIMOM server in the Network Address field. 3. (Optional) Enter a description of the CIMOM server in the Description field. The description cannot be over 1024 characters. 4. Enter the CIMOM port number for the CIMOM server in the CIMOM Port field. The default port number is 5989. 5. Enter the namespace of the CIM_FCPort in the Namespace field. The default namespace is root/cimv2. 6.
Viewing existing CIMOM servers NOTE Port commissioning is only supported on FICON devices running Fabric OS 7.1 or later. Before you can decommission or recommission an F-Port, you must register the CIMOM servers within the fabric affected by the action. For more information, refer to “Registering a CIMOM server” on page 5. 1. Select Configure > Port Commissioning > Setup. The Port Commissioning Setup dialog box displays (Figure 1). The Port Commissioning Setup dialog box has two main areas.
2. To register a CIMOM server, refer to “Registering a CIMOM server” on page 5. 3. To edit a CIMOM server, refer to “Editing CIMOM server credentials” on page 8. 4. To import CIMOM servers, refer to “Importing CIMOM servers and credentials” on page 9. 5. To export CIMOM servers, refer to “Exporting CIMOM servers and credentials” on page 9. 6. To edit CIMOM server credentials for one or more CIMOM servers, refer to “Changing CIMOM server credentials” on page 10. 7.
Importing CIMOM servers and credentials You can import one or more CIMOM servers (system and credentials) using a CSV formatted file. You can import a maximum of 2,000 CIMOM servers. 1. Select Configure > Port Commissioning > Setup. The Port Commissioning Setup dialog box displays (Figure 1). 2. Click Import to import CIMOM server information from a file. The CSV file must use the following format: Network Address, User ID,CIMOM Port, Namespace, Description, Password Example 10.24.48.
Changing CIMOM server credentials You can edit the CIMOM server credentials for one or more CIMOM servers at the same time. 1. Select Configure > Port Commissioning > Setup. The Port Commissioning Setup dialog box displays (Figure 1). 2. Select one or more CIMOM servers from the System List table and click Change Credentials. The Edit Credentials dialog box displays. If you selected one CIMOM server, the credentials for the selected server display in the dialog box.
Deleting CIMOM server credentials 1. Select Configure > Port Commissioning > Setup. The Port Commissioning Setup dialog box displays (Figure 1). 2. Select one or more CIMOM server from the System List table and click the left arrow button. The details for the last selected CIMOM server row displays in the Add/Edit System and Credentials area. 3. Confirm that this is the CIMOM server you want to delete and click OK or Apply to delete the CIMOM server from the Port Commissioning Setup dialog box.
• Force — Select to force decommission on the N-Port connected to the F-Port. The Management application contacts all registered CIMOM servers within the fabric affected by the action, but forces the N-Port decommission regardless of the CIMOM server response. NOTE You cannot force decommission on an F-Port. 3. Click View Deployment Status to view the port commissioning results immediately (refer to “Port commissioning deployment results” on page 17).
E-Port commissioning Although you can use any of the following methods to access the E-Port commissioning commands, individual procedures only include one method. • From the main menu, select the E-Port in the Product List or Topology, then select Configure > Port Commissioning > Decommission/Recommission > Port. • From the Product List, right-click the E-Port and select Decommission/Recommission > Port. • From the Topology, right-click the E-Port and select Decommission/Recommission > Port.
Port commissioning by switch Although you can use any of the following methods to access the port commissioning commands for a switch, individual procedures only include one method. • From the main menu, select the switch in the Product List or Topology, then select Configure > Port Commissioning > Decommission/Recommission > All F-Ports on the Switch. • From the Product List, right-click the switch and select Decommission/Recommission > All F-Ports on the Switch.
Recommissioning all ports on a switch Select the switch or logical switch for which you want to recommission all ports in the Product List, then select Configure > Port Commissioning > Recommission > All F-Ports on the Switch. NOTE You can only recommission ports from the logical switch, not the physical chassis. While recommissioning is in progress, an up arrow icon displays next to the port icon in the Product List.
• Force — Select to force decommission on the N-Port connected to the F-Port. The Management application contacts all registered CIMOM servers within the fabric affected by the action, but forces the N-Port decommission regardless of the CIMOM server response. NOTE You cannot force decommission on an F-Port. NOTE If any CIMOM server is not reachable or the credentials fail, port decommission does not occur. 3. Click OK on the Port Commission Confirmation dialog box.
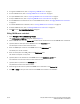
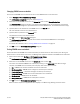
Port commissioning deployment results FIGURE 2 Port commissioning deployment results The Deployment Results contains the following data: • Date and Time — The date and time of the deployment. • Export — Select to export the results to CSV or HTML (refer to “Exporting and saving a report to a file” on page 19). • Email — Select to e-mail the results (refer to “E-mailing a report” on page 19). • Configuration Name — Name of the deployment.
Viewing a port commissioning deployment report To access a port commissioning deployment report, complete the following steps. 1. Select Configure > Task Scheduler. The Task Scheduler dialog box displays. 2. Click the Log tab. A list of deployment configurations that are executed and the status of each displays. 3. Select the port commissioning deployment report you want to view and click Report. 4. Review the contents of the port commissioning deployment report.
Exporting and saving a report to a file You can save a report to a CSV (comma separated values) or HTML file. Each report has an Export list at the top right corner of the page. 1. Select one of the following from the Export list: • Select Export as HTML. • Select Export as CSV. 2. Browse to the location where you want to save the file and click Save. E-mailing a report You can e-mail a report in a CSV (comma separated values) or HTML file.
CIMCLI trouble shooting Use the following sections to obtain data to support trouble shooting. Obtaining FCPort and PCCUPort data To obtain CIMOM supporting documentation for troubles hooting, complete the following steps. 1. Log onto the TSO. NOTE You need a very large TSO user region size for the cimcli command. 2. From the ISPF Primary Option Menu, select option 6. 3. Enter the TSO OMVS to open the z/OS USS shell. 4.
Capturing Server and Client support save data To capture both server and client support save files, complete the following steps. 1. Select Monitor > Technical Support > SupportSave. The SupportSave dialog box displays. 2. Select the Server SupportSave check box to run supportsave on the server. 3. Enter a file name for the server support save file in the File Name field. The default file name is DCM-SS-Time_Stamp. 4.