
User Manual v12.3.0 User Manual

Brocade Network Advisor SAN User Manual 633
53-1003154-01
LLDP-DCBX configuration
16
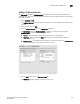
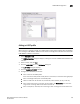
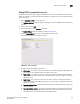
FIGURE 241 Edit Switch dialog box - LLDP-DCBX tab
Adding an LLDP profile
NOTE
When a TE port is selected to assign to an LLDP profile, a yellow banner displays with the following
error message: “LLDP-DCBX is disabled on this switch. The configuration becomes functional when
LLDP-DCBX is enabled on the switch.”
1. Select Configure > DCB.
The DCB Configuration dialog box displays, showing the status of all DCB-related hardware and
functions.
2. Select a switch, and click Edit.
3. Click the LLDP-DCBX tab on the Edit Switch dialog box.
The LLDP-DCBX dialog box displays.
4. Click the Enable LLDP-DCBX checkbox.
5. Configure the LLDP Profile parameters:
• Enter a name for the LLDP profile.
If the name of the LLDP profile already exists on the switch, an overwrite warning displays.
• Enter a meaningful description of the LLDP profile.
• Select a mode from the list: Both Tx (transmitted) or Rx (received), Tx only, or Rx only.
• Enter a hello interval time (in seconds) for the bridge in the Hello (secs) field. The value
range is from 4 through 180 and the default value is 30.
• Enter a multiplier (in seconds). The value range is from 1 through 10 and the default is 4.