53-1002669-01 22 August 2012 ® Brocade VDX 8770-4 Four-Post Flush Mount Rack Kit Installation Procedure Supporting the Brocade VDX 8770-4 switch 53-1002669-01 *53-1002669-01*
Copyright © 2012 Brocade Communications Systems, Inc. All Rights Reserved. Brocade, Brocade Assurance, the B-wing symbol, BigIron, DCX, Fabric OS, FastIron, MLX, NetIron, SAN Health, ServerIron, TurboIron, VCS, and VDX are registered trademarks, and AnyIO, Brocade One, CloudPlex, Effortless Networking, ICX, NET Health, OpenScript, and The Effortless Network are trademarks of Brocade Communications Systems, Inc., in the United States and/or in other countries.
This document provides instructions to install a Brocade VDX 8770-4 switch in a 19 in. EIA rack with a rail-to-rail depth of 27-31 in.(68.58 to 78.74 cm). The document is organized as follows. • Safety . . . . . . . . . . . . . . . . . . . . . . . . . . . . . . . . . . . . . . . . . . . . . . . . . . . . . . . . 5 • Installation guidelines . . . . . . . . . . . . . . . . . . . . . . . . . . . . . . . . . . . . . . . . . . . 5 • Installing the switch in a four-post rack . . . . . . . . . . . . . . . . . . .
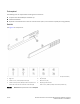
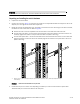
Tools required The following tools are required when installing the rack mount kit: • Torque wrench with #2 Phillips screwdriver tip • Flathead screwdriver • Hydraulic or assisted lift with a minimum raise of 140 cm (55 in.) and a minimum capacity of 113 kg (250 lbs). Parts list See Figure 1 for the parts list. 1 Left rail 5 Alignment washer for racks that have rails with square holes 4) 2 Right rail 6 Clip nuts (14) 3 10-32 x .31 in. (.
ATTENTION This hardware kit is a universal kit, and some hardware will not be used in this installation. Unpacking and installing the rack kit hardware 1. Unpack the rack kit hardware. 2. On each rail (1 and 2 in Figure 1), loosen the four screws on the adjustable brackets and adjust the rails to the depth of your rack. Tighten the screws after adjustment. 3. Noting that the rails are designated “Left” and “Right,” install each rail in the rack using four 10-32 x .
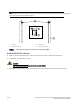
NOTE For posts with round holes, use the clip nuts on the rack posts for securing 10-32 screws. For posts with square holes, use the retainer nuts. Refer to Figure 3. 1 3 4 2 1 Clip nuts 3 Retainer nut 2 Round hole rack rail 4 Square hole rack rail FIGURE 3 Using clip nuts and retainer nuts to secure screws to the rack uprights. Install the VDX 8770-4 in the rack 5. Move the lift with the switch in front of the rack and adjust the height to match the installed rails. 6.
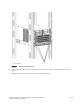
1 Screw locations FIGURE 4 VDX 8770-4 installed in the rack 8. Secure the switch to the equipment rack racks with six 10-32 x .63 screws , three screws on each side. See Figure 4. 9. Tighten the screws to a torque of 29.2 to 36.5 in-lb (33.6 to 42 cm-kg).
10 of 10 Brocade VDX 8770-4 Four-Post Flush Mount Rack Kit Installation Procedure Publication Number: 53-1002669-01