
(Supporting ADX v03.1.00) Owner's manual
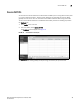
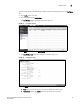
Table Of Contents
- Contents
- Preface
- Introduction to the Brocade Virtual ADX Web Interface
- Navigating the Web Interface
- Navigating the Dashboard
- Configuration Overview
- System Settings
- Network Settings
- Traffic Settings
- GSLB Settings
- Security Settings
- Monitoring Overview
- Viewing System Information
- Viewing Network Status
- Viewing Traffic Statistics
- Viewing Security Statistics
- Maintenance Overview
- Managing Software Images
- Restarting the System
- License Management
- Packet Capture
- Accessing the CLI
- Retrieving System Information for Technical Support
- Troubleshooting
- Config Template XML Schema
- Managing Config Templates through the CLI
90 Brocade Virtual ADX Graphical User Interface Guide
53-1003242-01
Source NAT IPs
7
3. Click New at the bottom of the Summary page.
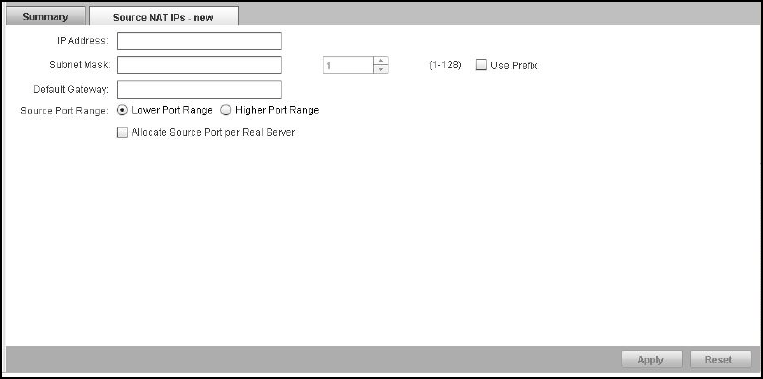
The Source NAT IPs - new tab is displayed. See Figure 75.
FIGURE 75 Source NAT IPs - new tab
4. Provide the following information:
• IP Address: Enter the source IP address.
• Subnet Mask: For an IPv4 address, enter the subnet mask in a class-based format. If you
prefer to use a prefix, click Use Prefix to enable field to enter the prefix as an integer from
1 to 128. For an IPv6 address, enter the prefix.
• Default Gateway: Enter the IP address of the default gateway. If you do not want to specify
a gateway, enter 0.0.0.0.
• Source Port Range: Specifies which port range this peer uses for source NAT for this
source IP address. Select one of the following buttons:
• Lower Port Range
• Higher Port Range
• Allocate Source Port per Real Server: Select the check box to enable port allocation per
real server. Consider the following when enabling port allocation per real server:
• When you enable port allocation per real server, you must reload the Brocade Virtual
ADX. Otherwise, the SLB traffic fails.
• The Brocade Virtual ADX does not use the default gateway for remote server health
checks as well as for forwarding SLB traffic to the remote server.
• You should not enable or disable this functionality while the IP addresses are in use by
the traffic flow. You must bring the number of traffic flows utilizing this IP address to
zero or remove source NAT IP address and redefine it.
5. Click Apply to save the entries.
Click Reset to revert the configuration to the previous configured values.
To modify the configured source NAT IP information, in the Summary table, select an entry and
click Edit or double-click the entry. You can also delete a configuration by clicking Delete.