
(Supporting ADX v03.1.00) Owner's manual
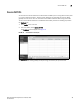
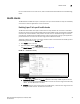
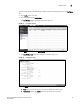
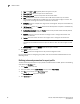
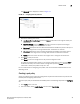
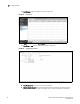
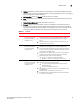
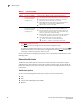
Table Of Contents
- Contents
- Preface
- Introduction to the Brocade Virtual ADX Web Interface
- Navigating the Web Interface
- Navigating the Dashboard
- Configuration Overview
- System Settings
- Network Settings
- Traffic Settings
- GSLB Settings
- Security Settings
- Monitoring Overview
- Viewing System Information
- Viewing Network Status
- Viewing Traffic Statistics
- Viewing Security Statistics
- Maintenance Overview
- Managing Software Images
- Restarting the System
- License Management
- Packet Capture
- Accessing the CLI
- Retrieving System Information for Technical Support
- Troubleshooting
- Config Template XML Schema
- Managing Config Templates through the CLI

94 Brocade Virtual ADX Graphical User Interface Guide
53-1003242-01
Health checks
7
• Type: Click TCP or UDP to globally define the type for the port.
• Keep Alive Port: Choose the port for the health check.
• Keep Alive Protocol: Choose the protocol for the health check.
• Age: Specifies the number of minutes a TCP or UDP session table entry can remain
inactive before the Brocade Virtual ADX times out the entry. Edit the age in minutes. The
range is from 2 through 60 minutes. The default is 30 minutes.
• Multiplier: Enter the multiplier. The range is from 2 through 20. This option is available only
for the TCP type.
• TCP Keepalive: Select the Enable check box for TCP keepalive. This option is available only
for the UDP type.
• Periodic Health Check: Select the Enable check box for periodic health check. By default,
periodic health check is enabled.
• Interval: Enter the interval in seconds. The range is from 1 through 120 seconds. The
default is 5 seconds.
• Retries: Enter the number of retries. The range is from 1 through 5. The default is 2.
NOTE
The Brocade Virtual ADX assumes that ports for which it does not know the type are UDP
ports.
• L4 Check Only: Select the Enable check box for Layer 4 checks.
6. Click Apply to save your entries.
Click Reset to revert the configuration to the previous configured values.
For more information on configuring port profiles, refer to the Brocade Virtual ADX Server Load
Balancing Guide.
Defining advanced parameters for a port profile
To define advanced parameters for a port profile on the Brocade Virtual ADX, perform the following
steps within the Configure tab.
1. Click Traffic on the menu bar.
2. From the sidebar, select Health Checks, and then select Port Profiles.
3. Click New at the bottom of the Port Profiles page.
The Port Profile - new page tab is displayed.
4. Click Advanced tab.