
(Supporting ADX v03.1.00) Owner's manual
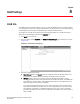
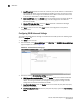

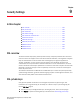
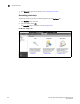
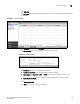
Table Of Contents
- Contents
- Preface
- Introduction to the Brocade Virtual ADX Web Interface
- Navigating the Web Interface
- Navigating the Dashboard
- Configuration Overview
- System Settings
- Network Settings
- Traffic Settings
- GSLB Settings
- Security Settings
- Monitoring Overview
- Viewing System Information
- Viewing Network Status
- Viewing Traffic Statistics
- Viewing Security Statistics
- Maintenance Overview
- Managing Software Images
- Restarting the System
- License Management
- Packet Capture
- Accessing the CLI
- Retrieving System Information for Technical Support
- Troubleshooting
- Config Template XML Schema
- Managing Config Templates through the CLI
Brocade Virtual ADX Graphical User Interface Guide 133
53-1003242-01
GSLB Site
8
• Timeout, configures the peer public keys to be valid for a specific duration of seconds
independent of how many TCP connection setup and tear down events occur during
this time. If the TCP connection is not established for the user-configured period of
time, or if the connection to the peer is lost for this duration of time, these keys time
out (expire). This setting enables the Peer Public Key Expiry Interval.
• One time, configures the peer public keys for a one-time usage, which is the highest
level of security. They expire after each TCP session to the peer device is
disconnected.
• Never, configures the peer public keys to never automatically expire after the initial
public key exchange. They are assumed to be valid until and unless the administrators
manually intervene and perform the public key exchange. The keys will be saved and
reused for new TCP connections.
• Peer Public Key Expiry Interval: Enter the expiry interval when the Timeout setting is the
Peer Public Key Expiry Type. Enter a number from 30 to 4294967295. The default is 180.
4. Provide the following Optimization Settings information:
• Optimized VIP List Sending: Select the Enable check box to enable to process the VIP list
from the controller in a more optimal manner. By default, it is disabled.
• Send Active Bindings: Select to Enable check box to the site Brocade Virtual ADX to send
active binding information.
5. Click Apply to save your entries. Click Reset to revert the configuration to the previous
configured values.
For more information on global settings, refer to the Brocade Virtual ADX Global Server Load
Balancing Guide.