
(Supporting ADX v03.1.00) Owner's manual
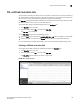
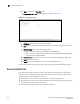
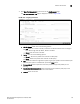
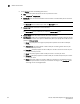
Table Of Contents
- Contents
- Preface
- Introduction to the Brocade Virtual ADX Web Interface
- Navigating the Web Interface
- Navigating the Dashboard
- Configuration Overview
- System Settings
- Network Settings
- Traffic Settings
- GSLB Settings
- Security Settings
- Monitoring Overview
- Viewing System Information
- Viewing Network Status
- Viewing Traffic Statistics
- Viewing Security Statistics
- Maintenance Overview
- Managing Software Images
- Restarting the System
- License Management
- Packet Capture
- Accessing the CLI
- Retrieving System Information for Technical Support
- Troubleshooting
- Config Template XML Schema
- Managing Config Templates through the CLI
Brocade Virtual ADX Graphical User Interface Guide 153
53-1003242-01
Access Control Lists
9
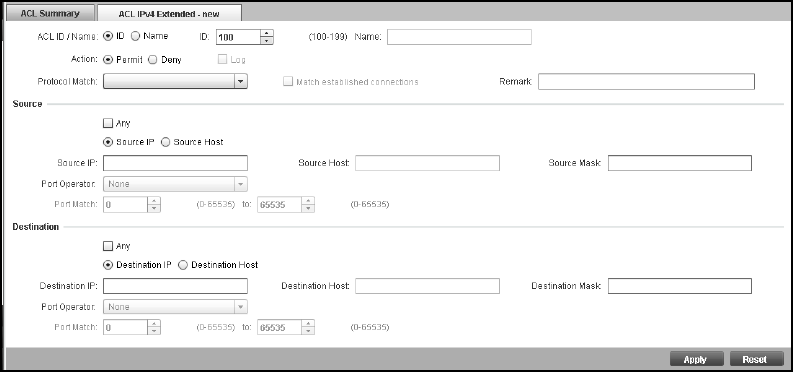
3. Click New IPv4 Extended ACL at the bottom of the ACL Summary page.
The ACL IPv4 Extended - new page is displayed, as shown in Figure 125.
FIGURE 125 Configuring extended ACL
4. Provide the following information:
• ACL ID / Name: Select one of the following options:
• ID#: Enter the number to identify a collection of individual ACL entries. The range is
from 100 through 199. By default, ACL ID is enabled.
• Name: Enter the name of the ACL.
• Action: Click one of the following options:
• Permit — Permits the packets that matches the ACL policy.
• Deny — Denies the packets that matches the ACL policy.
• Log: Select the check box to generate a system log entry for packets that are denied by the
ACL entry. This option is enabled when you choose Deny action.
• Protocol Match: Select a protocol in the list to provide the type of IP packet you are
filtering.
• Match established connections: Select the check box to enable the policy only to the
established TCP connections, and not to new sessions.
• Remark: Enter the remark.