
(Supporting ADX v03.1.00) Owner's manual
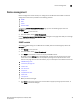
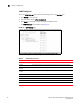
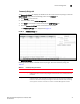
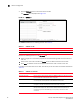
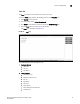
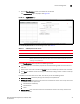

Table Of Contents
- Contents
- Preface
- Introduction to the Brocade Virtual ADX Web Interface
- Navigating the Web Interface
- Navigating the Dashboard
- Configuration Overview
- System Settings
- Network Settings
- Traffic Settings
- GSLB Settings
- Security Settings
- Monitoring Overview
- Viewing System Information
- Viewing Network Status
- Viewing Traffic Statistics
- Viewing Security Statistics
- Maintenance Overview
- Managing Software Images
- Restarting the System
- License Management
- Packet Capture
- Accessing the CLI
- Retrieving System Information for Technical Support
- Troubleshooting
- Config Template XML Schema
- Managing Config Templates through the CLI
Brocade Virtual ADX Graphical User Interface Guide 39
53-1003242-01
Device management
5
Device management
Device management controls allow you to configure how the Brocade Virtual ADX is accessed.
Configuration controls are provided for the following protocols:
• SNMP
• SSH
• Telnet
• TFTP on VLAN
To display the Device Management Summary page, perform the following steps within the
Configure tab.
1. Click System on the menu bar.
2. From the sidebar, select Device Management.
Use the Device Management Configuration Page to navigate to the pages that allow you to manage
SNMP, SSH, Telnet, and TFTP.
SNMP controls
To configure SNMP settings on the Brocade Virtual ADX, perform the following steps within the
Configure tab.
1. Click System on the menu bar.
2. From the sidebar, select Device Management.
3. Click SNMP in the sidebar sub-menu to display the SNMP controls.
By default, only the Settings tab is displayed when you first open this control set; the other
seven tabs for the SNMP controls are displayed by clicking their respective buttons at the
bottom of the page. Click on the links below to jump to a description of the features of that tab.
• “SNMP Settings tab”
• “Community Strings tab”
• “Clients tab”
• “V3 Users tab”
• “Traps tab”
• “Trap Receivers tab”
• “Views tab”
• “Groups tab”
4. Make your desired changes.
5. Click Apply at the bottom right corner of the window to apply any change you have made, or
click Reset to discard all changes.