53-1003250-01 July 2014 Brocade Virtual ADX Security Guide Supporting Brocade Virtual ADX version 03.1.
DRAFT: BROCADE CONFIDENTIAL Copyright © 2014 Brocade Communications Systems, Inc. All Rights Reserved. Brocade, the B-wing symbol, Brocade Assurance, ADX, AnyIO, DCX, Fabric OS, FastIron, HyperEdge, ICX, MLX, MyBrocade, NetIron, OpenScript, VCS, VDX, and Vyatta are registered trademarks, and The Effortless Network and the On-Demand Data Center are trademarks of Brocade Communications Systems, Inc., in the United States and in other countries.
Contents Preface Document conventions . . . . . . . . . . . . . . . . . . . . . . . . . . . . . . . . . . . . . ix Text formatting . . . . . . . . . . . . . . . . . . . . . . . . . . . . . . . . . . . . . . . . ix Command syntax conventions . . . . . . . . . . . . . . . . . . . . . . . . . . . x Notes, cautions, and warnings . . . . . . . . . . . . . . . . . . . . . . . . . . . x Brocade resources . . . . . . . . . . . . . . . . . . . . . . . . . . . . . . . . . . . . . . . .
DNS-DPI Attack Protection . . . . . . . . . . . . . . . . . . . . . . . . . . . . . . . . . 17 Configuring DNS attack protection . . . . . . . . . . . . . . . . . . . . . . . 18 Displaying DNS attack protection information . . . . . . . . . . . . . . 22 Rate Limiting Feature on a Brocade Virtual ADX . . . . . . . . . . . . . . . 23 Chapter 2 Access Control List How the Brocade Virtual ADX processes ACLs . . . . . . . . . . . . . . . . . 25 How fragmented packets are processed . . . . . . . . . . . . . . .
Chapter 4 Network Address Translation Introduction . . . . . . . . . . . . . . . . . . . . . . . . . . . . . . . . . . . . . . . . . . . . . 59 Configuring NAT . . . . . . . . . . . . . . . . . . . . . . . . . . . . . . . . . . . . . . . . . . 60 Configuring static NAT . . . . . . . . . . . . . . . . . . . . . . . . . . . . . . . . . 60 Configuring dynamic NAT. . . . . . . . . . . . . . . . . . . . . . . . . . . . . . . 61 NAT configuration examples . . . . . . . . . . . . . . . . . . . . . . . . . . . .
SSL overview . . . . . . . . . . . . . . . . . . . . . . . . . . . . . . . . . . . . . . . . . . . . 97 Public key infrastructure . . . . . . . . . . . . . . . . . . . . . . . . . . . . . . . 97 Asymmetric cryptography . . . . . . . . . . . . . . . . . . . . . . . . . . . . . . 98 Certificate authority . . . . . . . . . . . . . . . . . . . . . . . . . . . . . . . . . . . 98 Certificate revocation list. . . . . . . . . . . . . . . . . . . . . . . . . . . . . . . 98 Cipher suite . . . . . . . . . . . . . . .
Appendix A Acknowledgements OpenSSL license . . . . . . . . . . . . . . . . . . . . . . . . . . . . . . . . . . . . . . . .165 Cryptographic software. . . . . . . . . . . . . . . . . . . . . . . . . . . . . . . . . . .166 Original SSLeay License . . . . . . . . . . . . . . . . . . . . . . . . . . . . . . . . . .
viii Brocade Virtual ADX Security Guide 53-1003250-01
Preface Document conventions This section describes text formatting conventions and important notice formats that may be used in this document. Text formatting The following text formatting conventions may be used in the flow of the text to highlight specific words or phrases.
Command syntax conventions Convention Description bold text Identifies command names, keywords, and command options. italic text Identifies variables. [] Syntax components displayed within square brackets are optional. { x | y |z } A choice of required parameters is enclosed in curly braces separated byvertical bars. You must select one. x|y A vertical bar separates mutually exclusive elements. <> Nonprinting characters, for example, passwords, are enclosed in angle brackets. ...
Brocade resources To get up-to-the-minute information, go to http://my.brocade.com to register at no cost for a user ID and password. Release notes are available at http://my.brocade.com. White papers, online demonstrations, and data sheets are available through the Brocade website at: http://www.brocade.com/products-solutions/products/index.page Select Application Delivery Switches on this page to navigate to the relevant product information.
Document feedback • For questions regarding service levels and response times, contact your OEM/Solution Provider. Document feedback Quality is our first concern at Brocade and we have made every effort to ensure the accuracy and completeness of this document. However, if you find an error or an omission, or you think that a topic needs further development, we want to hear from you. You can provide feedback in two ways: • Through the online feedback form in the HTML documents posted on http://www.
Chapter Network Security 1 No response to non-SYN first packet of a TCP flow The Brocade Virtual ADX Application Delivery Switch (Brocade Virtual ADX) can remain passive for non-SYN packet in the beginning of the flow. The default behavior is to send a TCP RST packet to client when a non-SYN packet is received at the beginning. By default, the Brocade Virtual ADX responds with a TCP RST packet whenever it receives a non-SYN TCP packet from a client destined for a VIP if there is no matching session.
1 Application Traffic Prioritization Prioritization of TCP port 80 traffic to management IP 10.200.1.1 from source subnet 10.1.1.X Virtual ADX#server prioritize-mgmt-traffic 10.1.1.1 255.255.255.0 10.200.1.1 6 80 Prioritization of TCP port 80 traffic to management IP 10.200.1.1 from any source IP address Virtual ADX#server prioritize-mgmt-traffic any 10.200.1.1 6 80 Prioritization of UDP port 2222 traffic to management IP 10.200.1.1 from source subnet 10.1.1.
Application Traffic Prioritization 1 The Brocade Virtual ADX offers up to eight priority levels ranging from 0 through 7. You can assign two priority levels against each application VIP, the default priority level and attack priority level. The probability of dropping an application packet is inversely proportional to the priority level of its respective VIP. In other words, VIPs with higher priority value have a lower drop probability compared to VIPs with lower priority value.
1 Application Traffic Prioritization Specifying traffic priority per VIP Use the priority command to configure default and attack priority on a per VIP basis. Use the max-tcp-conn-rate or max-udp-conn-rate command to specify maximum TCP and UDP connection rate at the VIP level and enable the traffic prioritization function. For example, to configure highest priority to a VIP servicing HTTP traffic, enter the following commands.
Application Traffic Prioritization 1 Syntax: [no] server attack-interval classify interval-1 de-classify interval-2 The interval-1 variable classifies traffic as attack traffic when the connection rate against a VIP exceeds the maximum rate for the time interval specified in multiples of 100 milliseconds. The interval-2 variable declassifies traffic as attack traffic when the connection rate against a VIP remains below the maximum rate for the time interval specified in multiples of 100 milliseconds.
1 VIP Maximum Connection Rate Virtual Servers Info Name: vs1 State: Enabled IP:200.1.1.1 Pred: weighted-round-robin ACL-Id: 0 TotalConn: 0 VIP state: healthy Rx pkts: 1201 Tx pkts: 1201 Rx bytes: 94656 Tx bytes: 975477 Rx PPS: 351 Tx PPS: 351 Rx Throughput: 221 Kbps Tx Throughput: 2281 Kbps tcp-conn-rate: 50 udp-conn-rate: 0 CPS: 50 CurrConn: 171 Note: The above statistics lag by 1 second tcp priority: Port State -------default enabled ...
Protection against malformed IP packets BP 1: last sec: 0.20%, 5 sec: 0.10%, 60 sec: 0.09%, 300 sec: 0.08% BP 2: last sec: 0.20%, 5 sec: 0.10%, 60 sec: 0.09%, 300 sec: 0.09% Per core utilization: Core 1: last sec: 1.00%, 5 sec: 0.60%, 60 sec: 0.32%, 300 sec: 0.29% Core 2: last sec: 0.00%, 5 sec: 0.40%, 60 sec: 0.48%, 300 sec: 0.52% Core 3: last sec: 0.00%, 5 sec: 0.00%, 60 sec: 0.00%, 300 sec: 0.
1 Transaction rate limit • Ability to apply a default transaction rate limit value to all clients, while maintaining an exception list. • Ability to apply a different transaction rate limit rate per client IP or prefix. • Ability to exclude specific IP addresses or prefixes from transaction rate limit and maintain an exclude list. • Ability to apply transaction rate limit to traffic coming to a specific VIP only.
Transaction rate limit 1 Virtual ADX# configure terminal 3. Configure name of a transaction rate limit rule set and enter client transaction rate limit configuration mode. Virtual ADX(config)# client-trans-rate-limit tcp TRL1 Syntax: [no] client-trans-rate-limit tcp | udp | icmp name 4. Specify the trl keyword for client subnet and set connection rate. For IPv4: Virtual ADX(config-client-trl-trl1)# trl 10.1.1.0 255.255.255.
1 Transaction rate limit Configure a transaction rate limit default You can specify a default transaction rate limit configuration for all other clients that are not explicitly configured. To create a transaction rate limit default for a group, follow these steps. 1. Enable privileged EXEC mode. Virtual ADX> enable 2. Enter global configuration mode. Virtual ADX# configure terminal 3. Specify name of transaction rate limit rule set and enter client transaction rate limit configuration mode.
Transaction rate limit 1 NOTE If you configure the hold-down-time keyword with a value of 0, the incoming request is not held down. Instead, it generates a syslog message with the source and destination IP addresses so that you can passively observe if the transaction count exceeds a specified threshold value rate limit. 5. The transaction rate limit policy pertaining to the protocol and the port must be applied to either the physical or the virtual interface for pass through traffic.
1 Transaction rate limit Applying policy on virtual interface Virtual ADX(config)# interface ve 20 Virtual ADX(config-vif-20)# ip udp trans-rate 53 Syntax: [no] ip tcp | udp trans-rate ports Syntax: [no] ip icmp trans-rate The ports parameter specifies one or more TCP or UDP ports to monitor. You can monitor up to four ports. Deleting all TRL rules in a policy You can delete all TRL rules in a policy as shown.
Transaction rate limit 1 Changing the maximum number of rules globally You can change the maximum number of TRL rules globally on a Brocade Virtual ADX for all policies as shown. Virtual ADX(config)# client-trans-rate-limit max-ipv4-rules 50 Syntax: [no] client-trans-rate-limit { max-ipv4-rules | max-ipv6-rules } rules-count The max-ipv4-rules parameter specifies that the rules limit is being set for IPv4 rules. The max-ipv6-rules parameter specifies that the rules limit is being set for IPv6 rules.
1 Transaction rate limit NOTE Where the storage of TRL rules on the internal USB drive of a Brocade Virtual ADX is disabled and the total rules exceeds 50, only 50 rules would be saved in startup-config. Configuring transaction rate limit rule names and traffic types Use the client-trans-rate-limit command in the global configuration mode to configure a transaction rate limit rule name and traffic type.
Transaction rate limit 1 Global TRL If TRL per client subnet is not needed, Global TRL can be used to create a configuration to apply to all the incoming traffic. Use the ip [tcp | udp | icmp] trans-rate command to enable TRL on the Brocade Virtual ADX for TCP, UDP, or ICMP traffic. If any more than a specified number packets per second come from the same IP address over a specified interval, then all traffic from that IP address is held down for a specified number of minutes.
1 Transaction rate limit Displaying TRL rules in a policy You can display TRL rules in a policy as shown. Virtual ADX#show client-trl trl-policy1 ipv6 40 Max Count: 2500 Total Count: 2 IP address/Mask --------------2001:db8::3a95/128 2001:db8::3a96/128 interval -------1 66 attempts -------67 38 holddown -------93 34 Syntax: show client-trl policy-name { ipv4 | ipv6} index The policy-name variable specifies the TRL policy that you want to display rules for.
DNS-DPI Attack Protection 1 DNS-DPI Attack Protection The Brocade Virtual ADX can be configured to provide DNS attack protection to VIP traffic. This protection is provided by performing a deep packet scan and then classifying DNS requests based on the following: query type, query name, RD flag or the DNSSEC OK bit in the EDNS0 header.
1 DNS-DPI Attack Protection • When multiple queries are in a single DNS packet, only first RR will be processed. • There is no CSW DNS rule to identify DNS Root requests. Configuring DNS attack protection Configuring DNS attack protection involves the following steps: 1. Create DNS DPI rules. In this step you specify the filtering parameters under a rule. A packet must match all of the filtering parameters defined under a rule to match the rule. 2. Create a DNS DPI policy and bind the rules to it.
DNS-DPI Attack Protection 1 The name variable specifies the name of the DNS query type to match on. Syntax: query-rd-flag { on | off } The on parameter is matched if the RD flag is set in the packet. The off parameter is matched if the RD flag is not set in the packet. Syntax: query-dnssec-ok { on | off } The on parameter is matched if the DNSSEC bit is set in the packet. The off parameter is matched if the DNSSEC bit is not set in the packet.
1 DNS-DPI Attack Protection NOTE A maximum of 255 DNS policies can be configured on a Brocade Virtual ADX. Also, the total number of rules that can be bound to a single policy is 512 and the global limit for binding rules to a policy is 2500. For example, if you bind 500 rules to each of 5 policies you will reach 2500 which is the global limit for binding rules to a policy.
DNS-DPI Attack Protection 1 You can bind a DNS DPI policy to a virtual port as shown. Virtual ADX(config)#server virtual vip1 10.120.62.53 Virtual ADX(config-vs-vip1)#port dns csw-policy DNSpolicy1 Virtual ADX(config-vs-vip1)#port dns csw Syntax: [no] port dns csw-policy policy-name The policy-name variable specifies the name of the policy to be bound to a virtual port. Syntax: [no] port dns csw This command enables DNS content switching.
1 DNS-DPI Attack Protection Displaying DNS attack protection information The following information can be displayed regarding DNS attack protection. • DNS DPI policy counters • IP addresses held down by a rate limit action Displaying DNS DPI policy counters DNS DPI policy counters can be displayed for a specified DNS policy as shown.
Rate Limiting Feature on a Brocade Virtual ADX 1 Rate Limiting Feature on a Brocade Virtual ADX The rate limiting feature for CPU protection is supported with the Brocade Virtual ADX software release 3.0.00. NOTE Reference the topic on “Rate Limiting” in the Brocade Virtual ADX Switch and Router Guide for more information on the feature and how to configure it.
1 24 Rate Limiting Feature on a Brocade Virtual ADX Brocade Virtual ADX Security Guide 53-1003250-01
Chapter Access Control List 2 How the Brocade Virtual ADX processes ACLs This chapter describes the Access Control List (ACL) feature. ACLs allow you to filter traffic based on the information in the IP packet header. You can use IP ACLs to provide input to other features such as distribution lists and rate limiting. When you use an ACL this way, use permit statements in the ACL to specify the traffic that you want to send to the other feature.
2 Default ACL action Default ACL action The default action when no ACLs is configured on a device is to permit all traffic. However, once you configure an ACL and apply it to a port, the default action for that port is to deny all traffic that is not explicitly permitted on the port: • If you want to tightly control access, configure ACLs consisting of permit entries for the access you want to permit. The ACLs implicitly deny all other access.
Configuring numbered and named ACLs 2 Support for up to 4096 ACL entries You can configure up to 4096 ACL entries on devices that have enough space to hold a startup-config file that contains the ACLs. To configure the maximum ACL rule limit of 4096 ACL rules, the following must be set: 1. The system-max ip-filter-sys command must be set to 4096. Virtual ADX (config)#system-max ip-filter-sys 4096 2. Execute the write memory command to save the running configuration to the startup-config. 3.
2 Configuring numbered and named ACLs The commands in this example configure an ACL to deny packets from three source IP addresses from being forwarded on port 1/1. The last ACL entry in this ACL permits all packets that are not explicitly denied by the first three ACL entries.
Configuring numbered and named ACLs 2 The host source-ip | hostname parameter lets you specify a host IP address or name. When you use this parameter, you do not need to specify the mask. A mask of all zeros (0.0.0.0) is implied. The any parameter configures the policy to match on all host addresses. The in parameter specifies whether the ACL applies to incoming traffic on the interface to which you apply the ACL. You can apply the ACL to an Ethernet port.
2 Configuring numbered and named ACLs Virtual ADX Virtual ADX Virtual ADX Virtual ADX 10.157.22.1 Virtual ADX Virtual ADX (config)#access-list (config)#access-list (config)#access-list (config)#access-list 102 102 102 102 perm deny deny deny icmp 10.157.22.0/24 10.157.21.0/24 igmp host rkwong 10.157.21.0/24 igrp 10.157.21.0/24 host rkwong ip host 10.157.21.
Configuring numbered and named ACLs Virtual Virtual Virtual Virtual Virtual Virtual ADX ADX ADX ADX ADX ADX 2 (config)#int eth 2/1 (config-if-2/1)#ip access-group 103 in (config-if-2/1)#exit (config)#int eth 2/2 (config-if-2/2)#ip access-group 103 in (config)#write memory Extended ACL syntax Use the following syntax for configuring extended numbered ACLs.
2 Configuring numbered and named ACLs NOTE If you use the CIDR format, the ACL entries appear in this format in the running-config and startup-config files, but are shown with subnet mask in the display produced by the show ip access-list command. The destination-ip | hostname variable specifies the destination IP host for the policy. If you want the policy to match on all destination addresses, enter any. The icmp-type | icmp-num variable specifies the ICMP protocol type.
Configuring numbered and named ACLs 2 • range – The policy applies to all TCP or UDP port numbers that are between the first TCP or UDP port name or number and the second one you enter following the range parameter. The range includes the port names or numbers you enter. For example, to apply the policy to all ports between and including 23 (Telnet) and 53 (DNS), enter the following: range 23 53. The first port number in the range must be lower than the last number in the range.
2 Configuring numbered and named ACLs • min-monetary-cost or 1 – The ACL matches packets that have the minimum monetary cost ToS. The decimal value for this option is 10. NOTE This value is not supported on 10 Gigabit Ethernet modules. • normal or 0 – The ACL matches packets that have the normal ToS. The decimal value for this option is 0. • num – A number from 0 – 15 that is the sum of the numeric values of the options you want.
Configuring numbered and named ACLs Virtual Virtual Virtual Virtual Virtual Virtual Virtual Virtual ADX ADX ADX ADX ADX ADX ADX ADX 2 (config)#ip access-list standard Net1 (config-std-nacl)#deny host 10.157.22.26 log (config-std-nacl)#deny 10.157.29.12 log (config-std-nacl)#deny host IPHost1 log (config-std-nacl)#permit any (config-std-nacl)#exit (config)#int eth 1/1 (config-if-1/1)#ip access-group Net1 in The commands in this example configure a standard ACL named “Net1”.
2 Configuring numbered and named ACLs Displaying ACL definitions To display the ACLs configured on a device, use the show ip access-lists command. Here is an example. Virtual ADX (config)#show ip access-lists Extended IP access list 101 deny tcp host 10.157.22.26 host 10.157.22.26 eq http Syntax: show ip access-lists [num] The show access-list and show ip access-list commands have been updated to display ACL entries with line numbers.
Configuring numbered and named ACLs 2 permit any If you want to display ACL entries beginning with the entry that contains the keyword “5” enter the following command. Virtual ADX Standard IP permit host permit host permit any (config)#show access-list 99 | begin 5 access-list 99 10.6.7.8 10.10.11.12 Since the second entry is the first entry that contains the keyword “5”, the display begins with line 10.
2 Configuring numbered and named ACLs If you want to display ACL entries beginning with the entry that contains the keyword “5” enter the following command. Virtual ADX Standard IP permit host permit host permit any (config)#show access-list melon | begin 5 access-list melon 10.6.7.8 10.10.11.12 Since the second entry is the first entry that contains the keyword “5”, the display begins with line 10. If you want to display only the ACL entries that contain the keyword “5” enter the following command.
Modifying ACLs 2 To show all entries containing the keyword “deny” you obtain the following output: Virtual ADX (config)#show access-list 99 | include deny Standard IP access-list 99 ACL Remark: Deny Building A deny host 10.2.3.4 deny host 10.10.11.12 NOTE All lines with the keyword “deny”, including remarks are included in the display. Modifying ACLs When you use the Brocade Virtual ADX device’s CLI to configure any ACL, the software places the ACL entries in the ACL in the order you enter them.
2 Modifying ACLs no access-list 1 no access-list 101 When you load the ACL list into the device, the software adds the ACL entries in the file after any entries that already exist in the same ACLs. Thus, if you intend to entirely replace an ACL, you must use the no access-list num command to clear the entries from the ACL before the new ones are added. 3. Place the commands to create the ACL entries into the file.
Displaying a list of ACL entries 2 Displaying a list of ACL entries The show access-list and show ip access-list commands displays ACL entries with line numbers. Numbered ACLs To display the contents of numbered ACLs, enter a command such as the following. Virtual ADX #show access-list 99 Standard IP access list 99 deny host 10.2.4.5 deny host 10.6.7.8 permit any Syntax: show access-list acl-num | all Named ACLs To display the contents of named ACLs, enter a command such as the following.
2 ACL logging To reapply ACLs following an ACL configuration change, enter the following command at the global CONFIG level of the CLI. Virtual ADX (config)#ip rebind-acl all Syntax: [no] ip rebind-acl num | name | all ACL logging You may want the software to log entries for ACLs in the syslog. This section present the how logging is processed by ACLs. You can globally disable ACL logging without the need to remove the log option from each ACL entry.
ACL logging 2 NOTE For an ACL entry to be eligible to generate a Syslog entry for permitted or denied packets, logging must be enabled for the entry. The Syslog contains entries only for the ACL entries that deny packets and have logging enabled. To display Syslog entries, enter the following command from any CLI prompt.
2 Dropping all fragments that exactly match an ACL ETH PORT ICMP inbound packets received 400 ICMP inbound packets permitted 200 ICMP inbound packets denied 200 Syntax: show ip acl-traffic The command lists a separate set of statistics for each of the following IP protocols: • • • • • • • • ICMP IGMP IGRP IP OSPF TCP UDP Protocol number, if an ACL is configured for a protocol not listed above For TCP and UDP, a separate set of statistics is listed for each application port.
ACLs and ICMP 2 The commands in this example deny (drop) ICMP echo request packets that contain a total length of 92 or 100 in the IP header field. You can specify an IP packet length of 1 – 65535. Refer to the section “ICMP filtering with flow-based ACLs” on page 45 for additional information on using ICMP to filter packets.
2 ACLs and ICMP Named ACLs For example, to deny the administratively-prohibited message type in a named ACL, enter commands such as the following.
ACLs and ICMP TABLE 2 2 ICMP message types and codes (Continued) ICMP message type Type Code host-redirect 5 1 host-tos-redirect 5 3 host-tos-unreachable 3 12 host-unreachable 3 1 information-request 15 0 mask-reply 18 0 mask-request 17 0 net-redirect 5 0 net-tos-redirect 5 2 net-tos-unreachable 3 11 net-unreachable 3 0 packet-too-big 3 4 parameter-problem 12 0 port-unreachable 3 3 precedence-cutoff 3 15 protocol-unreachable 3 2 reassembly-timeout 11
2 Displaying ACL bindings Displaying ACL bindings You can display which ACLs (IPv4 and IPv6) are bound to which interfaces as shown in the following.
Chapter IPv6 Access Control Lists 3 IPv6 ACL overview Brocade Virtual ADX supports IPv6 access control lists (ACLs). The maximum number of ACL entries you can configure is a system-wide parameter and depends on the device you are configuring. You can configure up to the maximum number of 1024 entries in any combination in different ACLs.
3 IPv6 ACL overview NOTE TCP and UDP filters will be matched only if they are listed as the first option in the extension header. For TCP and UDP, you also can specify a comparison operator and port name or number. For example, you can configure a policy to block web access to a specific website by denying all TCP port 80 (HTTP) packets from a specified source IPv6 address to the website’s IPv6 address.
IPv6 ACL overview 3 Here is another example of commands for configuring an ACL and applying it to an interface.
3 IPv6 ACL overview Virtual ADX(config)#sh ipv6 access-list rtr ipv6 access-list rtr: 3 entries deny tcp 2001:db8:1570:21::/24 2001:db8:1570:22::/24 deny udp any range 5 6 2001:db8:1570:22::/24 permit ipv6 any any The following commands apply the ACL rtr to the incoming traffic on ports 2/1 and 2/2.
IPv6 ACL overview 3 Furthermore, if you add the statement deny icmp any any in the access list, then all neighbor discovery messages will be denied. You must explicitly enter the permit icmp any any nd-na and permit icmp any any nd-ns statements just before the deny icmp statement if you want the ACLs to permit neighbor discovery as in the following example.
3 IPv6 ACL overview TABLE 3 54 Syntax descriptions (Continued) Arguments... Description... protocol The type of IPv6 packet you are filtering. You can specify a well-known name for some protocols whose number is less than 255. For other protocols, you must enter the number. Enter “?” instead of a protocol to list the well-known names recognized by the CLI.
IPv6 ACL overview TABLE 3 3 Syntax descriptions (Continued) Arguments... Description... host Allows you specify a host IPv6 address. When you use this parameter, you do not need to specify the prefix length. A prefix length of all128 is implied. tcp-udp-operator The tcp-udp-operator variable can be one of the following: eq – The policy applies to the TCP or UDP port name or number you enter after eq.
3 Using an ACL to restrict SSH access Virtual ADX#show ipv6 access-list ipv6 access-list v6-acl1: 1 entries deny ipv6 any any ipv6 access-list v6-acl2: 1 entries permit ipv6 any any ipv6 access-list v6-acl3: 2 entries deny ipv6 2001:db8:aa:10::/64 any permit ipv6 any any ipv6 access-list v6-acl4: 2 entries deny ipv6 2001:db8:aa::/64 any permit ipv6 any any ipv6 access-list v6-acl5: 6 entries permit tcp 2001:db8:bb::/64 any permit ipv6 2001:db8:bb::/64 any permit ipv6 2001:db8:aa:101::/64 any permit ipv6 2
Using an ACL to restrict Telnet access 3 Using an ACL to restrict Telnet access To configure an ACL that restricts Telnet access to an IPv6 device, first create the named ACL with the ACL statements.
3 58 Using an ACL to restrict Telnet access Brocade Virtual ADX Security Guide 53-1003250-01
Chapter Network Address Translation 4 Introduction Network Address Translation (NAT) translates one IP address into another. For example, it translates an internal private IP address (nonregistered) into an external unique IP address (registered) used on the Internet. FIGURE 2 Mapping an internal address to an external address NAT also provides a more graceful renumbering strategy for organizations changing service providers or voluntarily renumbering into Classless Interdomain Routing (CIDR) blocks.
4 Configuring NAT Configuring NAT The following types of NAT are supported: • Static NAT — Maps a specific global IP address (Internet IP address) with a specific private address. Static translation ensures the software always maps the same public address to a given private address. For example, you can map 10.1.1.1 to 192.168.1.1. Use static NAT when you want a specific host in the private network to always use the same Internet address when communicating outside the private network.
Configuring NAT 4 The priority variable specifies a value of 1 or 2 and enables static NAT redundancy. A value of 2 means higher priority, and will be the owner of the NAT IP as long as the system is up. The list parameter specifies the access list identified by the acl-id variable that will permit only the configured TCP or UDP port numbers.
4 Configuring NAT Associating a range of private addresses with a pool and enabling PAT Use ip nat inside source list to associate a private address range with a pool of Internet addresses and enable PAT. For an example, refer to “Dynamic NAT configuration example 1” on page 62. Syntax: [no] ip nat inside source list acl-id pool pool-name The inside source keyword specifies that the translation applies to private addresses sending traffic to the Internet (inside source).
Configuring NAT 4 The Brocade Virtual ADX is connected to the Internet through a router. The outside interface of the Brocade Virtual ADX has a global IP address of 192.168.1.1. The Brocade Virtual ADX also has a pool of global IP addresses, which are used to map internal IP addresses. Minimum required commands for dynamic NAT configuration. 1. Identify an internal and external interface on the Brocade Virtual ADX. In this example, Ethernet 2 and 1 are used. int eth 2 int eth 1 2.
4 Configuring NAT Dynamic NAT configuration example 2 In the following example, the Brocade Virtual ADX is configured to translate inside hosts in the 10.20.0.0 network to unique global addresses in the 192.168.15.15/24 network. FIGURE 4 Example of a dynamic NAT configuration - translating inside host addresses to unique pool addresses This example requires that Interfaces 1and 2 be configured as Inside and Outside interfaces respectively as shown.
Configuring NAT 4 Static NAT configuration example The following examples describe how to configure a Static NAT configuration for Inside to Outside and Outside to Inside translation for the example shown in Figure 5. FIGURE 5 Example of a static NAT configuration using router code Configured for inside to outside translation In the following example, the Brocade Virtual ADX is configured to translate the local host IP address 10.20.5.6 to the unique global address 192.168.15.15.
4 PAT Configured for outside to inside translation To configure the network shown in Figure 5 for Outside to Inside translation the only requirement is that the Interface configured as an Outside interface must be configured with an additional IP address in the 192.168.15.0/24 network as shown in the following. Virtual Virtual Virtual Virtual ADX(config)#interface ethernet 2 ADX(config-if-e10000-2)#ip address 192.168.0.1 255.255.0.0 ADX(config-if-e10000-2)#ip address 192.168.15.100 255.255.0.
Translation timeouts 4 Translation timeouts The NAT translation table contains all the currently active NAT translation entries on the device. An active entry is one the Brocade Virtual ADX creates for a private address when the client at that address sends traffic. NAT performs the following steps to provide an address translation for a source IP address: • NAT looks in the translation table for an active NAT entry for the translation.
4 Stateless static IP NAT The icmp-timeout keyword indicates timeout for NAT ICMP flows. The syn-timeout keyword indicates timeout for NAT TCP flows after a SYN. The tcp-timeout keyword indicates dynamic entries that use PAT based on TCP port numbers. The default is 120 seconds. This timer applies only to TCP sessions that do not end “gracefully”, with a TCP FIN or TCP RST. The udp-timeout keyword indicates dynamic entries that use PAT based on UDP port numbers. The default is 120 seconds.
Displaying NAT information 4 Syntax: [no] ip nat [inside | outside] The inside parameter configures the interface as an IP NAT inside interface. The outside parameter configures the interface as an IP NAT outside interface. Displaying NAT information The following sections describe how to display NAT information. Displaying NAT statistics To display NAT statistics, enter commands such as the following.
4 Displaying NAT information Dynamic mappings: pool p1: prefix_len= 24 start 192.168.15.15 end 192.168.15.
Displaying NAT information TABLE 4 4 Display fields for show ip nat statistics (Continued) This field... Displays... nat tcp rev ip status zero Indicates the number of times that an error in NAT translation for TCP reverse traffic has occurred. nat tcp rev usr index null Indicates the number of times that a “port unreachable” message was generated because the Brocade Virtual ADX could not create a user session for TCP reverse traffic.
4 Displaying NAT information TABLE 4 Display fields for show ip nat statistics (Continued) This field... Displays... h The value following "h:" refers to the head of the port pool for the IP address in the IP NAT pool. The head indicates the location in the port pool where the next port will be allocated from. t The value following "t:" refers to the tail of the port pool for the IP address in the IP NAT pool. The tail indicates the location in the port pool where the next port will be freed from.
Clearing NAT entries from the table 4 Clearing NAT entries from the table Use the clear ip nat command to manually clear entries from the NAT table. Syntax: clear ip nat protocol inside global-ip global-port private-ip local-port The protocol parameter specifies the protocol type and can be tcp or udp plus its global or local port number. To clear a specific NAT entry based on the private and global IP addresses, enter the command such as the following. Virtual ADX#clear ip nat inside 192.168.1.43 10.10.
4 74 Clearing NAT entries from the table Brocade Virtual ADX Security Guide 53-1003250-01
Chapter Syn-Proxy and DoS Protection 5 Understanding Syn-Proxy Syn-Proxy™ allows TCP connections to be terminated on the Brocade Virtual ADX. When Syn-Proxy is enabled, the Brocade Virtual ADX completes the three-way handshake with a connecting client. Only when the three-way handshake is completed does the Brocade Virtual ADX establish a connection with the destination server and forward packets from the client to the server. In a TCP SYN attack, the attacker floods a host with TCP SYN packets.
5 Configuring Syn-Proxy NOTE In a syn-proxy configuration for a local client, if an ARP entry for the client is not stored, the first TCP connection may need to retransmit none-syn packets since it may get dropped until the Brocade Virtual ADX stores an ARP entry for the client. There will only be a performance impact for the very first connection. NOTE DSR is not supported with SYN-proxy and is supported with SYN-def. Enabling SYN-Proxy To activate Syn-Proxy, follow these steps: 1.
Configuring Syn-Proxy 5 Setting SYN-Ack-Window-Size To globally set the TCP window size that the Brocade Virtual ADX uses on a SYN-ACK packet sent back to a client with SYN-Cookie, use the following command: Virtual ADX(config)#server syn-proxy-syn-ack-window-size 5000 Syntax: [no] server syn-proxy-syn-ack-window-size value The value variable is the window size. The range from 1 to 65535. The default is 8192. This command works with a syn-proxy configuration.
5 Configuring Syn-Proxy Retransmitting the SYN to the server in this way allows the server to respond in case the initial SYNs sent by the Brocade Virtual ADX are lost, without having to reset the connection with the client. The Brocade Virtual ADX can retransmit SYNs for up to 65,536 pending connections concurrently. This functionality is enabled by default when you enable syn-proxy. No CLI configuration is necessary. The output of show tcp-attack displays information about SYN retransmissions.
Configuring Syn-Proxy 5 Dropping ACK packets with no data This feature applies where Syn-Proxy is enabled. Configuring this feature causes ACK packets with no data to be dropped after the Brocade Virtual ADX responds with a SYN-ACK to the client SYN. An ACK packet with data is forwarded to the BP and processed by the BP. This feature is enabled with the following command. Virtual ADX(config)#server virtual-name-or-ip www.example1.com 10.95.55.1 Virtual ADX(config-vs-www.example1.
5 Configuring Syn-Proxy 3. Global level – Values configured at this level take effect over all SYN-ACK packets generated by a Brocade Virtual ADX unless the MSS value is configured at one of the levels previous described in 1, 2 or 3.
Configuring Syn-Proxy 5 The mss-value variable specifies MSS value for all SYN-ACK packets generated by the Brocade Virtual ADX for the port specified by the port-value variable regardless of the client MSS value. This value can be from 64 to 9216. Make sure that the IP MTU of the interfaces is always greater than the MSS value.
5 Configuring Syn-Proxy 1. Set the SYN-Proxy auto control threshold levels – This procedure described in “Setting the SYN-Proxy auto control thresholds” on page 82, sets the thresholds for enabling and disabling Syn-Proxy during operation of the Brocade Virtual ADX. 2. Set the interval time for counting TCP SYN packets – This procedure described in “Setting the interval time for counting TCP SYN packets” on page 83, sets the time period over which the thresholds set in Step 1 are evaluated. 3.
5 Configuring Syn-Proxy Setting the interval time for counting TCP SYN packets The rate at which Syn-proxy is enabled and disabled is determined by the thresholds set in the ip tcp syn-proxy on-threshold on-threshold-value off-threshold off-threshold-value command over the time period specified in the server syn-attack-detection-interval command. This interval is configured on the Brocade Virtual ADX as shown in the following.
5 Configuring Syn-Proxy Displaying Server Traffic information The show server traffic command displays four counters that help to analyze incoming traffic and determine the DOS attack occurrence. Be sure to issue show Layer 4 traffic from the SSM CPU (not the MP).
5 DDoS protection Displaying SYN Cookie Information This show server syn-cookie command displays information about the SYN ACKs that are sent and received.
5 DDoS protection • • • • • “Configuring a rule for ip-option attack types” on page 89 “Configuring a rule for icmp-type options” on page 90 “Configuring a rule for IPv6 ICMP types” on page 92 “Configuring a rule for IPv6 ext header types” on page 92 “Binding the filter to an interface” on page 93 Configuring a security filter Configuring a a security filter requires you to define it by name and configure rules within it as shown in the following.
DDoS protection • • • • • gt greater-than gteq greater-than-or-equals lt less-than lteq less-than-or-equals neq not-equals 5 The configured generic rule will have to be bound to a filter, to take effect.
5 DDoS protection The log parameter directs the Brocade Virtual ADX to log traffic on the bound interface that matches the rule specified by the configured rule-name. The no-log parameter disables this function. The drop parameter directs the Brocade Virtual ADX to drop traffic on the bound interface that matches the rule specified by the configured rule-name. The no-drop parameter disables this function.
DDoS protection TABLE 10 5 Rules for common attack types and descriptions (Continued) Attack Type Description address-sweep dest-ip hold-down-interval Attacker scans the network for information behind the Brocade Virtual ADX, uncovering an address to target. For example, sending ping requests to 10.1.1.1 through 100. A reply from any device indicates a server exists. Use address-sweep dest-ip hold-down-interval to log the number of different addresses being accessed from one remote source.
5 DDoS protection The log parameter directs the Brocade Virtual ADX to log traffic on the bound interface that matches the rule specified by the configured ip-option-attack variable. The no-log parameter disables this function. The drop parameter directs the Brocade Virtual ADX to drop traffic on the bound interface that matches the rule specified by the configured ip-option-attack variable. The no-drop parameter disables this function.
DDoS protection 5 The drop parameter directs the Brocade Virtual ADX to drop traffic on the bound interface that matches the rule specified by the configured icmp-type. The no-drop parameter disables this function.
5 DDoS protection Configuring a rule for IPv6 ICMP types Brocade Virtual ADX has a set of built-in rules to manage IPv6 icmp types. In this case, the rule command is used with a icmp-option variable specified in Table 13. The following example configures the "filter4" security filter with a rule to drop packets that contains the icmpv6-option type echo-reply.
DDoS protection 5 Virtual ADX(config)#security filter filter5 Virtual ADX(config-sec-filter5)#rule ipv6-ext-header-type esp drop Syntax: [no] rule ipv6-ext-header-type pv6-ext-header-type [log | no-log] [drop | no-drop] The ipv6-ext-header-type variable is specified as one of the options described in Table 14. The log parameter directs the Brocade Virtual ADX to drop traffic on the bound interface that matches the rule specified by the configured ipv6-ext-header-type.
5 DDoS protection Clearing all DDOS Filter & Attack Counters Use security clear all-dos-filter-counters to reset all DDOS Filter and Attack Counters. Syntax: security clear all-dos-filter-counters Logging for DoS attacks Use the show log command to display the logging information and notice the attack type hits. For each log event taking place for software rules, the Brocade Virtual ADX sends a syslog message and an SNMP trap.
DDoS protection 5 Displaying security filter statistics You can display security filter statistics as shown.
5 96 DDoS protection Brocade Virtual ADX Security Guide 53-1003250-01
Chapter Secure Socket Layer (SSL) 6 Introduction Brocade Virtual ADX supports integrated software-based SSL. This chapter describes how to configure a Brocade Virtual ADX for SSL in SSL Termination mode. SSL support on the Brocade Virtual ADX includes support for SSLv2, SSLv3, and TLS1.0. SSL overview The Secure Sockets Layer (SSL) protocol was developed by Netscape to provide security and privacy between client and server over the Internet.
6 SSL overview Asymmetric cryptography This method alters information so that the key used for encryption is different from the key used for decryption. Encrypted information is unintelligible to unauthorized parties. Certificate authority The certificate authority (CA) issues and manages security credentials and public keys for message encryption within a network.
SSL on the Brocade Virtual ADX 6 Public key The other half of a key pair, a public key is held in a digital certificate. Public keys are usually published in a directory. Any public key can encrypt information; however, data encrypted with a specific public key can only be decrypted by the corresponding private key. NOTE We recommend that you always back up your SSL certificate keys. These keys may be lost in the event of module failure.
6 SSL on the Brocade Virtual ADX Brocade Virtual ADX SSL This section describes the SSL features used in configuration of a Brocade Virtual ADX for SSL. Brocade Virtual ADX keypair file The keypair file specifies the location for retrieving the SSL asymmetric key pair, during an SSL handshake. You can create a keypair file by generating a key pair locally on the Brocade Virtual ADX or import a pre-existing key pair, using secure copy (SCP).
Configuring SSL on a Brocade Virtual ADX 6 Four level chain CA ---> 1st level Intermediate CA ---> 2nd level Intermediate CA ---> server certificate The end clients, including Mozilla, Firefox and Internet Explorer, always have a copy of the well-known parent CA's certificate. They, however, may not have the intermediate CA's certificates.
6 Configuring SSL on a Brocade Virtual ADX NOTE The Brocade Virtual ADX does not support key strength greater than 2048 bits. The password variable specifies the password to the file. The length of password should not exceed 64 characters. Once a key pair is generated it can be saved for backup on your server by exporting it as described in “Importing keys and certificates” on page 109.
Configuring SSL on a Brocade Virtual ADX 6 The password variable is the password that is used to store this certificate. The cert-name variable is the filename used to store the generated certificate. This file name can contain a maximum of 32 characters. NOTE To generate a self-signed certificate, the certkey and sign key must be the same.
6 Configuring SSL on a Brocade Virtual ADX -----BEGIN CERTIFICATE----MIIDKTCCApKgAwIBAgIRAJoKUHAGHghM4kW84LNXP1wwDQYJKoZIhvcNAQEFBQAw ZDETMBEGCgmSJomT8ixkARkWA29yZzEYMBYGCgmSJomT8ixkARkWCGpvbmRhdmlz MQ0wCwYDVQQKEwRUQU1VMREwDwYDVQQLEwhTZWN1cml0eTERMA8GA1UEAxMIVW5k ZXJ0b3cwHhcNMDQwOTAyMTc1ODE3WhcNMDcwNzIzMTc1NzQxWjBkMRMwEQYKCZIm iZPyLGQBGRYDb3JnMRgwFgYKCZImiZPyLGQBGRYIam9uZGF2aXMxDTALBgNVBAoT BFRBTVUxETAPBgNVBAsTCFNlY3VyaXR5MREwDwYDVQQDEwhVbmRlcnRvdzCBnzAN BgkqhkiG9w0BAQEFAAOBjQAwgYkCgYEAyk4jxC526rUPrkYC1pL
Configuring SSL on a Brocade Virtual ADX 7. 6 In the Export File Format dialog box, choose.PFX. If the certificate has already been formatted, that format is selected as the default. Click Next. Do not select Delete the private key if export is successful, because this disables the SSL site that corresponds to the private key. 8. Continue to follow steps in the wizard, and enter a password for the certificate backup file when prompted.
6 Configuring SSL on a Brocade Virtual ADX 11. When prompted for the import password, enter the password you used when exporting the certificate to a PFX file. You should receive a message that says MAC verified OK. The resulting file contents will resemble the following: 1.3.6.1.4.1.311.17.
Configuring SSL on a Brocade Virtual ADX 6 Bag Attributes: subject=/DC=org/DC=test/O=root/OU=Security/CN=root issuer=/DC=org/DC=test/O=root/OU=Security/CN=root -----BEGIN CERTIFICATE----MIIC1TCCAj6gAwIBAgIQJhB5wR9FdbXPEWcLp/1MAjANBgkqhkiG9w0BAQUFADBm MRMwEQYKCZImiZPyLGQBGRYDb3JnMRgwFgYKCZImiZPyLGQBGRYIam9uZGF2aXMx EDAOBgNVBAoTB1Rla2VsZWMxETAPBgNVBAsTCFNlY3VyaXR5MRAwDgYDVQQDEwdU ZWtlbGVjMB4XDTA1MDQxOTAxMTk1OFoXDTA3MDgwNzE3NDM1OFowZjETMBEGCgmS JomT8ixkARkWA29yZzEYMBYGCgmSJomT8ixkARkWCGpvb
6 Configuring SSL on a Brocade Virtual ADX Converting certificate formats The Brocade Virtual ADX accepts server certificates in the PEM or PKCS12 format. The following sections describe how to convert between the two formats and from PFX to the two formats using OpenSSL. You can download a Win32 distribution of OpenSSL at the following location: http://gnuwin32.sourceforge.net/packages/openssl.htm Converting PEM to PKCS12 Use the open-source utility OpenSSL to perform the conversion from .PEM to .
Configuring SSL on a Brocade Virtual ADX 6 Converting a PFX file to a P12 file To convert a PFX file to a P12 file on a Windows machine, change the extension from .PFX to .P12. Converting a PFX file to a PEM file To convert a PFX file to a PEM file on a Windows machine, follow these steps: 1. If you do not have it installed, download and install the Win32 OpenSSL package from the URL described under “Converting certificate formats”. 2. Create a folder C:\certs and copy the file yourcert.
6 Configuring SSL on a Brocade Virtual ADX Windows users GUI-based SCP tools do not work in the current environment when you use SCP to transfer the certificate files to the Brocade Virtual ADX. Windows users should have PSCP, a free SCP utility based on putty SSH client. To access this Windows utility, use the following commands: C:\images>pscp first.cer admin@10.100.100.2:sslcert:bs:pem C:\images>pscp second.cer admin@10.100.100.
Configuring SSL on a Brocade Virtual ADX 6 After uploading the keypair file, the same file can be downloaded to a client with the following command: c:\ scp admin@ip_addr:sslkeypair:myrsakeys:brocade:pem myrsakeys.pem NOTE The downloaded file includes the following additional block of text at the end.
6 Configuring SSL on a Brocade Virtual ADX After transferring the file, it can be used both as a key and a certificate. To add the certificate file and keys to the profile, use the following commands: Virtual ADX(config-ssl-profile-mysslprofile)#keypair-file mypkcsfile Virtual ADX(config-ssl-profile-mysslprofile)#certificate-file mypkcsfile The show ssl cert command can be used to display a pkcs file. The show ssl key command does not display a pkcs file, but it does contain a keypair.
Configuring SSL on a Brocade Virtual ADX 6 Certificate verification Every certificate has two very important fields: issuer (issued-by) and subject (issued-to). A CA’s certificate has the same value in both fields, because the authority has issued a certificate to itself. However, when the authority issues a certificate to a server, the issuer field contains the CA's name, but the subject contains the server's name.
6 Configuring SSL on a Brocade Virtual ADX Chained certificate verification When the server certificate is not signed directly by the root CA, but signed by an intermediate CA, as shown in the following example, there are two possible scenarios. CA ----> intermediate CA ----> server certificate Client already has intermediate CA's certificate In the first scenario, there are NO additional requirements.
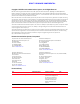
Configuring SSL on a Brocade Virtual ADX 6 Figure 8 shows the certificate fields. FIGURE 8 Certificate Fields There are two steps that will ensure that the chain is correct. 1. Verify that the issuer of the server certificate matches the subject of the intermediate CA's certificate. 2. Verify that the issuer of the intermediate CA's certificate has an entry in the client's trusted certificates. For the first step, you must convert the certificate chain to a readable format.
6 Configuring SSL on a Brocade Virtual ADX Virtual ADX#show ssl cert verisign128cert Certificate: Dat Version: lu (0xlx) Serial Number: 70:2b:a7:4b:07:ea:29:99:5a:dc:3f:6f:74:da:39:6d Signature Algorithm: sha1WithRSAEncryption Issuer: O=VeriSign Trust Network, OU=VeriSign, Inc., OU=VeriSign International Server CA - Class 3, OU=www.verisign.com/CPS Incorp.by Ref. LIABILITY LTD.
Configuring SSL on a Brocade Virtual ADX 6 Certificate: Dat Version: lu (0xlx) Serial Number: 25:4b:8a:85:38:42:cc:e3:58:f8:c5:dd:ae:22:6e:a4 Signature Algorithm: sha1WithRSAEncryption Issuer: C=US, O=VeriSign, Inc., OU=Class 3 Public Primary Certification Authority Validity Not Before: Apr 17 00:00:00 1997 GMT Not After : Oct 24 23:59:59 2011 GMT Subject: O=VeriSign Trust Network, OU=VeriSign, Inc., OU=VeriSign International Server CA - Class 3, OU=www.verisign.com/CPS Incorp.by Ref. LIABILITY LTD.
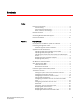
6 Configuring SSL on a Brocade Virtual ADX Find and match this certificate in the list of trusted root certificates from the client browser. Figure 9 shows the issuer certificate authority window. FIGURE 9 Issuer certificate authority Now the certificate chain is complete and the client browser will able to interpret it correctly. Let’s consider another example with four level chain. Here, the root certificate authority is called as "OS Level_0 CA".
Configuring SSL on a Brocade Virtual ADX 6 The certificate hierarchy is shown as follows: Level 0 (root) issuer : CN=OS Level_0 CA Subject : CN=OS Level_0 CA Level 1 (first intermediary: Issuer : CN=OS Level_0 CA Subject : CN=OS Level_1 CA Level 2 (Second intermediary:Issuer : CN=OS Level_1 CA Subject: CN=OS Level_2 CA Level 3 (Server Certificate)Issuer: CN=OS Level_2 CA Subject: CN=ServerCert by Level_2 VirtualADX#show ssl cert l4chaincert Certificate: Dat Version: lu (0xlx) Serial Number: 3 (0x00000003
6 Configuring SSL on a Brocade Virtual ADX *sX509v3 Certificate Policies: *sPolicy: 1.1.1.1.1 *sCPS: *sUser Notice: *sExplicit Text: *sX509v3 Issuer Alternative Name: *semail:root@s1.example4.com, URI:http://sq.example4.
Configuring SSL on a Brocade Virtual ADX 6 Exponent: lu IÕ8~0xlx) *s: *sX509v3 Basic Constraints: critical *sCA:TRUE *sX509v3 Key Usage: critical *sCertificate Sign, CRL Sign *sNetscape Cert Type: *sSSL CA, S/MIME CA, Object Signing CA *sNetscape CA Revocation Url: *s *sX509v3 Subject Key Identifier: *s *sX509v3 Authority Key Identifier: *skeyid:D6:D5:03:E1:B4:F0:0D:82:E9:AB:F0:4C:B2:FC:84:1B:82:18:8A:76 *sDirName:/CN=OS Level_0 CA *sserial:01 *sAuthority Information Access: *sCA Issuers - URI:http://s1.
6 Configuring SSL on a Brocade Virtual ADX Subject Public Key Info: Public Key Algorithm: rsaEncryption RSA Public Key: (2048 bit) Modulus (2048 bit): 00:a2:a9:48:46:79:dd:98:6b:9f:e9:77:b0:c7:eb: 37:ea:0a:7b:71:0d:5e:02:e6:d4:f7:1e:f2:9b:4f: 2d:f4:17:98:52:bc:13:5c:3b:83:84:f1:58:65:5b: db:73:1b:38:96:c9:11:11:ca:6e:92:3c:80:9b:25: 3d:5a:78:15:93:00:a9:b8:82:9e:35:d3:13:1e:55: 9f:4f:87:03:d6:63:df:41:bd:51:85:5d:ef:b3:aa: 08:d9:80:43:9d:40:05:ae:10:f4:a1:0d:2c:32:b0: d8:c5:50:59:65:01:a8:87:79:6e:f8:bf:6
Configuring SSL on a Brocade Virtual ADX 6 d3:c2:64:4d:24:41:5a:2c:17:3d:34:27:8b:0c:25:60:6b:3a: 86:f6:54:fc:8d:31:08:3b:dd:4c:cb:46:fb:47:a3:e4:23:3d: 82:33:84:d2:fb:81:05:61:95:09:98:a4:25:f0:55:eb:80:0c: 32:69:48:cf:41:7c:36:2d:d7:c0:02:79:a1:7b:4d:28:4c:84: 64:68:3c:8a:af:28:5f:f6:78:1e:31:d4:5a:2c:60:20:12:99: 5c:e3:df:59:01:79:7c:20:c8:f5:ab:75:e6:ab:db:de:2a:e7: be:4d:a1:9d:d5:5a:7c:9a:22:14:ca:7b:31:9d:48:d8:62:3a: ab:97:15:6b:4f:13:3e:35:c0:fb:82:57:20:e7:08:03:33:28: 19:20:16:24:28:98:d4:f7:cf:
6 Configuring SSL on a Brocade Virtual ADX • Symptom: The wrong format was specified when uploading the certificate. For example, the certificate was obtained in DER format but uploaded in PEM format. Solution: Display the certificate using the CLI to make sure it is readable.
Basic SSL profile configuration 6 Support for SSL renegotiation Some SSL application clients use renegotiation as a way within SSL protocols to change cipher specifications and redo the handshake. It has been found however that unsecure renegotiation is susceptible to Man-in-the-Middle attack.
6 Basic SSL profile configuration Syntax: keypair-file keypair-file-name The keypair-file-name variable is an ASCII string a keypair file that was generated using the genrsa command. Specifying a cipher suite By specifying cipher suites under an SSL profile, you can control the security strength of the SSL handshakes. The Brocade Virtual ADX can accept a new SSL handshake from the client only if the list of cipher suites presented by the client includes a cipher suite configured under the SSL profile.
Advanced SSL profile configuration 6 To configure this feature, use commands such as the following: Virtual Virtual Virtual Virtual ADX(config)#ssl profile sp1 ADX(config-ssl-profile-sp1)#cipher-suite rsa-with-aes-128-sha ADX(config-ssl-profile-sp1)#cipher-suite rsa-with-rc4-128-md5 ADX(config-ssl-profile-sp1)#cipher-suite rsa-with-rc4-128-sha Specifying a certificate file Each SSL profile must be associated with a certificate file that was either imported or self generated as described in “Chained cert
6 Advanced SSL profile configuration Enabling certificate verification The Brocade Virtual ADX can be optionally configured to enforce client certificate verification. When client certificate verification is configured, the Brocade Virtual ADX requires all clients to present their signed certificates. The certificates are compared against trusted CAs and a connection is allowed or denied.
Advanced SSL profile configuration 6 Virtual ADX(config)#ssl profile profile1 Virtual ADX(config-ssl-profile-profile1)#ca-cert-file certfile1 Syntax: ca-cert-file ca-certificate-filename The ca-certificate-filename variable specifies the name of the certificate file where a CA certificate is stored. Creating a certificate revocation list (CRL) Certificate revocation lists contain the list of certificates that have been revoked by a CA. A certificate can be revoked by a CA for many reasons.
6 Advanced SSL profile configuration NOTE To avoid “man-in-the-middle” attacks, where the CRL may be compromised while on the network, CRLs are digitally signed by the issuing CAs. For this reason, it is essential that the certificate of the CA that issues the CRL is present on the Brocade Virtual ADX when a client certificate is being checked for revocation.
Advanced SSL profile configuration 6 Enabling session caching Session caching or session reuse is a mode of operation in SSL where multiple SSL connections can share the same SSL session. A complete SSL handshake is done only for the first connection. All subsequent connections use the parameters negotiated in the first connection, for as long as the SSL session is cached. By default, session caching is turned off on the Brocade Virtual ADX.
6 Advanced SSL profile configuration Virtual ADX(config)#ssl profile profile1 Virtual ADX(config-ssl-profile-profile1)#enable-ssl-v2 Syntax: [no] enable-ssl-v2 SSLv2 is disabled by default. Enabling close notify You can configure a Brocade Virtual ADX to send an alert before closing an SSL session as shown in the following.
Configuring Real and Virtual Servers for SSL Termination Mode 6 Configuring Real and Virtual Servers for SSL Termination Mode When configuring a Brocade Virtual ADX for SSL Termination mode, the real and virtual servers need to be configured to support these features. The following sections describe the procedures and commands required. For a description of SSL Termination Mode, see “SSL Termination Mode” on page 99.
6 Configuration examples for SSL Termination Mode • An SSL port is defined on the virtual server vip2. • SSL Termination is enabled and the SSL profile ipv6_profile is specified on the virtual server vip2. • A bind is configured between SSL on virtual server vip2 and HTTP on real server rs2.
Configuration examples for SSL Termination Mode 6 State or province (full name) [California] California Locality name (city) [city]San Jose Organization name (Company name) [Brocade] Brocade Organizational unit name (department) [Web administration] Web Administration Common name (your domain name) [www.brocade.com] www.brocade.com Email address [webadmin@brocade.com] webadmin@brocade.
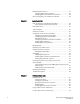
6 Configuration examples for SSL Termination Mode FIGURE 11 136 Client Capture Brocade Virtual ADX Security Guide 53-1003250-01
Configuration examples for SSL Termination Mode FIGURE 12 6 Server Capture In these examples, the HTTP GET requests are intentionally broken down into multiple parts. In real life, you may not see GET requests divided over multiple packets. These trace results indicate that there is degradation of performance when the Brocade Virtual ADX is configured for SSL terminate.
6 Configuration examples for SSL Termination Mode Resolution There two possible approaches to this problem. • Turn OFF delayed ACK on the server. To see how to modify or turn off delayed ACK on Windows 2003 servers, go to the following location: http://support.microsoft.com/default.aspx?scid=kb;en-us;823764 NOTE This method might not be the most satisfactory, as it involves changing the registry on the servers. • Turn OFF Nagle Algorithm on the Brocade Virtual ADX.
Configuration examples for SSL Termination Mode 6 Disabling Nagle’s Algorithm You can disable Nagle’s algorithm within a TCP profile as shown in the following example. Virtual ADX(config)#tcp profile tcpprofile1 Virtual ADX(config-tcp-profile-tcpprofile1)#nagle off Syntax: [no] nagle off Disabling the delayed ACK algorithm You can disable the delayed ACK algorithm within a TCP profile as shown in the following example.
6 Configuration examples for SSL Termination Mode Applying the TCP profile to VIP for SSL terminate When you apply the TCP profile on the VIP in an SSL terminate configuration, the profile is applied to the traffic between the Brocade Virtual ADX and the real server. In the following example, the TCP profile "nagleoff" is applied to the port ssl ssl-terminate command in the virtual server configuration.
Configuration examples for SSL Termination Mode 6 Define client certificate insertion mode and prefix The client certificate insertion mode and prefix can be optionally configured within a CSW policy as described in the following. To configure the client insertion mode, use the default rewrite request-insert command as shown.
6 Configuration examples for SSL Termination Mode Other protocols supported for SSL In addition to HTTPS, Brocade Virtual ADX SSL supports the following protocols: • LDAPS • POP3S • IMAPS The following example provides a configuration of SSL support for these protocols.
Configuration examples for SSL Termination Mode 6 Configuring SSLv2 connection rate You can configure the maximum connection rate for SSLv2, as shown in the following example. Virtual ADX(config)#ssl-v2-rate num-conn-per-sec Syntax: ssl-v2-rate num-conn-per-sec The num-conn-per-sec variable sets the maximum connections for SSLv2 allowed per second. Valid range: 16 to 256 Default: 100 NOTE The connection count for the SSLv2 rate includes only client-side connection in SSL-terminate mode.
6 SSL debug and troubleshooting commands Syntax: [no] system-max ssl-cert-count num-max-certs Syntax: [no] system-max ssl-keys num-max-keys The num-max-certs variable sets the maximum number of SSL certificates. The num-max-keys variable sets the maximum number of SSL keys. The minimum, maximum and default values for these settings are determined by the license that is active on your system. For actual values associated with your license, refer to the Brocade Virtual ADX Licensing Guide.
SSL debug and troubleshooting commands 6 Using Rconsole To access the display command that present this information, you must enter the BP console using the rconsole command as shown. Virtual ADX# rconsole 1 1 Syntax: rconsole slot bp The slot variable specifies the number of the slot that the ASM is installed in whose BP console you want to access. The bp variable specifies the number of the barrel processor whose BP console you want to access.
6 SSL debug and troubleshooting commands Displaying authentication statistics Use the show ssl authentication-stats command in rconsole mode to display authentication statistics about certificate verification on the Brocade Virtual ADX. This information is relevant in the case of client certificate verification (on the client side).
SSL debug and troubleshooting commands 6 Displaying SSL connection information Use the show ssl con command in rconsole mode to display SSL connection information as shown in the following.
6 SSL debug and troubleshooting commands Virtual ADX#show ssl crl crl-name (on MP) Output : URL : /temp.crl IP address : 192.168.5.16 CRL state : Download complete CRL size : 2029 bytes Expiry time : 1 hour Next download : After 1 hour and 9 minutes Virtual ADX3/1#show ssl crl crl-name (on BP) 3/1 #sh ssl crl crl1 Certificate Revocation List (CRL): Version lu (0xlx) Signature Algorithm: md5WithRSAEncryption Issuer: /C=BE/O=BELNET/OU=BEGrid/CN=BEGrid CA/emailAddress=gridca@belnet.
SSL debug and troubleshooting commands 6 Displaying SSL debug counters Use the show ssl debug command in the rconsole mode to display debug counters, as shown in the following.
6 SSL debug and troubleshooting commands The following example provides information about a specified key: "rsakey".
SSL debug and troubleshooting commands 6 The keyfile-name variable specifies a locally stored SSL key that you want to display information for. The * parameter displays a list of all locally stored SSL keys. Displaying an SSL profile The show ssl profile command allows you to display the configuration of a particular SSL profile or all configured SSL profiles. The following example displays all configured SSL profiles on a Brocade Virtual ADX.
6 SSL debug and troubleshooting commands Displaying the certificate bound to an SSL profile Use the show ssl profile cert command on the rconsole, as shown in the following, to display the certificate bound to a specified profile. This is useful when checking to see if a certificate is intact on the BPs.
SSL debug and troubleshooting commands 6 Private-Key: (1024 bit) modulus: 00:ac:6e:a1:3d:3c:0a:f3:df:e2:8d:b4:5e:d6:cb: 90:e3:96:87:2d:bc:aa:41:64:22:fa:ea:c2:86:d8: b1:bc:99:c5:c6:af:87:2d:d1:2b:89:b9:31:6f:9c: 35:03:86:9b:47:6d:82:a8:4f:88:07:dc:46:8a:87: 86:5c:cd:15:c6:3d:de:72:05:68:0b:50:b5:77:27: 9f:6c:33:a3:8b:2a:de:e6:f7:b3:f3:70:e6:b9:cc: 8d:4c:84:25:b7:2f:62:d6:76:ed:93:59:87:f7:4c: b1:99:23:f0:9f:d9:61:d3:e1:e7:40:a0:12:6a:1d: f5:20:b7:2e:2b:08:9e:80:c5 publicExponent: 00010001 (0x00010001) pri
6 SSL debug and troubleshooting commands Displaying SSL statistics information The following SSL statistics information is available from the BP console within the rconsole mode: • • • • SSL statistics alert information Decoded status counters of SSL alerts SSL decoded client site status counters SSL statistical counters To access the display command that present this information, you must enter the BP console using the rconsole command as shown in “Using Rconsole” on page 145.
SSL debug and troubleshooting commands 6 Displaying SSL decoded client site status counters Use the show ssl statistics client command in rconsole mode to display SSL decoded client site status counters as shown.
6 SSL debug and troubleshooting commands Displaying SSL statistics counters Use the show ssl statistics counters command in rconsole mode to display SSL statistical counters as shown.
SSL debug and troubleshooting commands 6 ASM SSL dump commands The following ASM SSL dump commands can be used for troubleshooting your Brocade Virtual ADX system. Because these commands are performance intensive, use discretion when using them within a production system. asm dm ssldump Use the asm dm ssldump command on the BP to display all transmit and receive SSL packets. Virtual ADX#rconsole 1 1 Virtual ADX1/1#asm dm ssldump SSL transmit and receive packets in on now 2/1 #1 135834ms 10.10.1.
6 SSL debug and troubleshooting commands asm dm ssldump both Use the asm dm ssldump both command on the BP to display both client and server SSL packets. Virtual ADX#rconsole 1 1 Virtual ADX1/1#asm dm ssldump both Debug both client and server packets Syntax: asm dm ssldump both asm dm ssldump client Use the asm dm ssldump client command on the BP to display client SSL packets only.
SSL debug and troubleshooting commands 6 asm dm ssldump mode detail Use the asm dm ssldump mode detail command on the BP to display SSL handshake packet detail information. asm dm ssldump mode decrypt Use the asm dm ssldump mode decrypt command on the BP to display SSL decrypted received packets only. asm dm ssldump receive Use the asm dm ssldump receive command on the BP to display received packets only.
6 Displaying socket information asm dm ssldump max Use the asm dm ssldump max count command to limit the number of packets logged on the console. Syntax: asm dm ssldump max count The default value is 50. Displaying socket information The following socket information is available from the BP console within the rconsole mode.
6 Displaying socket information Virtual ADX# rconsole 1 1 Virtual ADX1/1# show socket state Socket Layer: Total sockets : 65000 Max reached : 0 TCP Connection States: Listen SYN-sent Close-wait Closing FIN-wait-2 Open sockets : Sock mem alloc fail : 10611 0 : : : : : 2 353 1 0 0 SYN-rcvd Established FIN-wait-1 Last-Ack Time-wait : : : : : 1154 9101 0 0 0 ConnProxy (client) states: Total count : Wait connect : Wait reuse : In Use : Wait remote close : Wait free : 48000 0 0 3893 0 0 Used count Wai
6 Displaying socket information Virtual ADX#rconsole 1 1 Virtual ADX1/1#show tcp-ip buffer Total Free 32B 414696 146884 64B 30720 14332 128B 135168 107922 256B 69632 58092 512B 8192 6173 1KB 16384 16384 2KB 24576 24576 8KB 8192 8191 8.
Displaying socket information 6 Displaying TCP and IP statistics Use the show tcp-ip statistics command in rconsole mode to display TCP and IP statistics as shown in the following.
6 Displaying socket information Show SSL memory Use the show ssl mem command in rconsole mode to display SSL memory statistics as shown in the following. Virtual ADX#rconsole 1 1 Virtual ADX1/1#show ssl mem Total SSL Buffer Usage: Size: 32B 64B 128B 256B Free 23dc4 037fc 1a592 e2ec Used 41624 04004 06a6e 2d14 512B 181d 07e3 1K 2K 8K 8.
Appendix Acknowledgements A This appendix presents the acknowledgements for portions of code from various vendors that are included in the Brocade devices covered in this manual. OpenSSL license Copyright (c) 1998-2001 The OpenSSL Project. All rights reserved. 1. Redistribution and use in source and binary forms, with or without modification, are permitted provided that the following conditions are met: 2.
A Cryptographic software Cryptographic software This product includes cryptographic software written by Eric Young (eay@cryptsoft.com). This product includes software written by Tim Hudson (tjh@cryptsoft.com). Original SSLeay License Copyright (C) 1995-1998 Eric Young (eay@cryptsoft.com)/. All rights reserved. This package is an SSL implementation written by Eric Young (eay@cryptsoft.com). The implementation was written so as to conform with Netscape’s SSL.
Original SSLeay License A The license and distribution terms for any publicly available version or derivative of this code cannot be changed. i.e. this code cannot simply be copied and put under another distribution license [including the GNU Public License.
A 168 Original SSLeay License Brocade Virtual ADX Security Guide 53-1003183-03