
Installation Guide
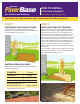


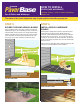

Base
Paver
BROCK
®
For all Patios and Walkways
The base is the most important step in your patio and walkway projects.
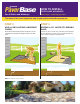
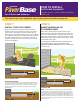
STEP 9
CLEAN THE SURFACE OF THE
PAVERS
MAKE SURE THE SURFACE OF THE PAVERS IS CLEAN!
Once you are done spreading the polymeric sand into the gaps,
use a leaf blower to blow the fine dust off the surface of your patio.
(You want to make sure you sweep it off well first or you will
generate a large dust cloud!) DO NOT WASH IT OFF WITH WATER!)
THAT COMES LATER. If the patio is not free of polymeric sand on
the surface of the pavers, you may see a film/haze on the pavers
once you follow step 9.
Once the surface of the patio is completely clean, follow the
instructions for wetting on the packaging of the polymeric sand.
This will entail lightly spraying the joint sand with water several
times which will activate the polymer that hardens the sand.
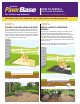
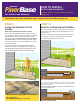
STEP 10
BACKFILL & FINISH NEW PATIO DESIGN
Since your new patio is by nature of a higher elevation than your old
concrete slab you must address the now exposed edge. There are a
few ways to do so.
The first is to back fill the area with topsoil that slowly tapers away
from the patio. You can then plant grass seed in the top soil and
have a finished yard right up to your new patio.
TOP SOIL OR GARDEN SOIL
MULCH OR LANDSCAPE ROCK
The second option is to install a short retaining or edger stone some distance from the
edge of your patio and install mulch in the area in-between to use as a planting bed to
further enhance you project.
FINAL IMAGE SHOWING THE EXPANDED PATIO WITH ALL THE COMPONENTS OF PATIO
PAVERS OVER A CONCRETE SLAB.
Now you can enjoy your new project!
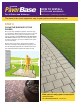
PROJECT QUESTIONS?
CALL TIM NEWTON ANYTIME AT: 813.431.8259
HOW TO INSTALL
PATIOS AND WALKWAYS
Concrete Overlay – (with or without expanding
project size)