P R E M I U M G R I LL S R3(N)-1, R3B(N)-1 R3 GRILL HEAD GAS-FIRED Page 1
IMPORTANT INFORMATION IMPORTANT This manual should be read thoroughly by the installer and by anyone who will use or maintain the grill. Installer - Write the model number, serial number, and date of installation in the manual. If available, attach a copy of the receipt. Leave this manual with the grill owner. Grill Owner - Read and retain this manual. It contains instructions on using and maintaining your grill, plus information on ordering replacements parts.
Thank you for purchasing a Broilmaster Infrared Grill. Broilmaster takes pride in its reputation as the The Most Durable Grill Known to Man. From its thick aluminum casting to its massive cooking grids, your Broilmaster is built to last. In fact we still make replacement parts for Broilmaster grills built more than 30 years ago. Thank You! Broilmaster is a registered trademark of Empire Comfort Systems, Inc. 918 Freeburg Ave.
TAble of Contents You have chosen the finest grill for your outdoor cooking pleasure. Please take time to read this entire manual before assembling your Broilmaster Infrared grill. ASSEMBLY INSTRUCTIONS......................................................................................................... 5 R3 SERIES PARTS DIAGRAM....................................................................................................... 6 GRILL HEAD HARDWARE PACK.................................................
ASSEMBLY INSTRUCTIONS BEFORE YOU BEGIN This Grill Head requires Broilmaster Mounting (Cart, Post, or a Built-In Kit). See Mounting Instructions to assemble mounting before Assembling Grill Head. Compare the parts in the box to the parts list provided in this manual. If any are missing, contact your Broilmaster dealer before beginning assembly. All Broilmaster grills require some assembly. For the best results, follow the step-by-step instructions.
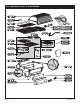
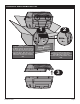
R3 SERIES PARTS DIAGRAM Page 6 B102218-5-1016
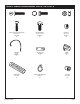
GRILL HEAD HARDWARE PACK - B101274 PHILLIPS PAN HEAD SCREW, SS,10-24 X 1 B073978 (2) B102218-5-1016 HEX HEAD BOLT, SS,1/4-20 X 3/4 B063096 (2) GROUND WIRE B072684 (1) BATTERY, AA B076529 (1) FOAM GRIP B073097 (1) IGNITER GROUND LUG B069747 (2) HEX NUT, SS,1/4-20 B076331 (2) KNOB R3918 (2) ORIFICE B101063 (2) Page 7
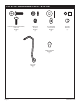
LID STOP HARDWARE PACK - B101097 PHILLIPS TRUSS HEAD SCREW, 10-24 X 3/4 B076522 (1) KEPS NUT, SS,10-24 B073967 (1) FLAT WASHER, 1/4 ID X 5/8 OD B076332 (2) SPACER B662325 (1) KNOB,TAPERED B100098 (1) LID, STOP B076521 (1) Page 8 B102218-5-1016
UNPACK AND REMOVE LID 2 1 REMOVING LID To ease assembly, remove Grill Lid and Warming Rack. Remove Warming Rack and set aside. Remove the two Pins and Clips at the rear of the Grill Lid and set aside. After Pins, Lid and Warming Rack have been removed, remove the contents from inside the Grill. STER BROILMA RILLS G PREMIUM Prior to assembling Grill Head assemble Cart or Post mounting first. Follow Mounting instructions provided with your Broilmaster Cart or Post.
wind DEFLECTOR PLACEMENT Place the Wind Deflector in the bottom Casting.
insert COLLECTOR BOX (r3B only) 9/16” 1 Note: If a side shelf accessory is to be used, install it at this time. Refer to side shelf installation instructions for more information.
Insert burners (r3b only) IGNITER WIRES Page 12 B102218-5-1016
insert infrared burners (r3 only) IGNITER WIRES B102218-5-1016 Page 13
INSERT BURNER SHIELD (r3B only) HEX HEAD BOLT SS, 1/4-20 X 3/4 B063096 (2) HEX NUT, SS, 1/4-20 B076331 (2) .
ATTACH ground WIRE (r3 only) HEX HEAD BOLT SS, 1/4-20 X 3/4 B063096 (2) HEX NUT, SS, 1/4-20 B076331 (2) . 7/16” GROUND WIRE B072684 (1) IGNITER GROUND LUG, SS, 1/4-20 B069747 (2) .
connecT IGNITER LEADS IGNITER IGNITER Route Leads from Burner and Secure to Ignitor Terminals (polarity is not important).
KNOB and battery PLACEMENT (R3 SHOWN) AFTER Unscrew the Igniter Knob from the Control Panel, and insert AA Battery, positive side up, and replace Igniter Button.
INSTALL LID STOP (r3 grill shown) PHILLIPS TRUSS HEAD SCREW, SS,10-24 X 3/4 B100128 (1) HEX LOCK NUT, SS, 10-24 R4021 (1) 3/8” FLAT WASHER 1/4 x 5/8 OD B076332 (2) SPACER, B662325 (1) LID STOP ROD Screw the black Knob onto the Lid Stop. Do not overtighten.
HANDLE INSTALLATION PHILLIPS PAN HEAD SCREW, SS,10-24 X 1 B073978 (2) Tip: For ease of installation, lightly lubricate the inside of the Foam Grip with Liquid Soap before twisting it on to Handle.
reinstall lid HINGE PIN, (FROM PREVIOUS STEPS) B057804 (2) COTTER PIN, (FROM PREVIOUS STEPS) B057805 (2) Page 20 B102218-5-1016
INSTALL BRIQUETS AND RACKS (r3b only) 3 2 1 Save leftover briquets for future use. Before cooking, always preheat the grill. Hot briquets give better flavor and allow quicker cooking. B102218-5-1016 Place the 'Char-Master' Briquets in a single layer evenly on your grill's briquet rack. DO NOT dump them onto the briquet rack. A single layer of 'Char-Master' Briquets works best.
INSTALL RACKS (r3 only) Page 22 B102218-5-1016
INSTALL warming RACK A C B A D C B D B102218-5-1016 Page 23
PROPANE GAS GRILLS For Natural Gas Grills please proceed to page 29. 3/4” Attach the LP hose and Regulator to the fitting on the Burner Control Valve mounted on the Control Panel. Tighten this connection with a wrench.
PROPANE GAS GRILLS Grill Location Failure to follow these safety precautions could result in a fire or explosion causing property damage or personal injury. Never operate your grill in any building, garage, or other enclosed area. Never operate your grill in a recreational vehicle or boat. Never operate your grill under any combustible materials, such as carports, covered porches, awnings, or overhangs. Use extreme caution when handling propane gas cylinders. This grill is designed for outdoor use only.
PROPANE GAS GRILLS Propane Cylinder Requirements Your Broilmaster Infrared Grill requires a standard 20-lb propane gas cylinder, which is available from your grill dealer, your LP supplier, and at most hardware and home stores. CAUTION Do not use a propane gas cylinder which has a capacity greater than twenty pounds with this grill. The propane gas cylinder used must be: 1. Constructed and marked in accordance with the specifications for LP gas cylinder of the U.S. Department of Transportation (D.O.T.
PROPANE GAS GRILLS Pressure Regulator and Hose Assembly The pressure regulator has an outlet pressure of not more than eleven inches water column. It must be connected to the Propane gas cylinder’s female valve outlet before the grill can be operated. CAUTION Operating a Propane gas grill without the pressure regulator and hose assembly will cause gas leaks which could lead to fire or explosion, resulting in property damage or personal injury.
CONNECTING PROPANE GAS GRILL Pressure Regulator and Hose Assembly The pressure regulator has an outlet pressure of not more than eleven inches water column. It must be connected to the Propane gas cylinder’s female valve outlet before the grill can be operated. Make sure the grill’s burner controls are off. Open the valve on the top of the LP cylinder, while listening for leaks. If you hear a leak or smell gas, turn off the valve and retighten the connection.
CONNECTING NATURAL GAS GRILL 3/4” Attach the Natural Gas hose to the fitting on the Burner Control Valve mounted on the Control Panel. Snug this connection with a wrench.
NATURAL GAS GRILLS Grill Location This grill is designed for outdoor use only. Never operate your grill in any building, garage, or other enclosed area. Never operate your grill in a recreational vehicle or boat. Never operate your grill under any combustible materials, such as carports, covered porches, awnings, or overhangs. CAUTION Keep the sides of the grill at least 16 inches from any combustible material. Keep the back of the grill at least 18 inches from any combustible material.
COMPLETED ASSEMBLY Thank you for purchasing a Broilmaster Infrared Grill and we hope you enjoy years of great meals prepared on your Broilmaster. Please feel free to visit the Broilmaster Facebook page and share photos of your Broilmaster grill.
INFRARED COOKING General Overview Broilmaster Infrared gas grills make it possible for you to enjoy cooking outdoors quickly and effortlessly. In minutes, you can enjoy steaks, hamburgers, poultry, pork chops, fish and other foods. You can also cook more slowly if you wish. Broilmaster's optional accessories are designed to enhance your grill's versatility. Infrared Searing Method Searing is a process that seals juices in food by cooking with intense heat for a short period of time.
INFRARED COOKING SAMPLE TIMES FOOD Steak Pieces - 1” Thick Steak - 1” Thick Pork Chops FOOD “DONENESS” APPROXIMATE COOKING TIME WITH INFRARED Medium/Medium Rare 4 Minutes, 2 minutes per side Medium Rare 6 Minutes, Turn every 2 minutes Medium Well 8 Minutes, Turn every 2 minutes Well 10 Minutes, Turn every 2 minutes Medium Rare 4 Minutes, 2 minutes per side Medium Well 8 Minutes, Turn every 2 minutes Well 10 Minutes, Turn every 2 minutes Medium Well 6 Minutes per side Well 7 Minutes per
OPERATION - PROPANE AND NATURAL GAS GRILLS Check for Gas Leaks Check for gas leaks every time you connect your Broilmaster propane gas grill to a Propane gas cylinder, when a connected cylinder has not been used recently, or when either a natural or propane grill is being used for the first time. 6. If a burner does not light, turn OFF all gas and refer to the Troubleshooting section of this manual. 7. Repeat steps 3 through 5 for other burner.
OPERATION - PROPANE AND NATURAL GAS GRILLS Before Cooking Preheating Before cooking on a grill for the first time, burn off any oil residue Before cooking on a infrared grill, allow the grill to preheat on HI for from the manufacturing process. 5 minutes with the lid open. Preheating uses very little fuel, provides better flavor, and 1. Open the grill lid. provides more consistent cooking times. 2. Light grill burner. 3. Burn on HI for ten minutes. WARNING 4.
blue flame burner MAINTENANCE Cleaning the Grill CAUTION To prevent injury, use care when cleaning a hot grill. the flames are yellow or lift off the burner. Stainless steel burners often turn reddish brown after use. This does not effect the performance of the grill. When cleaning the interior of the grill, remove the burners and clean with a brush. Wash with water and a mild detergent. Buy a good grill brush.
INFRARED BURNER MAINTENANCE General Overview Proper care, maintenance and cleaning will help ensure a long life for your grill. Periodic cleaning will help avoid accumulations of flammable grease and other debris. Exterior Clean regularly with a solution of mild detergent and hot water. Touch-up paint is available from your dealer. Broilmaster protective covers are recommended. Stainless steel components can be easily cleaned with a spray-on stainless steel cleaner found in most hardware stores.
TROUBLESHOOTING Although we have attempted to ensure that your grill will operate properly and satisfactorily, sometimes problems do arise. The following troubleshooting guide lists several possible problems and their probable cause and solution. Do not repair or replace any part of the grill unless specifically recommended in this manual. All other service should be referred to a qualified technician. Problem Cause Solution Burner will not light. Spider webs in venturi tubes Clean venturi tubes.
important safety information WARNING Spiders and insects can nest in gas grill burners causing the gas ignite under the control panel. This is very dangerous and can damage the grill, making it unsafe to operate. Inspect the grill at least twice per year and more often if spiders are active. Be sure all grill controls are turned off and the grill is cool before using any type of aerosol cleaner on or around the grill. Some chemicals, in the presence of heat, may ignite or cause metal parts to corrode.
Important safety information Practice Safe Grilling Do not wear loose fitting clothing or flammable clothing (such as synthetics) around the grill. Never let clothing, pot holders, or other flammable materials come in contact with or too close to any grate, burner or hot surface. Fabric may ignite and result in personal injury. Use only dry pot holders. Using a damp pot holder on a hot surface may cause burns from steam. Do not use towels or bulky cloth in place of pot holders.
WARRANTY TERMS Empire Comfort Systems Inc. warranties this Broilmaster premium gas grill to be free from defects at the time of purchase and for the periods specified below. Broilmaster Premium Gas Grills must be installed by a qualified technician and must be maintained and operated safely, in accordance with the instructions in the owner’s manual. This warranty applies to the original purchaser only and is not transferable. All warranty repairs must be accomplished by a qualified gas appliance technician.
GRILL MAINTENANCE HISTORY Date Page 42 Maintenance Performed B102218-5-1016
MASTER PARTS DISTRIBUTOR LIST To order parts under warranty, please contact your local Broilmaster dealer. See the dealer locator at www.broilmaster.com. To provide warranty service, your dealer will need your name and address, purchase date and serial number, and the nature of the problem. Please keep your receipt to establish ownership and date of purchase. To order parts after the warranty period, please contact your dealer or one of the Master Parts Distributors listed below.
PR EM IU M GR ILL S BROILMASTER A Division of Empire Comfort Systems, Inc. Belleville, Illinois broilmaster.com If you have a general question about our products, please e-mail us at info@empirecomfort.com. If you have a service or repair question, please contact your dealer.