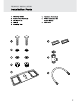
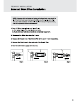
BRITT hes al Lite Installation Parts Mounting Bolt (2) Rubber Cone Washer (2) Flat Washer (2) Nuts (2) Mounting Plate aan o Adjustable Brackets (2} T-Valve Connector with Rubber Washer Bidet Hose
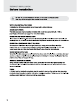
a Br Educ en al ELATION Before Installation DO NOT PLUG THE PRODUCT IN WHILE THE UNIT IS UPSIDE DOWN This may cause damage to the internal components. WATCH OUR INSTALLATION VIDEO Installation for all Swash products can be found online at broadminded CHECK BOLT SPREAD This bidet seat can only be installed on toilets with a bolt hole spread of 5.25 — 745 in. {see Product Dimensions on page 7 for more information).
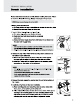
BRITT hes al Lite Swash Installation Please read these instructions carefully before Installing the Swash. Failure to do so could result in flooding, leaking or damage to the product. NOTE: Steps may vary by type of seat and toilet 1. Existing Toilet Seat Removal a. Lift hinge covers and use a screwdriver to remove the mounting bolts. b. Remove the toilet seat. Keep for future use. 2. Turn Off Water Supply Valve and Flush Toilet a. Turn water valve off to stop the flow of water, b.
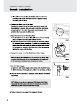
12 Br Educ en al ELATION Swash Installation c. Slide rubber cone washer, flat washer, and then nut onto mounting bolts under the toilet bowl and tighten to keep mounting plate in place. 6. Connect the Bidet Hose to the Seat Connect the plastic side of the bidet hose to the water inlet. Hand-tighten to secure. Take care not to twist the bidet hose, excessively bend it, or strip the plastic screw threads when screwing the hose onto the bidet seat. 7. Attach the Swash to the Mounting Plate a.
-. External Bidet Filter Installation NOTE: Customers with hard water, well water, and softened water can extend the life of their bidet seat by purchasing and installing an external inline wale filter to bie used with the Swash. The bidet fleeter should be changed every six months, and can be purchased online at broadminded. 1. Turn Off Water Supply Valve and Flush Toilet. a. Turn water valve off to stop the flow of water. b. Flush toilet and hold down handle to completely empty tank. 2.