OWNER MANUAL PS-65 Bidet Attachment
CONTENTS Product Features . . . . . . . . . . . . . . . . . . . . Page 2 Parts List. . . . . . . . . . . . . . . . . . . . . . . . . . . . Page 3 Product Specs. . . . . . . . . . . . . . . . . . . . . . . Page 4 Installation. . . . . . . . . . . . . . . . . . . . . . . . . . Page 4 Operation. . . . . . . . . . . . . . . . . . . . . . . . . . . Page 9 Maintenance. . . . . . . . . . . . . . . . . . .
PRODUCT FEATURES • High-quality ABS material with full body panel • Hygienic retractable nozzle • Self-cleaning nozzle feature • Ambient temperature bidet wash • Positionable nozzle • Adjustable water pressure • Ceramic core internal valve with patented uni-body construction for safety • High-quality metal 7/8” T-valve • Durable braided metal cold water hose • No electricity or batteries required • Easy installation and adjustable toilet fit • All accessories included for standard in
PARTS LIST WHAT'S IN THE BOX? Bidet attachment with turn-dial control and adjustable brackets T-Valve connector (7/8" x 7/8" x 3/8" ) 25” braided metal bidet hose Large rubber washer (2) Owner manual 3
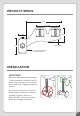
PRODUCT SPECS 13.4" 4.1"–7.9" 5.5" 3.14" 6.3" 0.4" deep 1.3" at deepest point on control panel INSTALLATION IMPORTANT Please be advised that the provided T-Valve should be installed at the Fill Valve under the toilet tank, and NOT at the cold water supply coming from the wall. If you do not have access to the Fill Valve under the toilet tank, contact Brondell Customer Service at 888.542.3355. We may be able to guide you through the process.
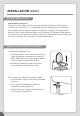
INSTALLATION (cont.) BEFORE INSTALLATION Check Water Supply Line Check the water supply line that connects the toilet tank fill valve to the water shutoff valve at the wall. If it is a rigid pipe, you will need to purchase a flexible water supply hose to replace it before installing the PureSpa.
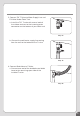
3. Connect 7/8” T-Valve to Water Supply Line and Fill Valve Under Toilet Tank. a. Install the 7/8” T-valve with one or both of the rubber washers to the incoming water connection on the bottom of your toilet tank. Step 3a b. Connect the cold water supply line coming from the wall to the bottom of the T-valve. Step 3b 4. Connect Bidet Hose to T-Valve a. Connect one end of the braided metal bidet hose to the remaining open side of the installed T-valve.
INSTALLATION (cont.) 5. Install Bidet Attachment on Toilet a. Place bidet attachment on the toilet so the nozzle is as close to the back of the toilet bowl as it will go. This will vary by toilet. Step 5a b. Make sure the adjustable brackets line up with the holes in the toilet fixture. You may need to move the adjustable brackets accordingly to line up properly. Step 5b c. Replace the toilet seat on top of bidet attachment and secure using original toilet seat hardware.
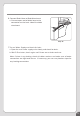
6. Connect Bidet Hose to Bidet Attachment a. Connect open end of bidet hose to the connection on the back side of the bidet attachment. Step 6a 7. Turn on Water Supply and check for leaks a. Open the main water supply valve slowly and check for leaks. b. Wait 5-10 minutes, check again and if there are no leaks continue. Note: if there is any leaking, check all rubber washers and make sure all water connections are tight and secure. If necessary, you can use plumbers tape for any leaking connections.
OPERATION USING THE PURESPA To clean the bidet nozzle, turn the control dial towards the “Nozzle Cleaning” position and water should wash over the nozzle. For the general bidet wash function, turn the dial towards the “Wash” position. • The further the dial is turned, the higher the water pressure will be. • To lower the water pressure, turn the nozzle back towards the center. NOZZLE POSITIONING The nozzle can be easily adjusted by gently pulling the end of the nozzle forward or backwards.
MAINTENANCE To clean the nozzle, gently pull down on the head of the nozzle, and use a toothbrush or soft cloth and mild detergent (such as dish soap). You may also unscrew the nozzle tip cap for a more thorough cleaning or use a toothpick if any nozzle holes are plugged with hard water buildup. When cleaning, be careful not to drop or flush the nozzle cap. To clean the bidet, use a mild cleaner such as Simple Green or Windex spray to clean the PureSpa.
WARRANTY Brondell products are backed by some of the most comprehensive warranties in the industry. Brondell warrants that all products (excluding consumable items) shall be free from defects in material and workmanship under normal use and service. PureSpa PS-65 Residential One-Year Limited Warranty 100% Coverage of all parts and labor for the entire product for the first year from original date of purchase.
CONTACT: Brondell, Inc. PO Box 470085 San Francisco, CA 94147-0085 Phone: 1-888-542-3355 Email: support@brondell.com Web: www.brondell.com For questions, contact Brondell Customer Service: 1-888-542-3355 MANUFACTURED BY: Brondell, Inc. PO Box 470085 San Francisco, CA 94147-0085 Please retain receipt records for any warranty claims.
MANUAL DEL USUARIO PS-65 Accesorio para el bidé
ÍNDICE Características del producto . . . . . . . . . . Página 15 Lista de piezas . . . . . . . . . . . . . . . . . . . . . . Página 16 Especificaciones del producto. . . . . . . . . Página 17 Instalación. . . . . . . . . . . . . . . . . . . . . . . . . . Página 17 Funcionamiento . . . . . . . . . . . . . . . . . . . . . Página 22 Mantenimiento . . . . . . . . . . . . . . . . . . . . . .
CARACTERÍSTICAS DEL PRODUCTO • Material ABS antibacterial de calidada alta con panel completo • Boquilla higiénica retráctil • Función de autolimpieza de la boquilla • Lavado de bidé a temperatura ambiente • Posicionamiento de la boquilla • Presión de agua adaptable • Válvula interna de núcleo de cerámica con construcción “Uni-body” patentado por seguridad • Válvula en T de 7/8 de alta calidad • Manguera de metal trenzado de bidé para la agua fría • No requiere energía eléctrica ni baterías • Fácil instala
LISTA DE PIEZAS ¿QUÉ HAY EN LA CAJA? Accesorio para el bidé con perilla de control y soportes ajustables Conector de válvula en T (7/8" x 7/8" x 3/8" ) Manguera de metal trenzado de bidé para la agua fría (25") Unión de goma grande (2) Manual del usuario 16
ESPECIFICACIONES DEL PRODUCTO 13.4" 4.1"–7.9" 5.5" 3.14" 6.3" 0.4" bajo 1.3" en el punto más bajo en el panel de control INSTALACIÓN IMPORTANTE Por favor, tenga en cuenta que la proporcionada válvula en T debe ser instalada en la válvula de llenado bajo el tanque del inodoro, y no en el suministro de agua fría procedente de la pared. Si usted no tiene acceso a la válvula de llenado bajo el tanque del inodoro, póngase en contacto Brondell Servicio al Cliente al 888.542.3355.
INSTALACIÓN (cont.) ANTES DE INSTALACIÓN Compruebe la Línea de Suministro de Agua Verifique la línea de suministro de agua que conecta el tanque del inodoro a la válvula de corte de agua en la pared. Si es una cañería rígida, deberá reemplazarla por una manguera flexible para suministro de agua antes de instalar el PureSpa. La extensión de la manguera varía, la conexión superior debe ser un flotador de 7/8" in para conectarse a su válvula de llenado debajo del tanque del inodoro.
INSTALACIÓN (cont.) 3. Conectar el 7/8" válvula en T de la línea del suministro de agua y válvula de llenado bajo tanque del inodoro. a. Instalar el 7/8" válvula en T con uno o los dos de gomas para la conexión de agua entrante en la parte inferior de la cisterna del retrete. Etapa 3a b. Conectar la línea de suministro de agua fría procedente de la pared a la parte inferior de la válvula en T. Etapa 3b 4. Conexión de la manguera del bidé a la válvula en T a.
5. Instalación del accesorio del bidé sobre el inodoro a. Coloque el accesorio del bidé sobre el inodoro que la boquilla quede tan cerca como sea posible de la parte trasera de la taza del inodoro. Esto varía según el modelo de inodoro. Etapa 5a b. Asegúrese de que los soportes ajustables estén alienados con respecto a los orificios de la estructura del bidé. Es posible que necesite mover los soportes ajustables para que se alineen adecuadamente. Etapa 5b c.
INSTALACIÓN (cont.) 6. Conexión de la manguera del bidé al accesorio del bidé a. Conecte el extremo abierto de la manguera del bidé a la conexión sobre el posterior del accesorio del bidé. Etapa 6a 7. Encendido del suministro de agua y verificación de pérdidas a. Abra la válvula de suministro de agua principal lentamente y verifique que no haya pérdidas. b. Espere de 5 a 10 minutos, verifique nuevamente y si no encuentra pérdidas, continúe.
FUNCIONAMIENTO CÓMO UTILIZAR EL PURESPA Para limpiar la boquilla del bidé, gire la perilla de control hasta la posición "Nozzle Cleaning" (Limpieza de boquilla) y el agua debería lavar la boquilla. Para activar la función de lavado general del bidé, gire la perilla hasta la posición "Wash" (Lavar). • Mientras más se gire la perilla, más presión de agua habrá • Para disminuir la presión del agua, gire la boquilla de vuelta hacia el centro.
MANTENIMIENTO Para limpiar la boquilla, tire hacia abajo la cabeza de la boquilla con cuidado y utilice un cepillo de dientes o un paño suave con detergente suave (como jabón lavavajillas). También puede desatornillar la punta de la tapa de la boquilla para una limpieza más exhaustiva o utilice un mondadientes en caso de que alguno de los orificios estén tapados con acumulación de agua dura. Durante la limpieza, tenga cuidado de no caer ni a eliminar el tapón de la boquilla.
GARANTÍA Los productos Brondell están respaldados por algunas de las garantías más completas en la industria. Brondell garantiza que todos los productos (con excepción de los consumibles) estarán libres de defectos en materiales y mano de obra bajo uso y servicio normales. PureSpa PS-65 Garantía residencial limitada por 3 años 100% de cobertura en todas las partes y mano de obra para todo el producto durante el primer año a partir de la fecha original de compra.
CONTACTAR: Brondell, Inc. PO Box 470085 San Francisco, CA 94147-0085 Phone: 1-888-542-3355 Email: support@brondell.com Web: www.brondell.com Si tiene preguntas, póngase en contacto con Brondell Servicio al Cliente: 1-888-542-3355 FABRICADO POR: Brondell, Inc. PO Box 470085 San Francisco, CA 94147-0085 Por favor, guarde los registros de recibos de las reclamaciones de garantía.
MANUAL DE L’UTILSATEUR PS-65 Accessoire bidet
TABLE DES MATIÈRES Caractéristiques du produit . . . . . . . . . . . Page 28 Liste des pièces . . . . . . . . . . . . . . . . . . . . . Page 29 Spécifications du produit . . . . . . . . . . . . . Page 30 Installation. . . . . . . . . . . . . . . . . . . . . . . . . . Page 30 Fonctionnement. . . . . . . . . . . . . . . . . . . . . Page 35 Entretien . . . . . . . . . . . . . . . . . . . . . . . . .
CARACTÉRISTIQUES DU PRODUIT • Matériau ABS antibactérien et corps monobloc • Buse rétractable hygiénique • Buse autonettoyante • Rinçage à température ambiante • Buse orientable • Pression d'eau réglable • Valve interne de noyau céramique avec construction breveté «Unibody» pour la sécurité • Raccord en T en laiton de 7/8 pouce • Boyau flexible de haute qualité en métal tressé • Obturateur de retour d'eau • Ne nécessite aucune alimentation électrique ou piles • Se pose facilement, s'
LISTE DES PIÈCES CE QUI EST DANS LA BOÎTE? Accessoire bidet avec cadran de commande et supports réglables Raccord en T (2.2cm x 2.2cm x 0.95cm) Boyau flexible en métal tressé (63.
SPÉCIFICATIONS DU PRODUIT 34cm 10.4cm–20cm 14cm 8cm 16cm 1cm de profondeur 3.3cm au point de le panneau de commande le plus profond INSTALLATION IMPORTANT S'il vous plaît noter que la condition Raccord en T doit être installé à la vanne de remplissage sous le réservoir de la toilette, et NON à l'alimentation en eau froide provenant du mur. Si vous ne disposez pas d'accès à la vanne de remplissage sous le réservoir de la toilette, contacter Brondell Service à la clientèle au 888.542.3355.
INSTALLATION (suite) AVANT L'INSTALLATION Vérifiez la conduite d'arrivée d'eau Vérifiez la conduite d'arrivée d'eau qui relie le réservoir de la chasse d'eau au robinet de la toilette. S'il s'agit d'un tuyau rigide, vous aurez besoin d'acheter un boyau d'arrivée d'eau flexible pour le remplacer avant de poser le PureSpa. La longueur du boyau flexible varie.
3. Brancher 7/8 "T-Vanne à la ligne d'approvisionnement en eau et du robinet à Sous Réservoir de toilette. a. Installez le 7/8" raccord en T avec la rondelle en caoutchouc à la connexion de l'eau entrant sur le fond de votre réservoir de toilette. Étape 3a b. Connectez la ligne d'eau froide provenant de la paroi au fond de la T-vanne. Étape 3b 4. Branchez le boyau du bidet sur le raccord en T a. Branchez une extrémité du boyau de bidet sur l'autre extrémité du raccord en T.
INSTALLATION (suite) 5. Posez l'accessoire bidet sur la toilette a. Placez l'accessoire bidet sur le toilette pour que la buse soit aussi près que possible de l'arrière de la cuvette des toilettes. Le placement varie selon le modèle de toilette. Étape 5a b. Assurez-vous que les supports réglables s'alignent avec les trous de fixation d'abattant sur la toilette. Il se peut que vous deviez déplacer les supports réglables pour qu'ils s'alignent correctement. Étape 5b c.
6. Branchez le boyau de bidet sur l'accessoire bidet a. Branchez une extrémité ouverte du boyau de bidet sur le raccord sur le dos l'accessoire de bidet. Étape 6a 7. Ouvrez l'eau et vérifiez qu'il n'y ait pas de fuite a. Ouvrez lentement le robinet d'eau principal et inspectez pour déceler d'éventuelles fuites. b. Patientez 5 minutes, vérifiez à nouveau et, s'il n'y a pas de fuites, continuez.
FONCTIONNEMENT UTILISATION DU PURESPA Pour nettoyer la buse du bidet, tournez le cadran de commande sur la position « Nozzle Cleaning » (Nettoyage buses) et de l'eau devrait couler pour rincer la buse. Pour la fonction générale de rinçage du bidet, tournez le cadran sur la position « Wash » (Lavage). • Plus on tourne le cadran, plus la pression d'eau sera élevée. • Pour abaisser la pression de l'eau, tournez le cadran vers le centre.
ENTRETIEN Pour nettoyer la buse, tirez délicatement la tête de la buse vers le bas et utilisez une brosse à dents ou un chiffon doux et un détergent doux (liquide vaisselle par exemple). Vous pouvez également dévisser le capuchon de buse pour un nettoyage plus approfondi ou utiliser un cure-dent si des trous de buse sont bouchés par des dépôts calcaires. Lors du nettoyage, veillez à ne pas laisser tomber ou de rincer le bouchon de buse.
GARANTÍA La garantie des produits Brondell est une des meilleures de l’industrie. Brondell garantit que tous ses produits (hors éléments consommables) sont exempts de tout vice de fabrication et de matière sous utilisation normale. PureSpa PS-65 Garantie résidentiel limitée d’un an Couverture à 100% de toutes pièces et main-d’œuvre pour l’ensemble du produit pour la première année à partir de la date d’achat originale.
COORDONNÉES: Brondell, Inc. PO Box 470085 San Francisco, CA 94147-0085 Phone: 1-888-542-3355 Email: support@brondell.com Web: www.brondell.com Pour toutes questions, communiquez avec le Service à la Clientèle Brondell : 1-888-542-3355. FABRIQUÉ PAR Brondell, Inc. PO Box 470085 San Francisco, CA 94147-0085 S’il vous plaît conserver les dossiers de réception des réclamations de garantie.