
Use and Care Guide


8
STEP 1: FAUCET INSTALLATION (cont.)
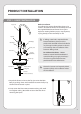
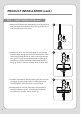
3. Attach the Escutcheon to the Main Body by inserting the blue
tubing through the Escutcheon and pushing it all the way up
until connected to the main body.
3
4. Install the faucet on top of the countertop or sink and feed
the blue tubing through the hole to the cabinet below. Then
slide the large Plastic Washer as shown up through the blue
tubing until snug against the bottom of the countertop or
sink hole. Be sure that the at part of the Plastic Washer is
facing up and the raised area is facing down, as shown here.
4
5
5. Install the “Lock Washer” and the “Locking Nut” the same way
and tighten until the plastic washer is holding the faucet
assembly rmly in place. The faucet is now installed!
6. Pull the plastic tab out from the battery compartment to
activate the faucet indicator. The LED light will blink red
once, blue once, and then will be ready to go.
PRODUCT INSTALLATION (cont.)