
Use and Care Manual


11
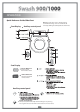
8. Connect Power
a. Plug the power cord into the electrical outlet.
Important: Make sure to only use a grounded GFI (ground fault interrupter) electrical
outlet. In the case of a short circuit, a grounded GFI outlet may help prevent electric
shock or injury. If using an extension cord is unavoidable, use one with grounding
terminals for 120V~/60 Hz or higher only.
Installing the Remote Control
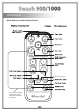
1. Battery Installation
a. Separate the remote control from the magnetic wall mount by pulling apart gently.
b. Turn remote over and open the battery compartment by popping off the battery
cover with your finger or small coin. Insert three “AAA” type batteries (included) as
indicated inside battery compartment and replace battery cover.
c. To confirm the batteries are installed correctly, press the “Stop” button and you
should see the “Wide Spray” LED light turn on for a few seconds (note: the 2 other
LED lights may or may not turn on at this time depending on the current settings).
2. Mount Remote (optional)
a. Identify a location in the bathroom for the remote control
that is visible and reachable from the toilet.
b. Depending on the wall type, you can install using the
supplied screws and anchor mounts or use the provided
double stick tape on the back of the remote wall mount.
Make sure the remote mount is fully secure with either
method so that it does not fall and damage the remote control.
c. Place the remote control into the mount as shown.
INSTALLATION