
Full Product Manual


13
SWASH INSTALLATION (cont.)
REMOTE CONTROL INSTALLATION
NOTES:
• Make sure to only use a grounded GFCI (ground fault circuit interrupter) electrical outlet. In
the case of a short circuit, a grounded GFCI outlet may help prevent electric shock or injury.
• If it is necessary to use an extension cord, only use those rated for a minimum of 15 amps
with a three-wire extension cord with a three-blade grounding plug.
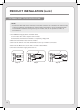
13. Follow instructions on Page 18 for using the Swash.
Step 1b
Step 2b
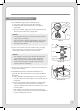
12. Fill the Water Reservoir Tank
a. Press either the “Rear” or “Front” button on the remote control to fill the Water Reservoir
Tank with water.
b. The Swash will beep continuously while the tank is filling and will emit one long beep to
indicate when the tank is full.
c. Wait 3-5 minutes for the water to heat up, and the Swash will be ready for use.
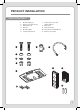
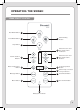
1. Battery Installation
a. Remove the Remote Control from the Wall Mount.
b. Turn remote over and remove the battery compartment.
Insert the two included AAA batteries and replace
battery cover.
c. To confirm the batteries are installed correctly, press
and release the DRY button. One of the center vertical
LED lights will illuminate for twenty seconds.
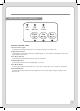
2. Mount Remote (optional)
a. Identify a location in the bathroom for the remote
control that is visible and reachable from the toilet.
b. Use the provided double-stick tape on the back of
the remote wall mount. Make sure the remote mount
is fully secure so that it does not fall and damage the
remote control.
c. Slide the remote control into the mount.
double-stick
tape (on back)