
Full Product Manual


11
SWASH INSTALLATION (cont.)
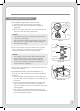
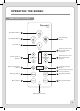
3. Connect the female side of the T-Valve to the incoming
water connection on the bottom of your toilet tank,
ensuring the rubber washer is properly seated.
4. Connect the water supply line coming from the wall to the
bottom of the T-Valve
5. Install Mounting Plate for Standard Installation (see
Page 12, Step 6 for instructions on using the Top-Mount
Brackets)
a. Place adjustable mounting plate over mounting holes
on toilet, rubber side facing down, arrow pointing to the
toilet bowl.
b. Insert the mounting bolts through the mounting plate
and mounting holes of the toilet. Be sure that the
square mounting bolt head is even with the sides of the
mounting plate.
c. Slide rubber cone washer, flat washer, and then nut
onto mounting bolts under the toilet bowl and tighten to
keep mounting plate in place.
NOTES:
• The T-Valve connects to the fill valve directly under
your toilet tank - it does not connect at the wall.
• Only connect to the cold toilet water supply line.
• If your water supply line is rigid you may need to
replace it before continuing.
Steps 5b & 5c
Steps 3-4
toilet tank
t-valve
cold water
supply line
NOTES:
• You may wish to place a container under the tank to
catch any excess water.
• Do not continue without completing the above steps
• Failure to do so could result in flooding, leaking or
damage to the Swash.
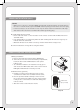
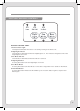
2. Turn O Water Supply Valve and Flush Toilet
a. Turn water valve o to stop the flow of water.
b. Flush toilet and hold down handle to completely
empty tank.
c. Disconnect water supply hose from toilet tank. Do not
disconnect from the water supply valve.
Step 2c