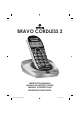
BRAVO CORDLESS 2 INSTRUCTION MANUAL MANUAL DE INSTRUCCIONES MANUEL D’INSTRUCTION BEDIENUNGSANLEITUNG BRAVO CORDLESS-2-lingue 1 6-09-2005, 16:02
BRAVO CORDLESS-2-lingue 2 ENGLISH 3 ESPAÑOL 19 FRANÇAIS 37 DEUTSCH 55 6-09-2005, 16:02
BRAVO CORDLESS 2 CORDLESS DECT GAP ENGLISH Congratulations for choosing BRAVO CORDLESS 2, Brondi’s DECT GAP cordless. This telephone which features big keys and big numbers on a light display will make it easier for you to make telephone calls. BRAVO CORDLESS 2 is provided with speakerphone and allows you to adjust the earpiece volume. For further details on this product, please check this instruction manual.
INDEX 1. UNPACKING YOUR CORDLESS .......................................................................................................... 5 2. FEATURES ............................................................................................................................................. 6 3. WHERE TO FIND IT ...............................................................................................................................7 4. SAFETY .......................................................
1.
2.
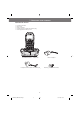
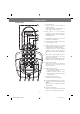
3. WHERE TO FIND IT HANDSET & BASE 1. Memory button Press for 2secs to store numbers in the Phone Book Press and release immediately to make calls to stored numbers 1 2 2. Back button: to move through numbers in the Phone Book or through records in the Caller Display list Redial button. 3 4 3. Speakerphone button: to switch to and from speakerphone 5 4. Phone button: to begin, answer and end a telephone call DEL 5.
INFORMATION ON THE DISPLAY Memory/ Store (to store a number in memory or to make a call to a stored number) Battery Level Battery Level (Battery Low) Headset Ringer on Headset Ringer off Speakerphone on Keypad locked On steadily: telephone line is busy Flashing: incoming call The X appears when the microphone is muted On steadily: all new Caller Display records have been listend to but not yet deleted Flashing: new Caller Display records present On steadily: handset within range of the base unit Flas
4. SAFETY • If necessary clean the equipment with a damp cloth. DO NOT CLEAN ANY PART WITH SOLVENT CHEMICALS. • Your cordless must be associated to an approved telephone. • Do not use your phone in exceedingly humid, cold or hot places and always keep it from direct exposure to the sun or other hot sources. • Do not place anything (objects or furniture) on the phone cables. • DON’T LET THE BASE UNIT OR CHARGER POD GET WET.
5. INSTALLATION 5.1 POWER SUPPLY IMPORTANT! The mains power lead must be installed near the equipment and must be easily accessible. 1. Plug the mains adapter pin end into the base unit power plug. 2. Plug the mains adapter into the wall mains socket. 5.2 CONNECT THE BASE UNIT TO THE TELEPHONE LINE 1. Insert the telephone line plug into the base unit socket. 2. Insert the telephone line threefold plug into the wall telephone socket. DC 9V TEL LINE MAINS POWER LEAD TELEPHONE LINE CORD 5.
6. OPERATIONAL FUNCTION Introduction When your cordless is in standby mode, i.e. no calls or operations are being made, the heading “HS-1” appears on the display (the number identifying the cordless). 6.1 TO ANSWER A CALL • When you receive a call, both handset and base start ringing, the symbol appears on the display, and both the red led on the handset locator button and the big white led on the phone base start flashing.
6.5 LAS NUMBER REDIAL You can call back the last 3 numbers you have dialled as your cordless stores them in memory. Last number redial • Press the phone button to dial the number. • Then press the button to have the number shown on the display. Note: If you have a PABX connection you need to pause for a few seconds between dialing the system code and the actual phone number. To pause, press the button and a dash “-” will appear on the display.
6.11 TO PAGE THE HANDSET This function is useful if you can’t find your handset. • On the base unit press and release the button. The handset rings with a special tone. • To stop the handset ringing, on the handset press any button or numbered key. 6.12 TO LOCK THE KEYPAD To lock the handste’s keypad so that no buttons can be pressed. • To block the handset keypad, while handset is idle press and hold it for a few seconds; until you hear a confirmation beep and appears on the display.
7. MEMORY AND CALLER DISPLAY 7.1 10 MEMORIES You can store up to 10 numbers in memory. Each number can have up to 25 digits. TO STORE A NUMBER Make sure the handset is idle (not connected). 1. Press the button and hold it untill the symbol flashes on the display. 2. Key in the number you want to store (max 25 digits). If you have a PABX connection, always remember to press the button between the system access code and the actual telephone number.
TO CHECK CALLER DISPLAY RECORDS With handset idle, press the Caller the display. Display button, you’ll see the most recent record on Details of the telephone number of the related call to be viewed number of Day-Month of received call received call Time of received call Wait a few seconds for the display to automatically show you the telephone number related to the call, otherwise press the button again to check the caller’s number.
8. GUARANTEE All Brondi products come with a 12-month Guarantee. Inside the package of BRAVO CORDLESS 2 you can find the guarantee form. The Guarantee is only valid when: − the form is fully filled in; − the sales ticket, invoice etc. is attached to the form; − the package has not been damaged. The Guarantee form must be filled in with: name of the product (BRAVO CORDLESS 2), the series number (SN) shown underneath the telephone base unit (but sometimes already printed on the form).
9. DECLARATION OF CONFORMITY CE Brondi Telefonia S.p.A., with registered offices in Str.
BRONDI TELEFONIA SPA Company with Quality Certification System For product details (features, on-line instruction manuals, etc.), updated directories of customer service centres and all our latest promotions and products please visit our website: www.brondi.
BRAVO CORDLESS 2 CORDLESS DECT GAP ESPAÑOL Brondi se congratula con Ud. por haber elegido BRAVO CORDLESS 2, el teléfono inalámbrico DECT GAP que, gracias a sus grandes teclas, sus grandes números visualizados en la pantalla iluminada, simplifica Sus llamadas. BRAVO CORDLESS 2 está equipado con la función de viva voz y de regulación del volumen de escucha. Para descubrirlo todo sobre este producto, Le rogamos consulte el presente manual de instrucciones.
ÍNDICE 1. CONTENIDO DEL EMBALAJE ............................................................................................................ 21 2. PRESTACIONES.................................................................................................................................. 22 3. DESCRIPCIÓN DEL APARATO........................................................................................................... 23 4. PRECAUCIONES PARA SU EMPLEO...................................................
1.
2.
3. DESCRIPCIÓN DEL APARATO PORTÁTIL Y BASE 1 1. Memorización núm. en agenda (pulsada por 2 seg.) Llamada núm. desde agenda (pulsada y enseguida soltada) 2 2. Tecla cursor entre las cifras de los números de las memorias/ Tecla visualización lista llamadas recibidas Tecla R 3 3. Activación / desactivación función viva voz 4 5 DEL 4. Línea ocupada/libre 5.
PANTALLA Acceso a las memorias (para memorizar o volver a llamar) Nivel de la batería Nivel de la batería Timbre portátil activado Timbre portátil desactivado Función viva voz activada Teclado bloqueado Encendido fijo: línea ocupada Intermitente: llamada en entrada Micrófono excluído Encendido fijo: números ya consultados presentes en la lista llamadas recibidas Intermitente: nuevos números, no consultados, presentes en la lista llamadas recibidas Encendido fijo: portátil conectado con la base Interm
4. PRECAUCIONES PARA EL EMPLEO • Si el equipo está sucio, utilice un trapo suave con detergente neutro. NO UTILICE ADITIVOS O SUSTANCIAS ABRASIVAS. • El telefóno inalámbrico tiene que conectarse con un teléfono asociado de tipo homologado. • No utilice por largo tiempo el aparato en lugares muy húmedos, particularmente fríos o calientes y evite la exposición directa a los rayos solares o fuentes de calor. • No apoye objetos o muebles sobre los cables o el aparato.
5. INSTALACIÓN 5.1 ALIMENTACIÓN DEL APARATO ¡CUIDADO! La toma de corriente tiene que instalarse cerca del equipo y tiene que resultar de fácil acceso. 1. Introduzca el pasador posicionado en una extremidad del cable del adaptador en dotación en la específica toma de la alimentación, posicionada en la parte trasera de la base. 2. Introduzca el enchufe del adaptador en la toma eléctrica de pared. 5.2 CONEXIÓN CON LA LÍNEA TELEFÓNICA 1.
5.4 COMO RECARGAR EL PORTÁTIL Cuando el portátil está descargado (es decir cuando en la pantalla aparece el símbolo para recargarlo es suficiente apoyar el portátil en el específico vano de la base con el teclado dirigido hacia Ud. Lo deje en carga por 15 horas para permitir la recarga completa de las baterías. 5.5 COMO SUSTITUIR LAS BATERÍAS CUIDADO: Utilice sólo las baterías recargables dedicadas a este modelo.
6. EMPLEO DE LAS FUNCIONES “TELÉFONO” Premisa Cuando el teléfono inalámbrico se encuentra en condición de espera, es decir cuando la línea no es ocupada y no hay ninguna operación en curso, en la pantalla aparece el mensaje “HS-1” (el número identifi ca el portátil). 6.1 CONTESTAR A UNA LLAMADA • Al llegar una llamada, el portátil y la base van a sonar, el icono en la pantalla y el led rojo sobre la tecla búsqueda porrtátil y el grande led blanco sobre la base se pondrán intermitentes.
6.5 REPETICIÓN ÚLTIMOS NÚMEROS SELECCIONADOS Su teléfono inalámbrico memoriza los últimos 3 números seleccionados, ofreciéndole la posibilidad de volver a llamarlos. Volver a llamar el último número seleccionado (con línea ocupada) • Pulse primero la tecla para ocupar la línea. • Luego pulse la tecla el número se visualizará en la pantalla y se seleccionará.
6.11 FUNZCIÓN BÚSQUEDA PORTÁTIL Esta función es útil cuando Ud. no logra encontrar Su portátil. • En modalidad de espera, pulse y suelte la tecla sobre la base, el portátil emitirá una señal acústica. • Para interrumpir la señal acústica, pulse cualquier tecla del portátil. 6.
7. MEMORIAS Y LISTAS LLAMADAS 7.1 10 MEMORIAS Ud. puede memorizar hasta 10 números telefónicos, cada uno puede contener máximo 25 cifras. MEMORIZACIÓN DE UN NÚMERO Asegúrese de que el portátil esté en stand-by. 1. Pulse y mantenga pulsada la tecla hasta cuando en la pantalla se pone intermitente el símbolo . 2. Digitee el número telefónico (máx 25 cifras).
CONSULTAR LA LISTA DE LAS LLAMADAS RECIBIDAS Con el teléfono en condición de espera, pulse la tecla información sobre la llamada más reciente.
8. GARANTÍA Igual que todos los productos Brondi, este producto tiene una garantía de 12 meses. Dentro del embalaje de BRAVO CORDLESS 2 se encuentra la específica tarjeta postal de garantía: − la tarjeta postal tiene que rellenarse en todas sus partes; − la tarjeta postal tiene que acompañarse a la prueba de compra (recibo fiscal, factura, etc.); − el embalaje tiene que guardarse intacto.
9. DECLARACIÓN DE CONFORMIDAD CE La sociedad Brondi Telefonia S.p.A., con sede legal en Str.
BRONDI TELEFONIA SPA Empresa con sistema de calidad certificado Para información sobre los productos (prestaciones, manuales de instrucciones en formato digital, etc.), para consultar la lista actualizada de los centros de asistencia y conocer las iniciativas y las últimas novedades, visite nuestro sitio: www.brondi.
BRAVO CORDLESS-2-lingue 36 6-09-2005, 16:03
BRAVO CORDLESS 2 TÉLÉPHONE SANS FIL DECT GAP FRANÇAIS Brondi vous félicite pour avoir choisi BRAVO CORDLESS 2 le téléphone sans fil DECT GAP qui simplifie vos appels grâce à ses grandes touches et à ses grands numéros affichés sur l’écran illuminé. BRAVO CORDLESS 2 est doté de la fonction haut-parleur et du réglage du volume d’écoute. Pour tout découvrir sur ce produit, nous vous invitons à consulter ce manuel d’instructions.
INDEX 1. CONTENU DE LA CONFECTION ....................................................................................................... 39 2. PRESTATIONS ..................................................................................................................................... 40 3. DESCRIPTION DE L’APPAREIL............................................................................................................ 41 4. PRECAUTION D’EMPLOI.........................................................
1.
2.
3. DESCRIPTION DE L’APPAREIL COMBINÉ ET BASE 1 1. Mémorisation des numéros dans la rubrique (appuyez pendant 2 sec) Rappel d’un numéro de la rubrique (appuyez et relâchez aussitôt) 2 2. Touche curseur entre les chiffres des numéros des mémoires/ Touche pour faire défiler la liste des appels reçus Touche R 3 4 3. Activation / désactivation de la fonction haut-parleur 5 4. Occupation/fin d’occupation de la ligne DEL 5.
ECRAN Accès aux mémoires (pour enregistrer ou rappeler) Niveau de charge de la batterie Niveau de charge de la batterie Sonnerie du combiné activée Sonnerie du combiné désactivée Fonction haut-parleur activé Clavier bloqué Allumé en continu: ligne occupée Clignotant: appel entrant Micro exclus Allumé en continu: numéros déjà consultés présents dans la liste des appels reçus Clignotant: nouveaux numéros, non consultés, présents dans la liste des appels reçus Allumé en continu: combiné connecté à la ba
4. PRECAUTIONS POUR L’EMPLOI • Si l’appareil est sale, utilisez un chiffon doux avec savon neutre. NE PAS UTILISER D’ADDITIFS OU DE SUBSTANCES ABRASIVES. • Le téléphone sans fil doit être connecté à un téléphone associé de type homologue. • Ne pas utiliser pendant longtemps l’appareil dans des lieux très humides, particulièrement froids ou chauds et éviter l’exposition aux rayons directs du soleil ainsi qu’à des sources de chaleur. • Ne pas appuyer d’objets ou de meubles sur les fils ou sur l’appareil.
5. INSTALLATION 5.1 ALIMENTATION DE L’APPAREIL ATTENTION! La prise de courant doit être installée à proximité de l’appareil et doit être facilement accessible. 1. Insérez la fiche placée sur une extrémité du fil de l’adaptateur fourni dans la prise d’alimentation spéciale, au dos de la base. 2. Insérez la prise de l’adaptateur dans la prise électrique au mur. 5.2 CONNEXION A LA LIGNE TELEPHONIQUE 1.
5.4 COMMENT RECHARGER LE COMBINÉ Quand le combiné est déchargé (c’est à dire quand le symbole apparaît sur l’écran), pour le recharger, il suffit de déposer le combiné sur la base, avec le clavier dirigé vers vous. Laisser-le en charge pendant au moins 15 heures, afin de permettre aux piles de se recharger complètement. 5.5 COMMENT SUBSTITUER LES PILES ATTENTION: Utilisez seulement les piles rechargeables dédiées à ce modèle.
6. UTILISATION DES FONCTIONS “TELEPHONE” Introduction Quand le téléphone sans fil est en attente, c’est à dire quand la ligne n’est pas occupée et quand il n’y a aucune opération en cours, il apparaît sur l”écran le message “HS-1” (le numéro identifie le combiné). 6.1 REPONDRE A UN APPEL • A l’arrivée d’un appel, le combiné et la base sonneront, sur l’écran l’icône ainsi que le voyant rouge sur la touche cherche-combiné et le grand voyant blanc sur la base du téléphone clignoteront.
6.5 REPETITION DES DERNIERS NUMEROS SELECTIONNES Votre téléphone sans fil mémorise les trois derniers numéros sélectionnés, afin de vous donner la possibilité de les rappeler. Rappel du dernier numéro sélectionné • Appuyez d’abord sur la touche afin d’occuper la ligne. • Appuyez ensuite sur la touche , le numéro sera visualisé sur l’écran puis sélectionné.
6.11 FONCTION CHERCHE-COMBINÉ Cette fonction est utile quand vous ne réussissez pas à trouver votre combiné. • En modalité d’attente, appuyez et relâchez la touche sur la base, le combiné émettra un signale sonore. • Pour interrompre le signal sonore, appuyez sur n’importe quelle touche de votre combiné. 6.
7. MEMOIRES ET LISTES D’APPELS 7.1 10 MEMOIRES Vous pouvez mémoriser jusqu’à 10 numéros de téléphone, chacun d’eux pouvant être composé de 25 chiffres maximum. MEMORISATION D’UN NUMERO Assurez-vous que le combiné est en stand-by. 1. Appuyez sur la touche jusqu’à ce que ce même symbole se mette à clignoter sur l’écran. 2. Tapez le numéro de téléphone (25 chiffre maximum).
NOTE: • Si votre téléphone sans fil est connecté à l’intérieur à un standard PABX, la fonction d’identification des appels sera activée seulement si le standard peut supporter cette fonction. • Ne seront mémorisés que les premiers 25 chiffres des numéros des appels reçus. CONSULTER LA LISTE DES APPELS RECUS Quand le téléphone est en attente, appuyez sur la touche dernier appel apparaîtront alors sur l’écran.
MEMORISATION D’UN NUMERO DE LA LISTE DANS UNE DES 10 MEMOIRES • Quand le téléphone est en attente, appuyez sur la touche pour accéder à la liste. • Utilisez. les touches et pour choisir le numéro à mémoriser. • Quand l’écran affiche le numéro désiré, appuyez pendant 2 secondes la touche , jusqu’à ce que ce même symbole ne clignote plus sur l’écran. • Appuyez sur le numéro correspondant à la cellule de mémoire où vous désirez mémoriser le numéro de téléphone (de 0 à 9).
8. GARANTIE Comme tous les produits Brondi, ce produit a une garantie de 12 mois A l’interieur de l’emballage de BRAVO CORDLESS 2 vous trouverez la carte de garantie. Pour que la garantie soit valable: − la carte devra être complètement remplie; − la carte devra être accompagnée de la preuve d’achat (ticket de caisse, facture, ecc.
9. DECLARATION DE CONFORMITE CEE La société Brondi telefonia S.p.A., ayant pour siège légal le n°14 Strada Caffadio - 10036 SETTIMO TORINESE (TO)- ITALY, et ayant pour unité opérationnelle le n°3 Via Guido Rossa - 10024 MONCALIERI (TO), déclare que l’appareil BRAVO CORDLESS 2 satisfait les critères requis par la Directive Européenne 1999/5/CE à propos des appareils radio et des poste de télécommunications.
BRONDI TELEFONIA SPA Entreprise avec système de qualité certifié Pour plus d’informations sur les produits (prestations, manuels d’instructions sous forme numérique, ect.), pour consulter la liste ajournée des centres de services après-vente et pour connaître les initiatives et les dernières nouveautés, visitez notre site: www.brondi.
BRAVO CORDLESS 2 CORDLESS DECT GAP DEUTSCH Brondi gratuliert Ihnen zur Wahl des schnurlosen Telefons BRAVO CORDLESS 2, Das schnurlose Telefon DECT GAP vereinfacht Ihre Anrufe dank der grossen Tasten und den am beleuchteten Display visualiisierten grossen Zahlen. BRAVO CORDLESS 2 verfügt über Freisprechmodus sowie über Volumenregulierung. Im folgenden Handbuch der Bedienungsanleitung erfahren Sie alles über dieses Produkt.
INHALTSVERZEICHNIS 1. VERPACKUNGSINHALT ..................................................................................................................... 57 2. LEISTUNGEN....................................................................................................................................... 58 3. GERÄTEBESCHREIBUNG.................................................................................................................... 59 4. VORSICHTSMASSNAHMEN BEI DER ANWENDUNG .................
1. VERPACKUNGSINHALT GERÄTE UND ZUBEHÖR: • • • • • 1 Mobilteil 1 Basisgerät 1 Adapter 220 V 1 Kabel mit ital. Telefonstecker 1 Packung aufladbare Batterien DEL 1 2 3 4 5 6 7 8 9 P 1 1 Mobilteil - 1 Basisgerät 1 Adapter 220V 1 Kabel mit ital.
2.
3. GERÄTEBESCHREIBUNG MOBILTEIL UND BASISGERÄT 1 1. Ruf-Nr. im Telefonbuch speichern (2 Sekunden lang drücken) Ruf-Nr. aus Telefonbuch abrufen (drücken und sofort loslassen) 2 2. Cursor-Taste zwischen den Zahlen und Nummern der Speicher/ Shift-Taste f. Liste der erhaltenen Anrufe Taste R 3 4 3. Freisprechmodus EIN / AUS 5 DEL 4. Telefonleitung belegt / frei 5. Zugang zur Liste der erhaltenen Anrufe Shift-Taste f. Liste erhaltene Anrufe Cursor-Taste zwischen den Zahlen der Speichernummern 6 6.
DISPLAY Zugang zu den Speicherplätzen (zum Speichern oder Abrufen) Batterieladelevel Batterielevel Läutwerk aktiviert Läutwerk ausgeschaltet Freisprechmodus aktiviert Tastatur gesperrt Ständig leuchtend: Telefonleitung besetzt Blinkend: eintreffender Anruf Mikrofon ausgeschaltet Ständig leuchtend: bereits eingelesene Tel.-Nr. aus der Liste der erhaltenen Anrufe Blinkend: neue, noch nicht eingelesene Tel.-Nr.
4. VORSICHTSMASSNAHMEN BEI DER ANWENDUNG • Ist das Gerät verschmutzt bitte zum Reinigen einen weichen Lappen und neutrales Reinigungsmittel verwenden. KEINE ADDITIVE ODER SCHLEIFMITTEL VERWENDEN. • Das schnurlose Telefon ist an ein zugeordnetes, typologisch zugelassenes Telefon anzuschließen. • Das Gerät nicht über einen längeren Zeitraum in sehr feuchter, besonders kalter oder heißer Umgebung benutzen, und die direkte Sonnenbestrahlung oder Wärmequellen vermeiden.
5. INSTALLATION 5.1 STROMVERSORGUNG ACHTUNG! Die Stromsteckdose muss in der Nähe des Gerätes angeordnet und leicht zugänglich sein 1. Den an einem Kabelende des beigestellten Adapaters befindlichen Steckerstift in die an der Basisgeräterückseite vorhandene Aufnahme einsetzen. 2. Adapterstecker in Wandsteckdose einstecken. 5.2 ANSCHLUSS AN TELEFONLEITUNG 1. Den an einem Kabelende des beigestellten Telefonkabels befindlichen Steckerstift in die an der Basisgeräterückseite vorhandene Aufnahme einsetzen. 2.
5.5 BATTERIEN AUSWECHSELN ACHTUNG: Bitte nur die für dieses Modell entsprechenden aufladbaren Batterien verwenden. Wenn sich die Autonomie/Stunden des Mobilteils immer mehr reduzieren, auch wenn die Batterien korrekt aufgeladen wurden, bedeutet es, dass die Batterien progressiv unbrauchbar werden und ausgewechselt werden müssen: diesbezüglich bitte die unter „Punkt 5.3 - Batterien einlegen“ angegebenen Anweisungen beachten.
6. FUNKTIONNUTZUNG “TELEFON” Hinweis: Wenn sich das schnurlose Telefon im Wartezustand befindet, d.h. bei freier Telefonleitung und keinem operativen Vorgang, erscheint am Display der Schriftzug “HS-1” (die Nummer identifiziert das Mobilteil). 6.1 EINEN ANRUF BEANTWORTEN • Bei eintreffendem Anruf klingeln Mobilteil und Basisgerät; es blinken die Ikone am Display und die rote LED auf der Suchtaste des Mobilteils und die große weiße LED am Basisgerät.
6.5 WAHLWIEDERHOLUNG DER LETZTEN 3 NUMMERN Ihr schnurloses Telefon speichert die letzten 3 angewählten Nummern und ermöglicht Ihnen diese zurückzurufen. Abruf der letzten angewaehlten Rufnummer (bei belegter Netzleitung) • Zuerst Taste drücken, um die Linie zu belegen • Dann Taste drücken; die Rufnummer erscheint am Display und wird angewählt.
6.11 FUNKTION: MOBILTEIL SUCHEN Eine nützliche Funktion, wenn Sie Ihr Mobilteil nicht finden. • Im Wartemodus die Taste am Basisgerät drücken und loslassen; das Mobilteil liefert, ein akustisches Signal. • Um das akustische Signal zu unterbrechen, drücken Sie eine beliebige Taste am Mobilteil. 6.
7. TELEFONBUCH UND ANRUFERLISTE 7.1 10 RUFNUMMERN Sie können bis zu 10 Rufnummern speichern; davon jede max. 25 stellig. RUFNUMMERN SPEICHERN Mobilteil in Standby: 1. Taste gedrückt halten bis das Symbol am Display blinkt. 2. Rufnummer eingeben (max. 25 stellig). Ist Ihr Gerät an eine PABX-Zentrale angeschlossen, ist eine Pause einzufügen (Taste ) zwischen Zugangscode zum Netz und der Rufnummer. Mit den Tasten u.
EINLESEN DER LISTE ERHALTENER ANRUFE Mit Mobilteil in Standby Taste drücken; am Display erscheinen die Infos zum letzten Anruf.
8. GARANTIE Wie für alle von Fa. Brondi hergestellten Produkte, beträgt die Garantiezeit für dieses Produkt 12 Monate. In der Verpackung des schnurlosen Telefons BRAVO CORDLESS 2 befindet sich der Garantieschein. Um die Garantie in Anspruch nehmen zu können, muss der Garantieschein: − vollständig ausgefüllt werden; − einen Kaufbeleg besitzen (Kassenbon, Rechnung, usw.); − Die Verpackung unbeschädigt aufbewahrt werden.
9. CE-ÜBEREINSTIMMIGUNGSERKLÄRUNG Die Fa. Brondi Telefonia S.p.A. (AG), mit Standort in I-10036 Settimo Torinese (TO/Turin), Str. Caffadio 14, und Produktionseinheit in I-10024 Moncalieri (TO/Turin), Via Guido Rossa 3, deklariert, dass das Gerät BRAVO CORDLESS 2 der Normvorschrift 1999/5/CE bzgl.
BRONDI TELEFONIA SPA Zertifiziertes Qualitätssystem Produktionformationen (Leistungen, Gebrauchsanweisungen im Digitalformat, usw.), aktualisierte Kundendienstliste, und um Initiativen und die neuesten Neuigkeiten zu erfahren, besuchen Sie uns im Internet unter: www.brondi.
Version: 1 - 06 september 2005 BRONDI TELEFONIA S.P.A. Via Guido Rossa, 3 - 10024 Moncalieri (TO) - ITALIA Tel. Servizio Clienti 011.647.44.07 - Fax 011.647.44.33 info@brondi.