
Installation Guide


/1917
ASSEMBLY
MODEL # AXCBCDRP-03
c
b
a
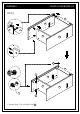
1. Determine the location for the unit on the wall. The Top A should be
approximately 1 ¼” above the top of the Wall Mount Bar F when mounted.
2. Place the Wall Mount Bar F at the predetermined height. Use a level to ensure
that it is straight. The flat side of Wall Mount Bar F should face outward away
from the wall. Hole (b) should align with your studs. Carefully mark the position of
each hole using the tip of the Phillips Screw 6 .
3. Install four Wall Anchors 10 to positions (a),(c) using a Phillips screwdriver.
Anchors are self-tapping and do not need pre-drilled holes.
4. Use your drill to create 1 hole 0.15” diameter x 2” deep at position (b) .
STEP-12 - Positioning
STEP-13 - Attach Wall Mount Bar to Wall
1. Screw one Phillip Screw 6 through the
raised side of the Wall Mount Bar F at position (b).
2. Screw four Phillip Screws 6 through the
raised side of the Wall Mount Bar F at positions
(a),(c) where Wall Anchors 10 were placed.
3. Tighten all screws. Do not over tighten.
a
b
c
10
F
6
6
6
F