Find thousands more great ideas online Rover 2.0 THE APP-CONTROLLED WIRELESS SPY TANK 792593 Merrimack, New Hampshire USA 03054 • 800-846-3000 • Brookstone.com For ages 14+ 792593_INS1211_Rover 2.0_Size:5”Wx4.
B,16B5RYHU LQGG %$&. RI 6KHHW RI 3DJHV :HG $XJ TABLE OF CONTENTS Quick Start Guide . . . . . . . . . . . . . . . . . . . . . . . . . . . . . . . . . . . . . . . . . . . . . . . . . . . . . . . . . . . . . . . . . . . . . . . . . . . 2 Warnings and Cautions. . . . . . . . . . . . . . . . . . . . . . . . . . . . . . . . . . . . . . . . . . . . . . . . . . . . . . . . . . . . . . . . . . . . . . 3 Location of Parts and Controls. . . . . . . . . . . . . . . . . . .
NOTES ROVER 2.0 QUICK START GUIDE IF YOU READ NOTHING ELSE, READ THIS: 1 Download the Rover 2.0’s free App from the iTunes® App StoreTM (for Apple® devices), or Google PlayTM (for Andriod devices), and attach Rover 2.0’s antenna and insert its batteries. 2 Slide Rover 2.0’s power switch to “on” and when the green LED blinks, go to the Wi-Fi® connection in the settings menu on your device to sync. 3 Open the Rover 2.0 App. The driving controls and live video will appear on your device’s screen.
IMPORTANT SAFETY INSTRUCTIONS All of the safety and operating instructions should be read, adhered to and followed before the unit is operated. WARNING Close supervision is necessary when this unit is used by or near children or mentally disabled individuals. T his product can be used to share content with Social Media Websites. Adult supervision is required. Use this unit only for its intended use as described in this manual. 4.
ONE (1) YEAR LIMITED WARRANTY ® Brookstone warrants this product against defects in materials and/or workmanship under normal use for a period of ONE (1) YEAR from the date of purchase by the original purchaser (“Warranty Period”).
iPhone 3GS iPad (3rd generation) iPad 2 iPad Android 2.2 and later Apple iOS: 5.1 and later )&& ,1)25 0 $7,21 FCC ID : ZRB792593 This device complies with Part 15 of the FCC Rules. Operation is subject to the following two conditions: 1) This device may not cause harmful interference. 2) This device must accept any interference received including interference that may cause undesired operation.
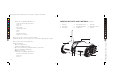
• Your device is compatible with Rover 2.0: iPod touch (3rd and 4th generations) iPhone 4S iPhone 4 iPhone 3GS iPad (3rd generation) iPad 2 iPad Android 2.2 and later Apple iOS: 5.1 and later LOCATION OF PARTS AND CONTROLS (ROVER 2.0) 1. 2. 3. 4. 5. 6. Antenna Tank Body Microphone Tilt Up/Down Camera Headlights/Tail Lights Trac-Belt (2) 7. 8. 9. Wheel (4) Night Vision Light Speaker 1 Why does the audio on my Rover 2.0 have feedback? 9 Your device may be too close to Rover 2.
I am having difficulty connecting Rover 2.0 to the wireless network. LOCATION OF PARTS AND CONTROLS (ROVER 2.0) Check the battery level on your Apple or Android device — and recharge if necessary. 1. Antenna Port 2. Green Connection LED 3. Battery Compartment Access Screw (2) 4. Battery Compartment 5. Reset Button 6. On/Off Switch 7. Orange Power LED 8. Can I use multiple Rover 2.0s with the same device? Yes, but not simultaneously. Can I use my Rover 2.0 outdoors? 1 2 Rover 2.
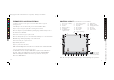
FREQUENTLY ASKED QUESTIONS CONTROL LAYOUT (YOUR DEVICE’S TOUCH-SCREEN) It is taking a long time for the green connection LED to blink to begin the syncing process. 1. 2. 3. 4. 5. 6. It can take up to 30 seconds for the green connection LED to blink. Why am I experiencing low quality video (freezing, discoloration)? Rover 2.0 may be beyond its maximum operating range, batteries may be low or the antenna is not attached. 7. Audio Volume (Apple) 8. Two-way Audio 9. Play Path 10. Record Path 11.
B,16B5RYHU LQGG %$&. RI 6KHHW RI 3DJHV :HG $XJ COMPATIBILITY ® iPod touch (3rd and 4th generations) iPhone® 4S iPhone 4 SPECIFICATIONS iPhone 3GS iPad® (3rd generation) iPad 2 iPad Apple iOS: 5.1 and later AndroidTM 2.2 and later Weight . . . . . . . . . . . . . . . . . . . . . . . . . . . . . . . . . . . . . . . .2.3 lbs. Dimensions with Antenna . . . . . . . . . . . . . . . . . . . . . .10.25" w x 7.75" l x 7.75" h Battery . . . . . . . . . . . . . . . .
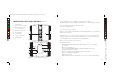
RESET INSERTING THE BATTERIES To reset the Rover 2.0, use the end of a paperclip to press the RESET button for five seconds. 1. Remove the BATTERY COMPARTMENT COVER by unscrewing the two ACCESS SCREWS on the cover with a small screwdriver. CARE AND MAINTENANCE 2. Remove the cover and insert 6 AA batteries (included) according to the polarity indicators inside the compartment. • Turn the Rover 2.0 off before cleaning. • Wipe the Rover 2.0 with a soft, dry cloth. 3.
POWER UP AND CONNECT SHARING 1. Slide the Power switch on the bottom of the Rover 2.0 to on. The ORANGE POWER LED will illuminate. Wait approximately 30 seconds and the GREEN CONNECTION LED will start to blink slowly. To View or Share Rover 2.0 Photos through email, Facebook, Twitter or Tumblr: 1. Exit Rover 2.0 app. LED STATE CHART 2. Go to settings and select a different Wi-Fi connection (other than Rover 2.0). LE D State Orange Solid Green Blinking Green Solid Represents 4. Select Photos.
3$7+ 3$7+ RECORDING A PATH/PLAYING A PATH The Rover 2.0 can record up to 60 seconds of a driving route, and then repeat it all by itself! 1. To record a path, press the Make Path route you want to record. 3$7+ DRIVING • Drive Forward Straight – push both driving control buttons up on your device’s screen button and drive the Rover 2.0 on the 6+$5( 2. After you complete your route, press the Make Path 3$7+ button again to save. to play the recorded route and the Rover 2.0 will 3.
• Turn Right Driving Forward – push the left driving control button up on the left of your device’s screen 6+$5( SHARE Press the and photos. 6+$5( button for information on how to share and view your Rover 2.0 videos 6+$5( &$0(5$ CAMERA Press the 9,'(2 67($/7+ &$0(5$ 3+272 9,'(2 3$7+ 3$7+ 7$/. 92/80( &$0(5$ button and use the slide to control the camera angle. VIDEO %5,*+76 The Rover 2.0 can take videos! Press the button to record a video. Press the button to end recording.
63($.(5 SPEAKER (FOR ANDROID DEVICES ONLY) • Turn Right Driving Backward – push the driving control button down on the left of your device’s screen The Rover 2.0 can transmit audio to your device. button to hear audio. Use the volume control on your device to control Press the the audio volume. Press the button again to turn the audio off. 63($.(5 6+$5( 63($.(5 Note: The Rover 2.0 will not transmit audio while it is in motion. Audio is only accessible when Rover 2.0 is stopped.
• 360º circle to the left – push the driving control button down on the left of your device’s screen and the driving control button up on the right of your device’s screen at the same time DRIVING USING YOUR DEVICE’S ACCELEROMETER To turn on this function, hold your device flat or tilted upward slightly (see image at right), and press the button on your device’s screen. The manual drive button graphics will disappear from your device’s screen. 6+$5( To drive the Rover 2.