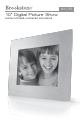
MY LIFE 10" Digital Picture Show Digital pictures—plus music and videos
Table of Contents Warnings and Cautions Accessories …………………………………………… 2-3 ………………………………………………………… Location of Parts and Controls ……………………………………… 4 …………………………………………………… 5 ……………………………………………………… 6 Frame Operation Frame Features 3 Optimizing Photo Storage Capacity …………………………………… Installing Software on your Computer ………………………………… 7 7 Software Control Locations …………………………………………… 8 HOW TO Clock and Settings ……………………………………… 9-10 HOW TO Photos ………………………………………………… 11-18 HOW TO Video …………………………………
IMPORTANT SAFETY INFORMATION Please read all safety and operating instructions carefully before use and keep these for future reference. CAUTION RISK OF ELECTRIC SHOCK DO NOT OPEN • TO REDUCE THE RISK OF ELECTRIC SHOCK, DO NOT REMOVE COVER. THERE ARE NO SERVICEABLE PARTS INSIDE. • TO REDUCE THE RISK OF FIRE OR ELECTRIC SHOCK, DO NOT EXPOSE THIS UNIT TO RAIN OR MOISTURE.
WARNING 1. Close supervision is necessary when this unit is used by or near children. 2. Use this unit only for its intended use as described in this manual. 3. Unplug this unit during lightning storms or when unused for long periods of time. 4. Never drop or insert an object into any opening. 5. P rotect the power cord from being walked on or pinched, particularly at plug outlets, convenience receptacles, and the point where it exits the unit. 6. D o not allow cord to touch hot surfaces.
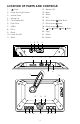
Location of Parts and Controls 1. 12. Speaker (2) Power 2. Power Save Light Sensor 13. Menu 3. Volume Down 14. Select 4. Volume Up 15. Exit 5. Card Reader Slot 16. Quick Access Slide Show 6. Flash Drive 17. Quick Access Video USB In 18. Quick Access Music 8. DC In 19. 9. Reset 20. Copy 7. Up, 10. Power On LED 21. Delete 11. Stand 22.
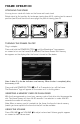
Frame operation Attaching the stand Line up pins on stand with holes on the frame and insert stand. Rotate stand to first position for landscape viewing (see A). Or, rotate stand to second position (see B) and stand the frame upright for portrait viewing (see C). A B C TURNING THE frame ON/OFF Plug in adapter. Press and hold the POWER BUTTON until the Brookstone® logo appears on screen to turn on the frame (5-6 seconds).
Frame Features Photo Smooth The PHOTO SMOOTH feature modifies faces within your photos with a smoothing airbrush effect. Feature only works in Slide Show mode (normal transition). Dynamic Lighting The DYNAMIC LIGHTING feature improves your photo’s light balance to enhance dark photos. Feature only works in Slide Show mode (normal transition). FACE ZOOM The FACE ZOOM feature automatically pans and zooms to faces within your photos. Feature only works in Slide Show mode (normal transition).
Optimizing photo storage capacity When the photos are downloaded to the frame with either a memory card or a flash drive, photos are automatically optimized for the frame’s screen resolution. MediaImpression software TM When using your computer to download photos onto the frame, it is recommended to use the included MediaImpression™ software. The MediaImpression™ software optimizes your photos for the frame’s screen resolution. (800 x 600 pixel dimensions, 72 dpi (pixels per inch)).
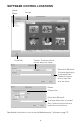
Software control locations Locate Photos Photo Edit Convert Convert: To convert files to correct format for frame. Destination (Browse): To choose destination of converted files. Choose the frame drive to load files onto the frame. Resize: Choose size. Destination (Browse): To choose destination of resized files. Choose the frame drive to load files onto the frame. See detailed instructions on how to use the MediaImpression™ software on page 13.
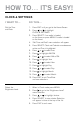
How To… it’s easy! CLOCK & SETTINGS I want to… Do this… Set the Time and Date. 1. Press EXIT until you get to the Home Screen. 2. Press and to highlight CLOCK & SETTINGS. 3. Press SELECT if no media is loaded on the frame, or press MENU if media is loaded on the frame. 4. “Set Time and Date” menu selection will appear. 5. Press SELECT. Clock and Calendar area becomes active and Time is highlighted. 6. Press or 7. Press to highlight AM/PM. 8. Press or 9. Press to highlight Year.
CLOCK & SETTINGS (continued) I want to… Do this… Activate the Power Save feature. 1. When in Clock mode press MENU. 2. Press 3. to go to the “Power Save” menu selection. Press or to highlight choice. 4. Press SELECT to save choice. Selection will appear in blue at the top of the list. 5. Display Time and Date in a Full Screen Slide Show. Press EXIT to exit menu. 1. Press EXIT until you get to the Home Screen. 2. Press and to highlight CLOCK & SETTINGS. 3.
Photos I want to… Do this… View my photos in Full Screen. 1. Press EXIT until you get to the Home Screen. 2. Press 3. Press SELECT. Unit will be in Thumbnail mode. or to highlight PHOTOS. 4. Search for photo and highlight selection by pressing , , or . 5. With chosen photo highlighted, press SELECT. 6. Press and to scroll through photos in Full Screen. View my photos in Thumbnail. 1. Press EXIT until you get to the Home Screen. 2. Press 3. Press SELECT. and to highlight PHOTOS. 4.
Photos (continued) I want to… Do this… ADVANCED Copy my photos onto the frame from my memory card or flash drive (continued). 3. Press SELECT. 4. Press MENU. 5. Press to go to the “Copy” menu selection. 6. Press or to highlight “Select to Copy” and then press SELECT. 7. Search for photo by pressing , , or . 8. Highlight your chosen photo and press SELECT. 9. A graphic will appear in the lower right corner of the photo to confirm it is to be copied. 10.
Photos (continued) I want to… Do this… Copy my photos onto the frame using my computer. (See page 8 for MediaImpression™ controls locations.) 1. Ensure MediaImpression™ software (included) is installed on your computer. See page 7 for installation instructions. 2. Insert one end of a USB cable (not included) into the USB In port on the unit and the other end of the cable into your computer’s USB port.
Photos (continued) I want to… Do this… Select Slide Show time. 1. When in either Full Screen or Thumbnail mode, press MENU. 2. “Slide Show Time” menu selection will appear. 3. Press or to highlight choice. 4. Press SELECT to save choice. Selection will appear in blue at the top of the list. 5. Select Slide Show Transition. Press EXIT to exit menu. 1. When in either Full Screen or Thumbnail mode, press MENU. 2. Press to go to the “Slide Show Transition” menu selection. 3.
Photos (continued) I want to… Do this… Activate Photo Smooth Feature. 1. When in either Full Screen or Thumbnail mode, press MENU. 2. Press to go to the “Photo Smooth” menu selection. 3. or Press to highlight “On”. 4. Press SELECT to save choice. Selection will appear in blue at the top of the list. 5. Activate Dynamic Lighting Feature. Press EXIT to exit menu. 1. When in either Full Screen or Thumbnail mode, press MENU. 2. Press to go to the “Dynamic Lighting” menu selection. 3.
Photos (continued) I want to… Do this… QUICK ACCESS Delete photos from the frame. DELETE SINGLE PHOTO 1. Remove your memory card or flash drive from the frame. or 2. Press to highlight PHOTOS. 3. Press SELECT. 4. Select photo to delete in either Full Screen or Thumbnail mode. 5. Press DELETE. 6. Prompt will come on screen to confirm photo to be deleted. Press DELETE to confirm. DELETE ALL PHOTOS 1. Remove your memory card or flash drive from the frame. or 2.
Photos (continued) I want to… Do this… ADVANCED Delete photos from the frame. DELETE SELECTED PHOTOS 1. Remove your memory card or flash drive from the frame. or 2. Press to highlight PHOTOS. 3. Press SELECT. 4. Press MENU. 5. Press to go to the “Delete” menu selection and then press SELECT. 6. Press or to highlight “Select to Delete.” 7. Search for photo and highlight selection by pressing , , or . 8. With chosen photo to delete highlighted, press SELECT. 9.
Photos (continued) I want to… Do this… Delete photos from the frame using my computer. 1. Insert one end of a USB cable (not included) into the USB In port on the unit and the other end of the cable into your computer’s USB port. The display will show “USB Connected” and an external “MyLifeFrame” will appear on your computer. 2. Access the “MyLifeFrame” drive. 3. Select photos to be deleted and drag them to the trash, or select and press delete. 4. Empty the trash. 5.
Video I want to… Do this… Play Videos. Press . If you are in a menu selection screen, press EXIT and then . Stop Video. While video is playing, press to stop the video, or press EXIT to go to the Thumbnail screen. View my videos in Full Screen. 1. Press EXIT until you get to the Home Screen. and 2. Press to highlight VIDEOS. 3. Press SELECT. Unit will be in Thumbnail mode. 4. S earch for video and highlight selection by pressing , , or . 5. With chosen video highlighted, press SELECT. 6.
Video (continued) I want to… Do this… ADVANCED Copy my videos onto the frame from my memory card or flash drive (continued). COPY SELECTED VIDEOS 1. Insert your memory card or flash drive into the frame. 2. Press 3. Press SELECT. 4. Press MENU. 5. Press or to highlight VIDEOS. to go to the “Copy” menu selection. 6. Press or to highlight “Select to Copy” and then press SELECT. 7. Search for video and highlight selection by pressing , or . , 8.
Video (continued) I want to… Do this… ADVANCED Copy my videos onto the frame from my memory card or flash drive (continued). COPY ALL VIDEOS 1. Insert your memory card or flash drive into the frame. 2. Press 3. Press SELECT. or to highlight VIDEOS. 4. When in either Full Screen or Thumbnail mode, press MENU. 5. Press to go to the “Copy” menu selection. 6. Press or 7. Press SELECT. to highlight “Copy All.” 8. Prompt will come on screen to confirm all videos to be copied.
Video (continued) I want to… Do this… Arrange my videos in a specific order. 1. The frame automatically arranges videos by file name numerically, then alphabetically. 2. For example, a video with the file name “01.mpg” will come before a video with the file name “a.mpg.” 3. Using your computer, rename your video files numerically or alphabetically and copy the videos onto the frame. HELPFUL HINTS: If ordering videos numerically, be sure to start with “01”, “02", etc...
Video (continued) I want to… Do this… ADVANCED Delete videos from the frame. DELETE SELECTED VIDEOS 1. Remove the memory card or flash drive from the frame. 2. Press or 3. Press SELECT. 4. Press MENU. 5. Press to highlight VIDEOS. to go to the “Delete” menu selection. 6. Press or to highlight “Select to Delete” and then press SELECT. 7. Search for video and highlight selection by pressing , , or . 8. With chosen video to delete highlighted, press SELECT. 9.
Video (continued) I want to… Do this… Delete videos from the frame (ADVANCED continued). DELETE ALL VIDEOS 1. Remove the memory card or flash drive from the frame. 2. Press or 3. Press SELECT. 4. Press MENU. to highlight VIDEOS. 5. Press to go to the “Delete” menu selection. 6. Press or 7. Press SELECT. to highlight “Delete All.” 8. Prompt will come on screen to confirm all videos to be deleted. Press SELECT to confirm.
Music I want to… Do this… Play Music. Press . If you are in a menu selection screen, press EXIT then . Stop Music. While music is playing, press to stop music, or EXIT to go to the music list. View my Music List. 1. 2. 3. 4. 5. 6. Play music with my Slide Show. 1. When in Music List mode press MENU. 2. Press to go to the “Slide Show Music” menu selection. Press EXIT until you get to the Home Screen. Press and to highlight MUSIC. Press SELECT. Press and to scroll though songs.
Music (continued) I want to… Do this… QUICK ACCESS Copy my music onto the frame from my memory card or flash drive. COPY SINGLE SONG 1. Insert your memory card or flash drive into the frame. 2. Press 3. Press SELECT. or to highlight MUSIC. 4. Select song to copy in Music List mode. 5. Press COPY. 6. Prompt will come on screen to confirm music to be copied. Press COPY to confirm. COPY ALL SONGS 1. Insert your memory card or flash drive into the frame. 2. Press or to highlight MUSIC. 3.
Music (continued) I want to… Do this… ADVANCED Copy my music onto the frame from my memory card or flash drive. COPY SELECTED SONGS 1. Insert your memory card or flash drive into the frame. 2. Press or to highlight MUSIC. 3. Press SELECT. 4. Press MENU. 5. Press to go to the “Copy” menu selection. 6. Press or to highlight “Select to Copy” and then press SELECT. 7. Search for song and highlight selection by pressing , , or . 8. With chosen song to copy highlighted, press SELECT.
Music (continued) I want to… Do this… Copy my music onto the frame from my memory card or flash drive (ADVANCED continued). COPY ALL SONGS 1. Insert your memory card or flash drive into the frame. 2. Press 3. Press SELECT. or to highlight MUSIC. 4. Press MENU. 5. Press to go to the “Copy” menu selection. 6. Press or 7. Press SELECT. to highlight “Copy All.” 8. Prompt will come on screen to confirm all songs to be copied. Press SELECT to confirm.
Music (continued) I want to… Do this… Select music playback. 1. When in Music List mode, press MENU. 2. “Playback” menu selection will appear. 3. Press or to highlight choice. 4. Press SELECT to save choice. Selection will appear in blue at the top of the list. 5. Arrange my songs in a specific order. Press EXIT to exit menu. 1. The frame automatically arranges songs by file name numerically, then alphabetically. 2. For example, a song with the file name “01.
Music (continued) I want to… Do this… ADVANCED Delete songs from the frame. DELETE SELECTED SONGS 1. Remove your memory card or flash drive from the frame. 2. Press or 3. Press SELECT. 4. Press MENU. 5. Press to highlight MUSIC. to go to the “Delete” menu selection. 6. Press or to highlight “Select to Delete” and then press SELECT. 7. Search for song and highlight selection by pressing , , or . 8. With chosen song to delete highlighted, press SELECT. 9.
Music (continued) I want to… Do this… Delete songs from the frame (ADVANCED continued). DELETE ALL SONGS 1. Remove the memory card or flash drive from the frame. 2. Press 3. Press SELECT. or 4. Press MENU. to highlight MUSIC. 5. Press to go to the “Delete” menu selection. 6. Press or 7. Press SELECT. to highlight “Delete All.” 8. Prompt will come on screen to confirm all songs to be deleted. Press SELECT to confirm.
Screen Prompts Screen Prompts are messages you may see on the frame’s screen. The following are examples of what you might see, with a brief explanation. IF you see… it means… The media inserted into the frame is either incompatible with the frame or is corrupt. The file is incompatible with the frame. The photo is either incompatible with the frame or is corrupt. The media inserted into the frame contains no files or contains files that are incompatible with the frame.
Screen Prompts (continued) IF you see… it means… The frame’s internal memory is full. Files cannot be copied to the frame until some files are deleted. The Quick Access Slide Show button has been pressed and there are no photo files on the frame or on the media inserted into the frame. The Quick Access Video button has been pressed and there are no video files on the frame or on the media inserted into the frame.
Specifications Key Features: . . . . . . . . . . . . . . . . . . . . . . . . . . . . . . . . 10" TFT LCD Screen, 512MB Internal Memory, USB Mass Storage, 800 x 600 Screen Resolution Compatible Memory Cards*: . . . . . . . . . . . . . . . . . . . SD® and Mini SDTM (Secure DigitalTM), MMC® (MultiMedia Card), MS, MS PRO, MS Duo (with adapter), MS PRO Duo (with adapter) (Memory Stick®) Power Supply: . . . . . . . . . . . . . . . . . . . . . . . . . . . . . . . .
troubleshooting guide problem possible cause action Frame does not power on. The adapter is not inserted correctly. Ensure adapter is connected correctly. Power outlet does not have power. Relocate to a power outlet that has power. Memory card is not inserted correctly. All cards are inserted with the label-side up. Using a Memory Stick® Duo adapter. Remove and reinsert card and adapter to ensure proper contact in card reader. Card is below 64MB. Use a 64MB or higher card.
troubleshooting guide (continued) problem possible cause action When selecting a photo from THUMBNAIL to show in FULL SCREEN, “File not supported” or “Photo Error” appears on screen. Photo data cannot be viewed in this mode. Photos not viewable in this mode may be removed by user. Photos are taking a long time to load/slide show times are inaccurate. Photo Smooth, Dynamic Lighting and Face Zoom features are active. Photo Smooth, Dynamic Lighting and Face Zoom features increase load time.
troubleshooting guide (continued) problem possible cause action The frame drive is not mounting on my computer. Frame may not be powered on. Make sure frame is powered on. USB cable connections may be loose. Make sure USB cable connections are secure. Flash drive is inserted into the frame. Remove flash drive from frame before connecting to computer. Flash drive connection may be loose.
troubleshooting guide (continued) problem possible cause action Music is not playing with my Slide Show. Slide Show Music is not on. Turn Slide Show Music on (see page 25). There are no music files on the internal memory, media card or flash drive. Make sure there are music files on the internal memory, media card or flash drive. My rotated photo goes back to its original orientation when I exit out of Photo Full Screen. Media card or flash drive is inserted into the frame.
Notes 39
Notes 40
Notes 41
One (1) Year Limited Warranty Brookstone warrants this product against defects in materials and/or workmanship under normal use for a period of ONE (1) YEAR from the date of purchase by the original purchaser (“Warranty Period”).
Merrimack, New Hampshire USA 03054 • 800-846-3000 • www.Brookstone.