Installation & Operating Instructions Covering Models: eVolution 4 & 7 Insert Wood Burning Stoves Tested to EN 13229 These appliances must be installed and commissioned by a HETAS registered engineer MS11-11 Issue 3 1
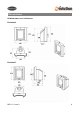
Contents Introduction Packing List Health & Safety 3 3 4 Specifications Dimensions Hearth Requirements & Clearances Chimney Requirements Combustion Air Requirements Assembly 5 6 7 8 9 10 Stove Operation Controls Layout Controls Explained Air wash System Ash Pan 15 16 16 16 Recommended Fuels 17 Lighting the Stove Kindling Stage Burning Wood Smoke Exempt Requirements Warning Notes 18 19 20 23 Maintenance Ash Removal Chimney Fires Chimney Sweeping General Stove Cleaning Glass Cleaning Annual Stove Se
Introduction May we take this opportunity to thank you for choosing one of our stoves. These appliances are designed to burn wood logs and wood derived fuels. It is essential that your wood has been seasoned to ensure that it is sufficiently dry for burning. You can determine the moisture content of your logs by using a digital moisture meter, your logs need to be below 20% moisture content before they are considered dry enough for burning.
Health & Safety Special care must be taken when installing the stove such that the requirements of the Health and Safety at Work Act are met. Installation This appliance MUST be installed and commissioned by a HETAS registered installer in England and Wales and a fully qualified Heating Engineer in Scotland and Ireland. Handling Adequate facilities must be available for loading, unloading and site handling.
Specifications In the UK these stoves have been approved by HETAS Ltd as intermittent heating appliances for burning manufactured or naturally occurring smokeless fuels and wood logs only. Heat Output: Weight: Flue Gas Mass Flow: Flue Gas Temp: Flue Draft Required: Flue Outlet Size: Efficiency: eVolution 4 4.2 kW 100 Kg 5.22 g/s 265°C 12-16 pa 6” / 150mm 75.3% eVolution 7 7.0 kW 139 Kg 4.1 g/s 317°C 12-16 pa 6” / 150mm 80.
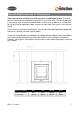
Dimensions All dimensions are in millimetres Evolution 4 Evolution 7 MS11-11 Issue 3 6
Hearth Requirements & Clearances Your stove must be installed on a solid, level non combustible hearth. The hearth does not need to be constructional but must be at least 12mm thick. The hearth protrusion in front of the stove to carpets or wooden floors must be at least 300mm. As it is possible for fuel to fall out on opening the door, a fender must be fitted if the hearth is flush with the carpet. These are just a few hearth specifications.
Chimney Requirements This appliance must not be fitted into a chimney serving another heating appliance. It is most important that there is no obstruction in the flue or chimney. Please ensure that any existing chimney is clear of obstruction and swept clean immediately before installation of the new stove. If the chimney has been used for an open fire it is recommended that it be swept for a second time having been used for a month following installation.
Combustion Air Requirements In order for the stove to perform efficiently and safely there should be an adequate air supply into the room in which the stove is installed to provide combustion air. This is particularly necessary in modern houses where drafts have been almost eliminated by double glazing etc. Under UK building regulations any appliance over 5kW MUST have a fixed permanent air vent (see building regulations approved document J for further information).
Assembly Smoke Exempt modification. Evolution 4 With both the Evolution 4 & 7 when it comes to installations in smoke control areas, you will need to adjust the secondary air intake to ensure permanent combustion air. You will need to remove the six screws holding the rear steel cover in place, once you have removed the cover you will be able to see the mechanism fixings as shown. The fixings indicated will need to be removed and re-fixed one position to the right (one at a time).
Assembly Liner Connection Unbolt the flue spigot from the stove (done by removing the internal baffle to access the fixings). Connect and seal the 150mm diameter flexible flue liner into the flue spigot, this can be done by screwing the liner using the 2 holes located in the spigot. Extra care should be taken to ensure an air tight seal between the liner and the spigot. (additional rope and or fire cement may be required).
Assembly With both the Evolution 4 & 7 insert stoves, several fixing points are provided for ease of installation. The fixing points will come sealed using a bolt and nut, which simply need to be removed from the appropriate fixings. Screws/fixings are not provided with the stove as these will need to suit the hearth and surround material.
Assembly The images below detail the sequence for installing the internal firebricks in the eVolution 4 1. Ensure there is no ash are debris to prevent the firebricks installation. 2. Start by installing the left side firebrick as shown. 3. Insert the right side firebrick but this time lean it towards the left brick as shown. 4. Insert the baffle, lift the baffle upwards towards the roof with one hand and with your other hand stand the right firebrick upright as shown.
Assembly The images below detail the sequence for installing the internal firebricks in the eVolution 7 1. Ensure that the firebox is clear of anything that might obstruct the firebrick installation. 2. Insert the left hand side firebricks (this piece is in two sections) as shown. 3. Insert the right hand side firebricks (also in two sections) this time lean the firebricks to the left as shown. 4.
Controls Layout The diagram below shows the position of the air controls, these controls need to be operated correctly to control the combustion rate of the stove. The top air control is classed as the “Secondary Air Intake” as it brings air in above the grate. The lower air control is classed as the “Primary Air Intake” as it brings air in below the grate. See the following section for a more detailed description of how this control works.
Controls Explained Fire needs air to burn therefore the stove is fitted with air controls that allow you to regulate the amount of combustion air therefore controlling the burn rate within the appliance. Secondary Air Intake The secondary air intake is located on the top of the stove, it is in the form of a slider. Having the slider pushed to the right indicates that the air intake is in the closed/minimum position and to the left indicates it is in the fully open/maximum position.
Recommended Fuels The HETAS Ltd. appliance approval along with approval in a smoke controlled area only covers the use of the following fuels in this appliance: • Wood logs not exceeding 20cms in length and 8×8cm thick. The fuel must not contain halogenated organic compounds or heavy metals as a result of treatment with wood preservatives or coatings.
Lighting the Stove Curing On initial firing you will notice a very pungent odour, this is caused through the curing of the paint, we recommend starting with short burning sessions (with smaller quantities of fuel) and build up gradually to allow the components of the stove to settle. Opening doors and windows will allow the paint curing odour to dissipate and to allow ventilation into the room. Curing times can vary but typically should take around 8-12 hours (operation at high output) to complete.
Burning Wood Once you have kindled your stove (see previous page) and your chimney (flue) is sufficiently heated and a large base of burning embers is present, you are ready to start adding you logs. Stage 4 Place 1-3 small logs onto the bed of hot embers using the gloves provided, close the door but leave both air intakes in the fully open/maximum position. Allow the logs time to fully ignite and turn black then close the primary air intake fully (leaving secondary fully open).
Smoke Exempt Requirements The Clean Air Act 1993 and Smoke Control Areas Under the Clean Air Act local authorities may declare the whole or part of the district of the authority to be a smoke control area. It is an offence to emit smoke from a chimney of a building, from a furnace or from any fixed boiler if located in a designated smoke control area.
Smoke Exempt Requirements eVo 7 Inset - Ignition The procedure adopted for ignition is to build a bed of embers in stages with the objective of warming the stove as quickly as possible. Firstly, a double handful of kindling (equivalent to the weight of about 1 kg) should be lit with chemical fire-lighters. The primary air and secondary air controls must be fully open at this stage. The fire door needs to be pushed against the latch but not closed, leaving a gap of a few millimetres.
Smoke Exempt Requirements FURTHER REQUIREMENTS: 1. It is important to follow these instructions in order to achieve clean burning and to maximise the efficiency from the stove 2. Do not leave the fire unattended after refuelling until flames are well on the newly charged logs 3. Refuelling on to a low fire bed If there is insufficient burning material in the fire bed to light a new fuel charge, excessive smoke emission can occur.
Warning Notes Over-Firing It is extremely important that you do NOT leave the air control in the fully open position for extended periods or run the appliance with the door open. Leaving the air control fully open (or running with the doors open) will lead to “over-firing”. Over-firing is caused when too much heat is generated within the fire chamber, this will lead to warping, buckling and general damage to the stove and its internal components. Over-firing can also be caused by an excessive flue draft.
Maintenance Ash Removal The ash pan can be removed by using the ash tool to hook out the grate so that you can grasp the pan using the gloves provided. We would recommend emptying the ash into a metal bucket for transportation. You should only empty the ash when the appliance and ashes are completely cool and can be disposed of in your normal household refuse.
Trouble-shooting Smoke comes out of the stove when the loading door is opened. • • • • The chimney cavity into which the 150mm flue pipe has been installed may be less than the minimum requirement. Deposits (soot or other obstructions) may have built up in the chimney and be restricting the flow of waste products. This flow rate is known as the ‘draw’. Insufficient draw, this is especially common during milder weather.
Commissioning Form Commissioning Statement and Check-list Stove Purchased From:_____________________________________________________ Address:_________________________________________________________________ Telephone Inc area code:____________________________________________________ Installation Date:_____/_____/__________ Stove Name:_________________________ Product Serial Number:________________ Invoice Number:_______________________ Stove installed by:___________________________________________________
EC Declaration DECLARATION OF CONFORMITY ACCORDING TO DIRECTIVES 89/106/EEC (CONSTRUCTION PRODUCTS) ISSUED BY: BROSELEY FIRES LTD KNIGHTS WAY, BATTLEFIELD ENT PARK. SHREWSBURY. SY1 3AB ph: +44 (0)1743 461444 TYPE OF EQUIPMENT: WOOD BURNING STOVE TRADEMARK: BROSELEY FIRES LTD MODEL: EVOLUTION 4 INSET STOVE USE: DOMESTIC SPACE HEATING MANUFACTURER: BROSELEY FIRES LTD KNIGHTS WAY, BATTLEFIELD ENT PARK. SHREWSBURY.
EC Declaration DECLARATION OF CONFORMITY ACCORDING TO DIRECTIVES 89/106/EEC (CONSTRUCTION PRODUCTS) ISSUED BY: BROSELEY FIRES LTD KNIGHTS WAY, BATTLEFIELD ENT PARK. SHREWSBURY. SY1 3AB ph: +44 (0)1743 461444 TYPE OF EQUIPMENT: WOOD BURNING STOVE TRADEMARK: BROSELEY FIRES LTD MODEL: EVOLUTION 7 INSET STOVE USE: DOMESTIC SPACE HEATING MANUFACTURER: BROSELEY FIRES LTD KNIGHTS WAY, BATTLEFIELD ENT PARK. SHREWSBURY.
Annual Service Record 1ST YEAR SERVICE completion date: SERVICE ENGINEER: COMPANY NAME: COMPANY ADDRESS: REG. No. . . POSTCODE: CONTACT NUMBER 2ND YEAR SERVICE completion date: SERVICE ENGINEER: COMPANY NAME: COMPANY ADDRESS: .. . . REG. No. POSTCODE: 3RD YEAR SERVICE completion date: SERVICE ENGINEER: COMPANY NAME: COMPANY ADDRESS: REG. No. . . POSTCODE: 4TH YEAR SERVICE completion date: SERVICE ENGINEER: COMPANY NAME: COMPANY ADDRESS: REG. No. . .
Warranty This appliance must be installed and commissioned by a fully qualified, registered engineer. A “Declaration of completion Certificate” must be obtained for the installation and retained by the end user. Failure to comply with these requirements may void your warranty. You, as the end user, have a contract by law with the supplier / dealer from whom you purchased the product. That dealer then has the same contract with the manufacturer or wholesaler and these have a contract with their suppliers.