
Service manual


2-4
Setting up the facsimile machine and your PC
If you want to update the current program to the newer version:
(1) Make sure that your PC is turned on.
(2) Make sure that the power cord of the facsimile machine is unplugged from the wall socket.
(3) While holding down the Menu key, plug the power cord of the facsimile machine into a wall
socket.
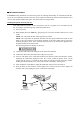
(4) Connect the USB cable to the USB port of the facsimile machine.
(5) Connect the other end of the cable to the USB port of your PC.
(6) Press the 0, 3, and 2 keys on the machine's control panel.
After you replace the main PCB with a new one:
(1) Plug the power cord of the facsimile machine into a wall socket.
The following pattern will display on the LCD:
(2) Turn on your PC.
(3) Connect the USB cable to the USB port on the back of the machine.
(4) Connect the other end of the cable to the USB port of your PC.
Installing the update data onto the flash ROM of the facsimile machine
NOTE: The following is an installation procedure example on a PC that is running Windows 98.
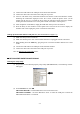
(1) Get "Filedg32.exe" utility and save it onto the desk top of your PC.
(2) Double-click the “Filedg32” icon.
The Filedrgs window will appear.
(3) Drag and drop the firmware update file (ex. 1800usaC.dat) onto the printer icon (e.g., "Brother
FAX1800C") in the Filedrgs window.
During downloading, the facsimile machine beeps intermittently.
Upon completion of the downloading, the facsimile machine beeps continuously.
(4) If continuous beeping stops, immediately disconnect the USB interface cable from the
facsimile machine and your PC.
NOTE: If the USB interface cable remains connected even after continuous beeping stops,
then the facsimile machine will return to the standby mode and the Found New Hardware
wizard will start. The printer driver with the unique ID code (which is not common to
facsimile machines of the same model) will be installed to the connected PC unexpectedly.