
Service manual


2-6
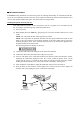
(3) Connect the USB cable to the USB port on the back of the machine.
(4) Connect the other end of the cable to the USB port of your PC.
(5) Your PC will detect newly connected hardware and start the Found New Hardware wizard.
Following the instructions displayed on the PC's screen, install the printer driver. (If the
wizard will not start, try to install the driver from the Add New Printer wizard by double-
clicking the Add New Printer icon in the printer folder of Windows' control panel.)
(6) After completion of installation, unplug the USB cable from your PC and restart it.
(7) Press the 9 key on the machine's control panel twice and wait for the LCD to display the
calendar clock. Then unplug the power cord from the wall socket.
Setting up the facsimile machine and your PC (See the illustration on page 2-3.)
(1) Make sure that your PC is turned on.
(2) Make sure that the power cord of the facsimile machine is unplugged from the wall socket.
(3) While holding down the Menu key, plug the power cord of the facsimile machine into a wall
socket.
(4) Connect the USB cable to the USB port of the facsimile machine.
(5) Connect the other end of the cable to the USB port of your PC.
Go to the Running the setup utility below.
MFC3100C/MFC580/MFC3200C/FAX1800C
Running the setup utility
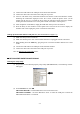
(1) On your PC, run the ID/head property setup utility (BRUSBSN.EXE). The following window
will appear.
(2) On the Model menu, click BH.
MFC3100C/MFC580: Click the Port down arrow to select the LPT1.
MFC3200C/FAX1800C: Click the Port down arrow to select the USB port to which the
MFC3200C/FAX1800C is connected.