
Operation Manual
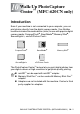
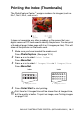

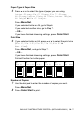
Table Of Contents
- USER'S GUIDE FAX-2440C/MFC-620CN
- Brother numbers
- Ordering accessories and supplies
- Safety precautions
- Choosing a location
- Quick Reference Guide
- Table of Contents
- 1 Introduction
- 2 Getting started
- Initial Setup
- General Setup
- Setting the Mode Timer (MFC-620CN only)
- Setting the Mode Timer (FAX-2440C only)
- Setting the Paper Type
- Setting the Paper Size
- Setting the Ring Volume
- Setting the Beeper Volume
- Setting the Speaker Volume
- Setting the Handset Volume
- Choosing the Handset Volume (For Volume Amplify)
- Setting Volume Amplify
- Turning on Automatic Daylight Savings Time
- Setting the LCD Contrast
- 3 Setup Send
- 4 Setup Receive
- Basic receiving operations
- 5 Quick-Dial numbers and dialing options
- 6 Remote Fax Options (Not available for color faxes)
- 7 Message Center
- Message Center mode
- Setting up the Message Center
- Recording Message Center Outgoing Message
- Activating Message Center mode
- Message indicator
- Playing voice messages
- Printing a fax message
- Erasing incoming messages
- Setting Maximum Time for incoming messages
- Setting Toll Saver
- ICM Recording Monitor
- Recording a conversation
- Record Fax/Tel Outgoing Announcement (F/T OGM)
- Message Center mode
- 8 Printing reports
- 9 Making copies
- 10 Walk-Up PhotoCapture Center™ (MFC-620CN only)
- 11 Important information
- Standard telephone and FCC Notices These notices are in effect on models sold and used in the United States only.
- Federal Communications Commission (FCC) Declaration of Conformity (USA only)
- Industry Canada Compliance Statement (Canada only)
- For your safety
- LAN connection (MFC-620CN only)
- International ENERGY STAR® Compliance Statement
- Important safety instructions
- Trademarks
- 12 Troubleshooting and routine maintenance
- Appendix A
- Appendix B
- Glossary
- Specifications
- Index
- Remote Retrieval Access card
- brother USA/Canada

10 - 4 WALK-UP PHOTOCAPTURE CENTER
™
(MFC-620CN ONLY)
The steps below give a brief outline of the Direct Printing
feature. Please see the remaining pages of this chapter for more
detailed instructions.
1
Insert the media card firmly into the media drive (slot).
When you insert your media card
into the proper slot, the LCD shows.
2
Press
PhotoCapture
.
If your digital camera supports DPOF printing, see
DPOF
printing
on page 10-8.
3
Print the index which shows thumbnails views of images stored
on your media card.
Your machine will give an image number to
each thumbnail.
Press
▲
or
▼
to select
Print Index
and then press
Menu/Set
.
Press
Color Start
to start printing the index sheet.
(See Printing the Index (Thumbnails) on page 10-5.)
4
To print images,
press
▲
or
▼
to select
Print Images
and then
press
Menu/Set
.
Enter the image number and press
Menu/Set
.
Press
Color Start
to start printing.
(See
Printing images
on page 10-6.)
The media active message will be shown for 60 seconds and
then disappear. Even in that case, you can enter the
PhotoCapture mode by pressing
PhotoCapture
.
You can change the settings for printing images, such as the
Paper Type & Paper Size, Print Size and number of copies.
(See
Printing images
on page 10-6.)
C.Flash Active
Press PhotoCapture key...