
Operation Manual
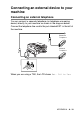
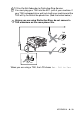
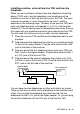
Table Of Contents
- USER'S GUIDE FAX-2440C/MFC-620CN
- Brother numbers
- Ordering accessories and supplies
- Safety precautions
- Choosing a location
- Quick Reference Guide
- Table of Contents
- 1 Introduction
- 2 Getting started
- Initial Setup
- General Setup
- Setting the Mode Timer (MFC-620CN only)
- Setting the Mode Timer (FAX-2440C only)
- Setting the Paper Type
- Setting the Paper Size
- Setting the Ring Volume
- Setting the Beeper Volume
- Setting the Speaker Volume
- Setting the Handset Volume
- Choosing the Handset Volume (For Volume Amplify)
- Setting Volume Amplify
- Turning on Automatic Daylight Savings Time
- Setting the LCD Contrast
- 3 Setup Send
- 4 Setup Receive
- Basic receiving operations
- 5 Quick-Dial numbers and dialing options
- 6 Remote Fax Options (Not available for color faxes)
- 7 Message Center
- Message Center mode
- Setting up the Message Center
- Recording Message Center Outgoing Message
- Activating Message Center mode
- Message indicator
- Playing voice messages
- Printing a fax message
- Erasing incoming messages
- Setting Maximum Time for incoming messages
- Setting Toll Saver
- ICM Recording Monitor
- Recording a conversation
- Record Fax/Tel Outgoing Announcement (F/T OGM)
- Message Center mode
- 8 Printing reports
- 9 Making copies
- 10 Walk-Up PhotoCapture Center™ (MFC-620CN only)
- 11 Important information
- Standard telephone and FCC Notices These notices are in effect on models sold and used in the United States only.
- Federal Communications Commission (FCC) Declaration of Conformity (USA only)
- Industry Canada Compliance Statement (Canada only)
- For your safety
- LAN connection (MFC-620CN only)
- International ENERGY STAR® Compliance Statement
- Important safety instructions
- Trademarks
- 12 Troubleshooting and routine maintenance
- Appendix A
- Appendix B
- Glossary
- Specifications
- Index
- Remote Retrieval Access card
- brother USA/Canada

A - 13 APPENDIX A
Connections
The external TAD must be plugged into the back of the machine, into
the jack labeled EXT. Your machine cannot work properly if you plug
the TAD into a wall jack (unless you are using Distinctive Ring).
1
Plug the telephone line cord from the telephone wall jack into the
back of the machine, in the jack labeled LINE.
2
Plug the telephone line cord from your external TAD into the
back of the machine, in the jack labeled EXT. (Make sure this
cord is connected to the TAD at the TAD’s telephone line jack,
and not its telephone jack.)
3
Set your external TAD to four rings or less. (The machine’s Ring
Delay setting does not apply.)
4
Record the outgoing message on your external TAD.
5
Set the TAD to answer calls.
6
Set the Receive Mode to
Manual
.
(See Choosing the Receive Mode on page 4-1.)
Recording outgoing message (OGM) on an external TAD
Timing is important in recording this message. The message sets up
the ways to handle both manual and automatic fax reception.
1
Record 5 seconds of silence at the beginning of your message.
(This allows your machine time to listen for the fax CNG tones
of automatic transmissions before they stop.)
2
Limit your speaking to 20 seconds.
3
End your 20-second message by giving your Fax Receive Code
for people sending manual faxes. For example:
“After the beep, leave a message or send a fax by pressing
51 and Start.”
We recommend beginning your OGM with an initial 5-second
silence because the machine cannot hear fax tones over a
resonant or loud voice. You may try omitting this pause, but if your
machine has trouble receiving, then you must re-record the OGM
to include it.