
Service manual


HL-5030/5040/5050/5070N SERVICE MANUAL
7-17
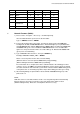
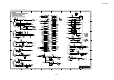
.00126 Sweden X X X O
.00136 Chile X O O O
.00143 GULF X O O O
.00147 Japan X O X O
.00151 PAN-NORDIC O O O X
.00160 France/Belgium/
Netherland
O O O O
.00216 CONSIP X O O X
NOTE: ”O”; Supported ”X”; Not supported
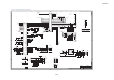
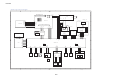
1. Network Firmware (ROM 1)
1) Choose Start…>Program…>Accessory…>Command prompt
Since the DOS window is opened, move the ZL2 folder.
Type c:+ ENTER, CD \ZL2 + ENTER.
2) Connect the Parallel cable to the printer, then turn the printer power switch ON while
holding down the Go and Job Cnacel buttons. All the LEDs light up. Keep the Go button
and Job Cancel button until the Paper LED and Status LED go off. When the Paper LED
and Status LED go off, release the Go and Job Cnacel buttons. Press the Go button
again for a short period of time. Make sure all the LEDs go off. Wait until the Status LED
(green) turns on from blinking.
3) Type <FW50NET ”BLF file name”>, then press ENTER key.
Example) FW50NET LZ0004_A.BLF + ENTER
Data is sent to the printer via the cable, and start writing.
(While the data is sent to the printer; Status LED (orange) blinking.)
(While rewriting the firmware; Status LED (red) blinking)
Even if the batch file is completed, the data is still transmitted or the rewriting procedure
continues. So, be sure NOT to shut down the Windows system, turn the printer off, unplug
the cable and turn the PC off until the system will be rebooted and the Status LED (green)
of the printer turns on. Re-writing may will be impossible if writing procedure goes wrong.
4) After finishing writing, the printer will be rebooted. Wait until Status LED (green) of the
printer turns on.
NOTE;
USB cable can be used to write firmware. In this case, Plug and Play will run automatically
when the printer is rebooted. Then another copy of the printer driver will be created.
(START>Setting>Printer) Delete the created printer driver if necessary.