
User`s guide
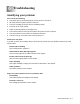
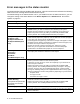
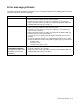
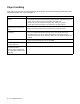
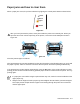
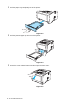

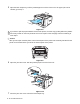
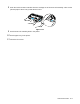
Table Of Contents
- Definitions of warnings, cautions, and notes
- To use the printer safely
- Brother Numbers (USA and Canada)
- Frequently asked questions (FAQs)
- Important information: Regulations
- Federal Communications Commission (FCC) Declaration of Conformity (For USA)
- Industry Canada Compliance Statement (For Canada)
- Radio interference (220 to 240 volt model only)
- International ENERGY STAR® Compliance Statement
- Laser Safety (100 to 120 volt model only)
- FDA Regulations (100 to 120 volt model only)
- IEC 60825 specification (220 to 240 volt model only)
- IMPORTANT - For Your Safety
- Trademarks
- Table of Contents
- About this printer
- Driver and software
- Control panel
- Options
- Routine maintenance
- Troubleshooting
- Appendix
- INDEX

TROUBLESHOOTING 6 - 5
Paper jams and how to clear them
When a paper jam occurs, the printer indicates it by lighting the control panel LEDs as shown below.
Figure 6-1
Clear the jammed paper as follows.
If the jammed paper is removed completely by using the information in the following steps, you can install
the paper tray first, and then close the front cover and the printer will resume printing automatically.
If the printer does not start printing automatically, press the Go button. If the printer still does not start
printing, please check that all the remaining jammed paper has been removed from the printer. Then try
printing again.
After you have just used the printer, some parts inside the printer are extremely hot. When you
open the front cover or back output tray of the printer, never touch the shaded parts shown in
Figure 6-2.
Figure 6-2
■ If a paper jam occurs when using the optional lower tray unit, check for correct installation of the
upper paper tray.
■ Always remove all paper from the paper tray and straighten the stack when you add new paper.
This helps prevent multiple sheets of paper from feeding through the printer at one time and
reduces paper jams.
Toner
Drum
Paper
Status