
User`s guide


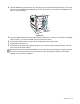
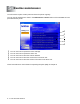
Table Of Contents
- Definitions of warnings, cautions, and notes
- To use the printer safely
- Brother Numbers (USA and Canada)
- Frequently asked questions (FAQs)
- Important information: Regulations
- Federal Communications Commission (FCC) Declaration of Conformity (For USA)
- Industry Canada Compliance Statement (For Canada)
- Radio interference (220 to 240 volt model only)
- International ENERGY STAR® Compliance Statement
- Laser Safety (100 to 120 volt model only)
- FDA Regulations (100 to 120 volt model only)
- IEC 60825 specification (220 to 240 volt model only)
- IMPORTANT - For Your Safety
- Trademarks
- Table of Contents
- About this printer
- Driver and software
- Control panel
- Options
- Routine maintenance
- Troubleshooting
- Appendix
- INDEX

OPTIONS 4 - 3
4
Hold the DIMM with your fingers on the side edges and your thumb on the back edge. Line up the
notches on the DIMM with the DIMM slot. (Check that the locks on each side of the DIMM slot are
open or facing outwards.)
Figure 4-4
5
Press the DIMM straight into the slot (press firmly). Make sure the locks on each side of the DIMM
click into place. (To remove a DIMM, you must release the locks.)
6
Put the metal plate back on and secure the metal plate with the two screws.
7
Put the side cover back on.
8
Reconnect the interface cable (printer cable) to your computer. Plug the printer back in, and then
turn on the printer power switch.
To check that you have installed the DIMM correctly, print the printer settings by using the selection
in the driver and check the printout to make sure it shows the additional memory. See Printer
Settings and Print fonts in Chapter 3.