
User Manual


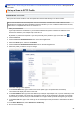
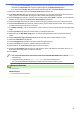


Table Of Contents
- Online User's Guide ADS-2200/ADS-2700W
- Table of Contents
- Before You Use Your Brother Machine
- Introduction to Your Brother Machine
- Paper Handling
- Scan
- Before Scanning
- Scan Using the Scan Button on Your Brother Machine
- Save Scanned Documents on Your Computer
- Save Scanned Documents to a USB Flash Drive
- Send Scanned Data to an Email Server
- Set Up the Address Book
- Scan to FTP
- Scan to SFTP
- Scan to Network
- Web Services for Scanning on Your Network (Windows 7, Windows 8 and Windows 10)
- Scan Options Using the Touchscreen
- Restrict Scan Functions from External Devices
- Scan from Your Computer (Windows)
- Scan from Your Computer (Mac)
- Network
- Supported Basic Network Features
- Network Management Software and Utilities
- Additional Methods of Configuring Your Brother Machine for a Wireless Network
- Before Configuring Your Brother Machine for a Wireless Network
- Configure Your Machine for a Wireless Network Using the One-Push Method of Wi-Fi Protected Setup™ (WPS)
- Configure Your Machine for a Wireless Network Using the PIN Method of Wi-Fi Protected Setup™ (WPS)
- Configure Your Machine for a Wireless Network Using the Machine's Control Panel Setup Wizard
- Use Wi-Fi Direct®
- Scan from Your Mobile Device Using Wi-Fi Direct
- Configure Your Wi-Fi Direct Network
- Wi-Fi Direct Network Configuration Overview
- Configure Your Wi-Fi Direct Network Using the One-Push Method
- Configure Your Wi-Fi Direct Network Using the One-Push Method of Wi-Fi Protected Setup™ (WPS)
- Configure Your Wi-Fi Direct Network Using the PIN Method
- Configure Your Wi-Fi Direct Network Using the PIN Method of Wi-Fi Protected Setup™ (WPS)
- Configure Your Wi-Fi Direct Network Manually
- Advanced Network Features
- Technical Information for Advanced Users
- Security
- Troubleshooting
- Routine Maintenance
- Machine Settings
- Appendix

• If you have selected Password, type the password (up to 32 characters) associated with the user name
you typed in the Username field. T
ype the password again in the Retype password field.
• If you have selected Public Key, select the authentication type from the Client Key Pair drop-down list.
12. Select the authentication type from the Server Public Key drop-down list.
13. In the Store Directory field, type the path (up to 60 characters) to the folder on the SFTP server where you
want to send your scanned data. Do not type a slash symbol at the beginning of the path.
14. Click the Quality drop-down list, and then select a quality setting. When Auto is selected, you can adjust the
detection level of color from the Auto Color detect adjust drop-down list.
15. Click the File Type drop-down list, and then select the file type you want to use for the scanned document.
16. Click the Document Size drop-down list, and then select your document size from the list. This is necessary
to make sure the scanned file is the correct size.
17. In the Margin Settings, enter a value between -3 and 3 to add or remove a specific margin at the edge of the
image.
18. Click the File Size drop-down list, and then select your file size from the list.
19. Select On from the Skip Blank Page option, to remove blank pages of the document from the scanning
results.
20. Click the Skip blank page sensitivity drop-down list, and then select a value between -5 and 5.
21. Click the 2-sided Scan drop-down list.
22. Click the Brightness drop-down list, and then select the brightness level.
23. Click the Contrast drop-down list, and then select the contrast level.
24. Select On from the Continuous Scan option to continue scanning.
25. Change the Port Number setting used to access the SFTP server. The default for this setting is port 21. In
most cases, this setting does not need to be changed.
26. Click Submit.
• You can set the scanned file name and file name style in the Scan File Name menu in the left
navigation bar.
• Using the following characters: ?, /, \, ", :, <, >, |, or * may cause a sending error.
• You can use Web Based Management to create, import, and export a client key pair.
Related Information
• Scan to SFTP
Related T
opics:
• Access Web Based Management
53