
BR-Receipts User's Guide (Macintosh)


18
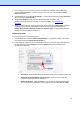
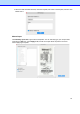
NOTE: When you select "Carrier Sheet Mode", the software automatically skips scanning the
header of the carrier sheet. The width of the header depends on the scanner you are using. If you
are scanning a long receipt, fold the receipt to fit to the carrier sheet with title and total amount
items shown. Do not skew the paper when folding.
NOTE: Carrier sheets may differ depending on your scanner model.
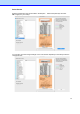
•
Scan Size: Select User Defined from the drop-down list to customize the
width, height, and unit.
•
Orientation: The default setting is Auto Detect. Click Settings... to select
other options from the list.
•
Enable Document Feeder: Select this check box if you want to use an
automatic document feeder (ADF). To use this option, the selected scanner
must have an ADF function.
•
Receipt Position (ADF only): Select Left, Right, or Center from the drop-down
list if you want BR-Receipts to tell you where you have placed the receipt in the
scanner’s document feeder.
•
Brightness and Contrast: Drag the sliders to adjust the contrast and brightness
of the scanned image. Threshold: When you select Black/White from the Image
Type
drop-down list, the threshold slider will appear.
3.
Click OK.
NOTE: The settings may differ depending on your scanner, and some features are only available for
specific scanners.
When you finish configuring your scan settings, you can start scanning receipts.